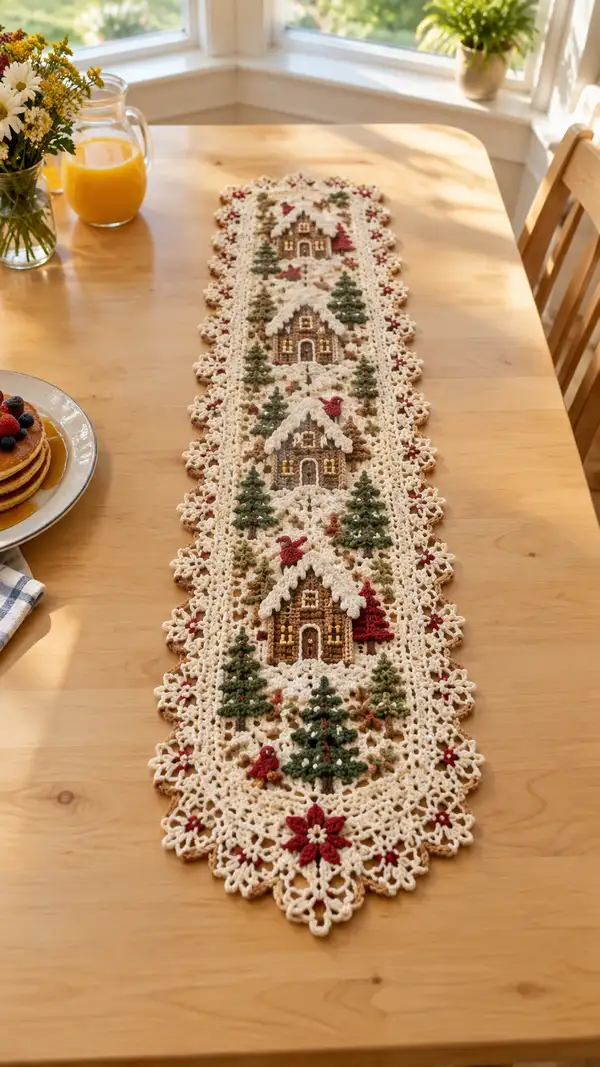
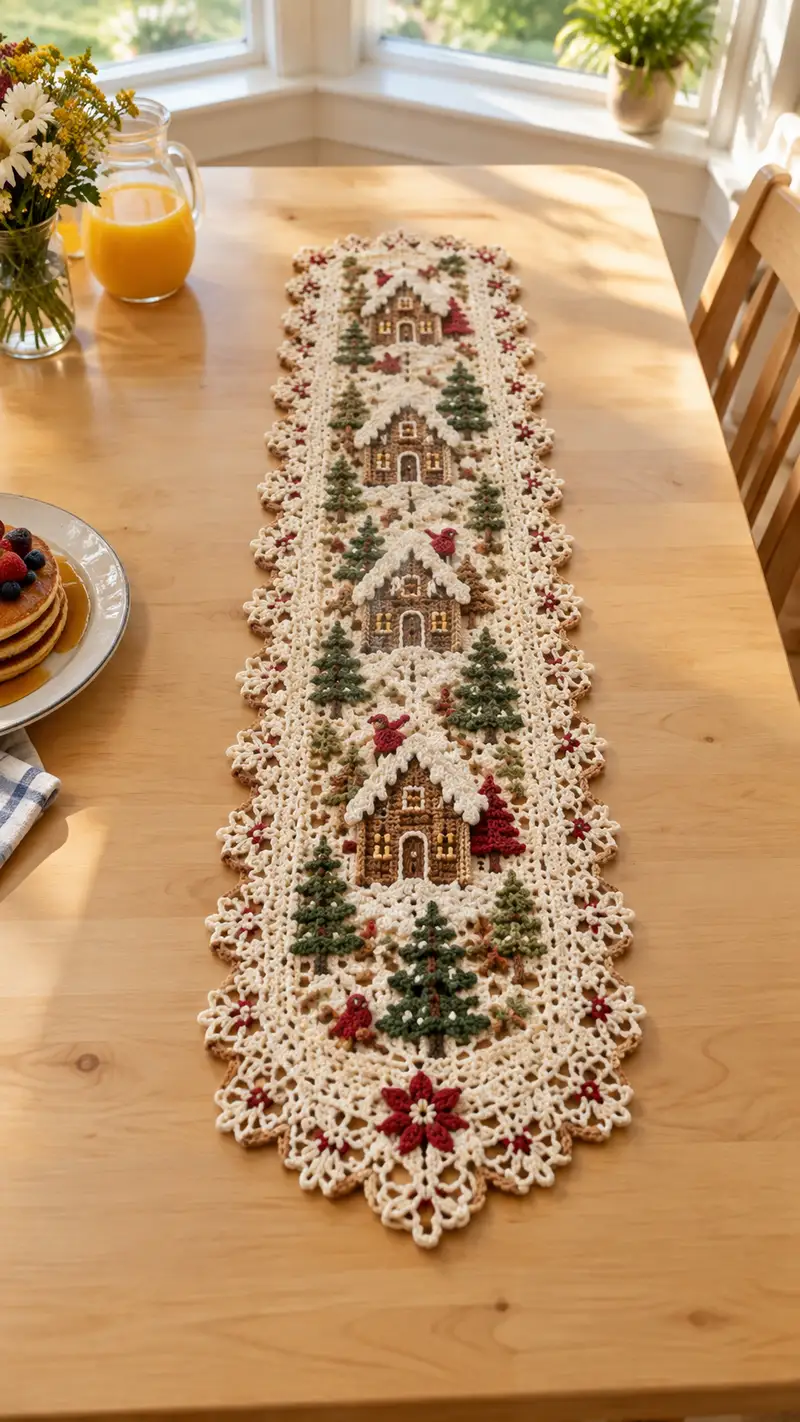
This elegant cream and burgundy cottage table runner features three charming raised cottage motifs, dimensional evergreen trees, tiny birds and poinsettia accents worked in warm neutrals and deep burgundy. Intricate lace stitches create a delicate scalloped border for a vintage-inspired centerpiece. Designed to lie flat on your dining table, the runner mixes applique, tapestry-style colorwork, and decorative surface stitches for a textured, heirloom finish.
Progress Tracker
0% Complete
— Gauge & Finished Size :
Info :
Using recommended yarn and 3.5mm hook, gauge is approximately 22 dc x 12 rows = 4 inches in lacy stitch. Finished runner shown measures approximately 14.5 x 46 inches. Adjust yarn weight or number of motif repeats to change size.
— Notes & Strategy :
Info :
This runner is constructed with three identical central cottage motifs worked flat, several tree and bird appliques worked separately, and narrow lace strips that join motifs together. Make motifs first, block flat, then join through crochet-join and work a continuous scalloped border. Use stitch markers to maintain alignment and work on a flat blocking surface for best results.
— Materials Prep :
Info :
Wind small bobbins for the accent colors (green, burgundy, dark brown, gold) to keep changes tidy. Label each applique so you can place them consistently along the runner. Keep a row counter or notepad for rounds that repeat across multiple motifs.
— Central Cottage Motif (Make 3) :
Info :
Each cottage motif is worked flat on cream background and uses light brown for the house body and darker brown for roof/door details. Work on RS throughout for neat surface embroidery later.
Round 1 :
Ch 10, sc in 2nd ch from hook and across (9 sc). Turn (9)
Round 2 :
Ch 1, 2 sc in first st, sc in next 7 sts, 2 sc in last st, turn (11)
Round 3 :
Ch 1, 2 sc in first st, sc in next 9 sts, 2 sc in last st, turn (13)
Round 4 :
Ch 1, 2 sc in first st, sc in next 11 sts, 2 sc in last st, turn (15)
Round 5 :
Ch 1, sc in each st across (15)
Round 6 :
Ch 1, sc in first 2 sts, (inc, sc) across until last 2 sts, sc in last 2 sts (18)
Info :
Change to light brown yarn now if you began with cream for a subtle framed house. Carry cream loosely along wrong side if needed to create integrated snowy edges later.
Round 7 :
Ch 1, 1 sc in each st across (18)
Round 8 :
Ch 1, (3 sc, inc) x 4, sc in remaining 2 sts (22)
Round 9 :
Ch 1, sc in each st across (22)
Round 10 :
Ch 1, (4 sc, inc) x 4, 2 sc (26)
Round 11 :
Ch 1, sc in each st across (26)
Round 12 :
Ch 1, (5 sc, inc) x 4, sc in remaining 2 sts (30)
Info :
At this stage the body of the cottage is the rectangle base. The next rounds start to shape the roof. Keep tension consistent to avoid skewing the roof center.
Round 13 :
Ch 1, sc in each st across (30)
Round 14 :
Change to dark brown for roof. Ch 1, sc in first 4 sts, 2 sc in next st, sc in next 16 sts, 2 sc in next st, sc in last 6 sts (32)
Round 15 :
Ch 1, sc in each st across (32)
Round 16 :
Ch 1, sc in first 6 sts, (inc, sc) across center 20 sts (work increases to create slight peaked roof), sc in last 6 sts (42)
Round 17 :
Ch 1, sc in each st across (42)
Round 18 :
Change to cream to work snowy roof scallops. Ch 1, *sk next st, 5 dc in next st, sk next st, sl st in next; rep from * across the roof area (creates scalloped edging). Work extra sl st to finish evenly (approx 10 scallops)
Info :
Use surface embroidery with gold for window panes and white for snow flecks after blocking. Leave tails long for sewing on the runner later.
Round 19 :
With light brown, ch 1, sc across the base row beneath the roof to form the ground-line (42)
Round 20 :
Ch 2 (counts as hdc), hdc in next 4 sts, sk 2, 5 dc cluster in next st for doorway arch, sk 2, hdc in next 10 sts, sk 2, 5 dc cluster for window arch, hdc remaining to end (42)
Round 21 :
Ch 1, sc across (42)
Round 22 :
Change to dark brown; embroider or crochet a small doorway: Ch 6, join with sl st to form door loop, sc around loop 8 sc; attach by sewing to center lower area of motif. Add two small gold window squares by weaving gold yarn through two 3-st spaces above door.
Info :
When making the second and third motifs, keep the same counts and place doors in the same lateral position so alignment is consistent when joining. Block each motif to identical dimensions.
Round 23 :
Ch 1, sc in each st across (42)
Round 24 :
Change to cream and work 1 round of crab stitch (reverse sc) along perimeter of motif to stabilize edges (42)
Round 25 :
Fasten off leaving a long tail for joining. Weave in ends partially but leave enough to sew applique features later.
Info :
Make 3 identical cottage motifs following Rounds 1-25. Block flat. Place them evenly spaced along the length of the runner: one near each end and one centered. Spacing in sample: 4.5 inches between motif centers.
— Evergreen Tree Appliques (Make 12 assorted sizes) :
Info :
Trees are made in green with a small trunk in brown. Work three sizes: small (6 rounds), medium (8 rounds), large (10 rounds). Trees are worked flat in rows to create triangular layers and finished with surface stitches for depth.
Small Tree Round 1 :
Ch 6, sc in 2nd ch from hook and across (5 sc). Turn (5)
Round 2 :
Ch 1, 2 sc in first, sc in next 3, 2 sc in last (7)
Round 3 :
Ch 1, sc in each st across (7)
Round 4 :
Ch 1, (sc, inc) x 2, sc in next 3 (9)
Round 5 :
Ch 1, sc across (9)
Round 6 :
Working along top edge: *sk 1, 5 dc in next st, sk 1, sl st in next; rep across to make scalloped branches (approx 3 scallops). Fasten off leaving tail for sewing. Add a 3-sc brown trunk at base by chaining 3 and sc in each chain, sew under tree.
Info :
For medium trees add two additional increase rounds before the branch scallops (total 8 rounds). For large trees add four increase rounds (total 10 rounds). Vary stitch counts evenly to keep symmetry. Place small trees nearer cottages; larger trees sit slightly away from cottage edges.
— Bird Appliques (Make 6) :
Info :
Birds are small decorative burgundy accents. Work them in very tight sc so they read as tiny shapes on the runner. Two sizes: tiny (5 rounds) and small (6 rounds). Embroider eyes with a tiny French knot in gold or black thread.
Bird Round 1 :
Make a magic loop, 6 sc in loop (6)
Bird Round 2 :
(1 sc, inc) x 3 (9)
Bird Round 3 :
1 sc in each st (9)
Bird Round 4 :
Make a tiny wing by ch 3, sl st into body to form a small feather; fasten off leaving tail to sew onto background.
Bird Round 5 :
Sew a tiny gold French knot eye using embroidery thread and secure wing. For the slightly larger bird, add one more round of 9 sc evenly distributed, finish wing the same way.
Info :
Sew birds to the runner with a few small stitches at base only so they sit slightly raised for dimensional shadowing.
— Snow Mound & Ground Cluster Motifs (Make sets for each cottage) :
Round 1 :
Ch 12, sc in 2nd ch from hook and across (11)
Round 2 :
Ch 1, 2 sc in first, sc across, 2 sc in last (13)
Round 3 :
Ch 1, sc across (13)
Round 4 :
Ch 1, (sc, inc) x 4, sc in remaining 5 sts (17)
Round 5 :
Surface crochet white flecks across top using small sl st clusters to simulate snow. Fasten off leaving tail to sew.
Info :
Make two or three small ground clusters per cottage and arrange them asymmetrically to look natural. Use a little textured sl st to anchor embroidered seeds (brown) as pebbles.
— Corner & Center Poinsettia Motifs (Make 2 large end flowers + 8 small filler flowers) :
Large Poinsettia Round 1 :
Ch 6, join into ring with sl st. Round 2: *(ch 3, 2 dc, ch 3, sl st) into ring; rep x 6 to make 6 petals. Fasten off and change to burgundy for petals.
Round 3 :
Attach burgundy at base of one petal, *(sc, ch 3, 5 dc in ch-3 sp, ch 3, sc) across each petal to form layered petals; rep x 6. Fasten off and add 6 small cream beads or French knots in center.
Info :
Small filler flowers are made similarly with three rounds to a total width of approx 1.25 inches. Use cream center knots to contrast the burgundy. Place along scalloped border points when joining.
— Lace Joining Panels (Make 4 identical lace strips) :
Info :
These narrow panels are worked in cream and are used to space the cottages evenly and create the porous lace background. Each strip is worked the same length as the cottage height plus a small border to allow for joining. Work in alternating filet and cluster stitches to echo the scalloped border.
Round 1 :
Ch 80, join with sl st to form a long loop (adjust ch count to match motif widths; sample uses 80). Round 2: Ch 3 (counts as dc), dc in each ch around (80 dc)
Round 3-4 :
Ch 1, sc in each st around (80)
Round 5 :
Ch 4 (counts as tr), *sk 2, 3 dc cluster in next, ch 1, sk 2, tr in next; rep across to create airy verticals (approx 20 clusters)
Round 6-8 :
Ch 1, sc in each st (80) — keep edge even and count to avoid drift.
Info :
Make 4 strips: two for between cottages and two for ends. Block them to match the height of cottage motifs to ensure flush joining edges.
— Assembly Prep :
Info :
Layout each cottage motif and lace strip on a blocking board in final order: lace strip, cottage, lace strip, cottage, lace strip, cottage, lace strip. Pin carefully to keep edges aligned. Place trees, birds and ground clusters around cottages according to sample photo spacing. Poinsettias go at each pointed runner end center and tiny fillers at scallop junctions.
— Joining Motifs and Panels :
Round 1 :
With cream yarn and 3.5mm hook, align edge of first cottage and lace strip RS together. Starting at left corner, sl st through both edges every 2 sts to tack them together for first 2 inches. Continue with sc join: sc through both pieces across entire edge to join firmly. Keep counts even — if one piece has more sts, space sc evenly to match ends.
Round 2 :
After joining, work 1 round of sc around the newly joined seam on the RS to stabilize (total seam sc count = combined edge stitches — check counts as you go).
Info :
Use pins to ensure motifs sit flat and do not ripple. If a seam puckers, unpick and resew with a sl st join spacing slightly further apart to distribute tension.
— Scalloped Border (Work continuous around entire joined runner) :
Info :
The scalloped border creates the elegant edge seen in the photo including small burgundy star accents. Work this after all motifs are joined and the runner is fully blocked and pinned. Work in cream for base scallops and add burgundy points at every scallop valley.
Round 1 :
With RS facing, attach cream yarn at any point along runner edge. Ch 1, sc evenly around entire runner edge, placing 3 sc in each inner corner to maintain smooth curve (approx total st count will equal perimeter in sc; sample perimeter ≈ 320 sc).
Round 2 :
Ch 3 (counts as dc), *sk next 2 sc, 7 dc in next sc (scallop), sk next 2 sc, tr in next; rep across to form scallops around (work 40 scallops around sample runner).
Round 3 :
Ch 1, sc in each dc across, placing 5 sc in the center dc of each scallop to create a raised point (maintains 320 sc roughly).
Round 4 :
Ch 1, *in center of each scallop work: sl st into center dc, ch 4, (5 dc in same dc), ch 4, sl st back into center; this forms the pointed rose petal motif. Repeat around to create pronounced scallops (40 larger petals).
Round 5 :
Change to burgundy. Working into every 4th scallop valley, attach burgundy and ch 1, sc, ch 3, sl st to form small star points alternating around length (approx 10 burgundy points per side in sample). Fasten off and weave tails.
Info :
If your runner perimeter differs, adjust the number of treble groups per scallop to maintain surface symmetry. Keep track of count by marking every 10th scallop with a removable stitch marker to ensure even spacing of burgundy stars.
— Finishing & Surface Embroidery :
Round 1 :
Using gold embroidery thread, work tiny satin stitches to create window panes on each cottage: two vertical stitches crossing to form 4 small panes. Secure thread on wrong side.
Round 2 :
Using cream embroidery floss, add snow flecks across roofs and ground clusters by making French knots at random positions (6-10 per cottage roof). Secure and trim tails.
Round 3 :
Sew trees and birds into place using long mattress stitch seams through the cream ground and motif back. Make sure appliques sit slightly raised by leaving a single sl st between applique and ground where you want a shadow.
Info :
For the final look, press lightly with a warm iron through a damp pressing cloth to set shape. Reblock lightly if scallops flatten during joining. Weave in all ends neatly on wrong side, trimming close to work.
— Care Instructions :
Info :
Hand wash gently in cool water with mild detergent. Reshape while damp and dry flat. Avoid tumble drying. If desired, lightly steam to refresh before display.
Completing this creamy, burgundy-accented cottage runner is such a satisfying process — each tiny house and tree brings the scene to life! The layered applique and lacework create an heirloom-quality centerpiece you'll be proud to display. Take your time with blocking and joining to achieve the best results. 🧶🏡 Your dining table will feel instantly cozy and seasonal with this charming runner. Happy stitching and enjoy the finishing flourish! ✨