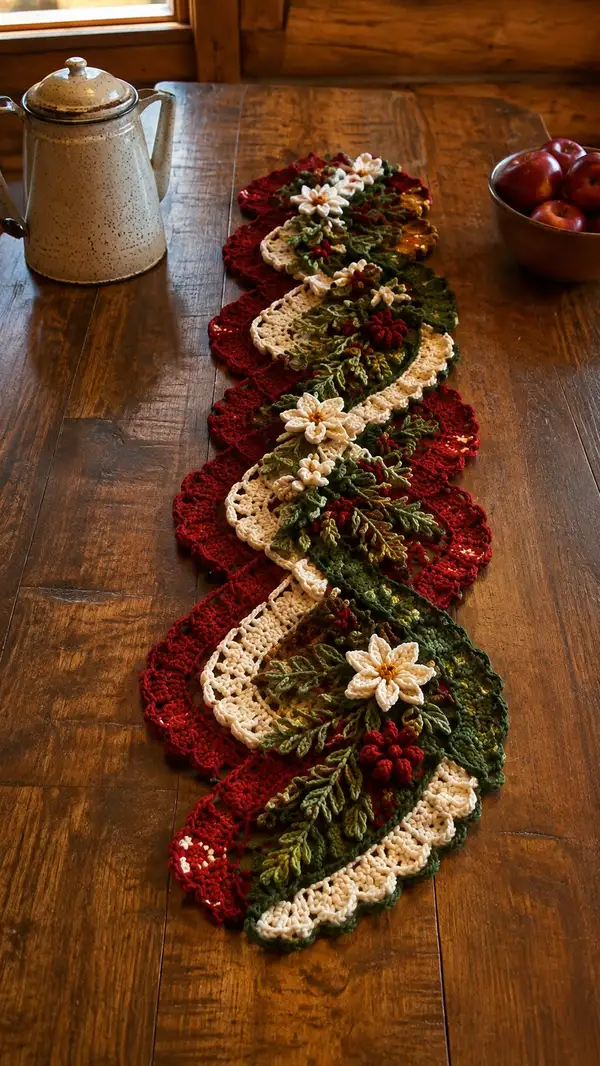
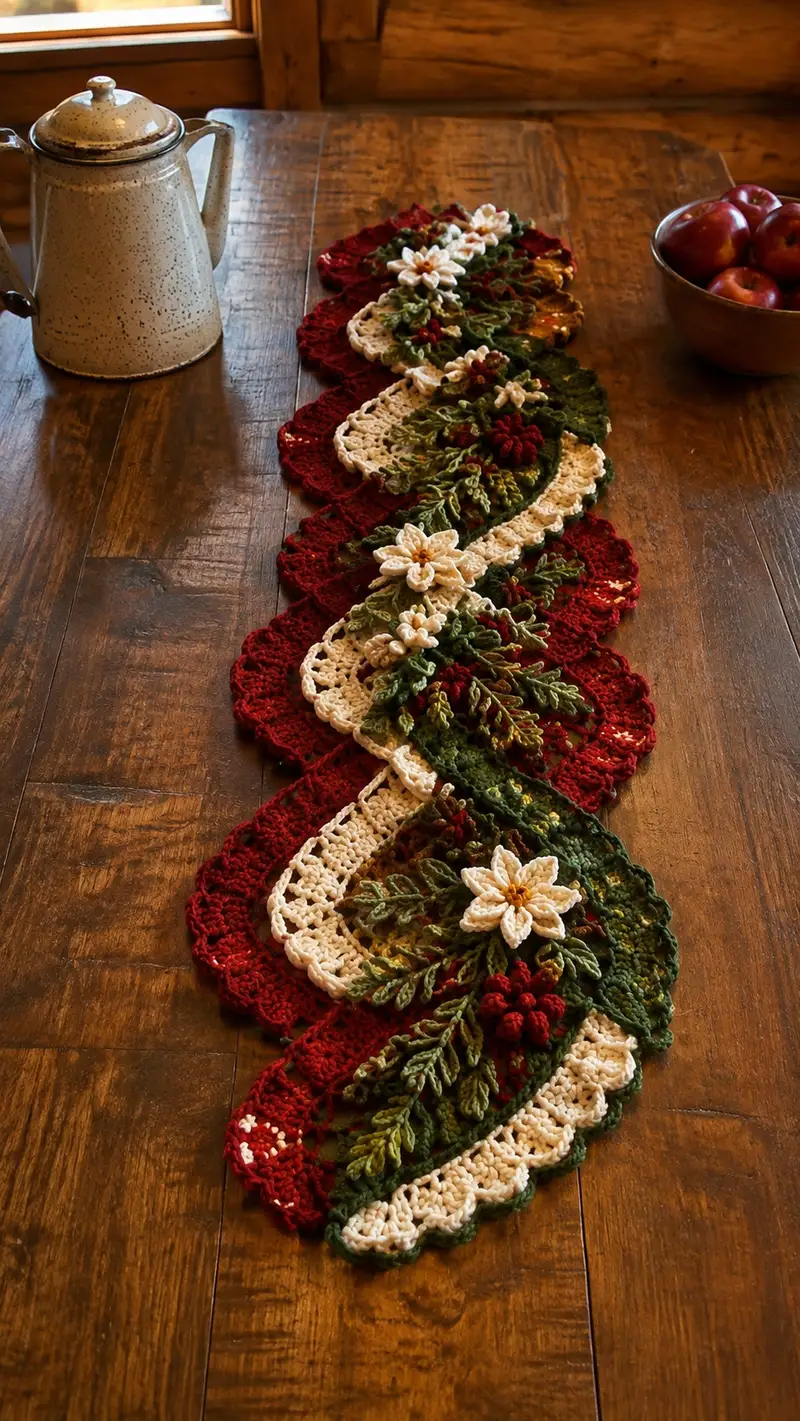
A richly textured lace table runner in cream, deep burgundy and layered greens with 3D poinsettia flowers and cascading fern-like leaves. This elegant runner features scalloped fans, layered leaves, bobble berry clusters, and raised petals for a festive centerpiece. Detailed stitch instructions and joining notes guide you through making each motif and assembling them into the finished runner.
Progress Tracker
0% Complete
— Notes & Gauge :
Info :
Pattern is worked in modular motifs: Fan (Module A), Leaf (Module B), Poinsettia Flower (Module C), Berry Cluster (Module D) and final Edging. Use 3.5mm hook for most pieces. Gauge: a completed Fan module measures approximately 6.5" across at widest point when blocked. Adjust hook or yarn to match desired size.
Info :
Read through each module before beginning. Block each motif flat after finishing and before joining for best results. Keep stitch markers handy for repeat markers and the start of rounds.
— Module A: Scalloped Fan (Make 8–12 to desired runner length) :
Round 1 :
6 sc in magic ring (6)
Round 3 :
(1 sc, inc) x 6 (18)
Round 4 :
(2 sc, inc) x 6 (24)
Round 5 :
(3 sc, inc) x 6 (30)
Round 6 :
1 sc in each st (30)
Info :
Switch to burgundy yarn now if making the outer scallop as pictured. Carry cream if you plan a two-color fan where inner rows remain cream. BLO on next rounds can create a ridge for the band between fan sections.
Round 7 :
1 sc in each st BLO (30)
Round 8 :
(3 sc, shell in next st) x 6; shell = (5 dc in same st) (30 base points / 6 shells)
Round 9 :
1 sc in each sc and 2 sc in each shell space to anchor (36)
Info :
When creating shells, keep loops relaxed so shells sit flat after blocking. Use stitch markers at each shell start to count shells (6 shells total).
Round 10 :
(4 sc, inc) x 6 (42)
Round 11 :
1 sc in each st (42)
Round 12 :
(1 sc, shell in next st, 4 sc) x 6; shell = (7 dc in same st) (42 base points)
Info :
Add a small picot to the outermost point of each large shell on next round for a lacy edge. Work picots lightly to prevent stiffness.
Round 13 :
In shell tops: (sl st, ch3, sl st) as picot across 6 shells, 1 sc between shells to stabilize (42)
Round 14 :
1 sc in each st (42)
Round 15 :
(5 sc, inc) x 6 (48)
Info :
To make the fan slightly larger for overlapping layering, repeat an additional increase round: (6 sc, inc) x 6 to reach 54 if you prefer broader fans for larger table sizes.
Round 16 :
1 sc in each st (48)
Round 17 :
Edge: work [*sc in next 2, picot (ch3 sl st to top of last sc), sc in next 2, shell (5 dc same st), sc in next 3*] around to create even decorative edge. Maintain base repeat count (48 anchors).
Round 18 :
Fasten off and weave ends. Block flat to measured width of 6.5" (48 anchor points) before assembly.
— Module A (Variation): Inner Cream Fan (Make same number as Module A) :
Info :
This inner fan sits inside the burgundy scallop and is worked in cream. It is slightly smaller so it nests inside the larger burgundy fan.
Round 1 :
6 sc in magic ring (6)
Round 3 :
(1 sc, inc) x 6 (18)
Round 4 :
(2 sc, inc) x 6 (24)
Round 5-7 :
1 sc in each st (24)
Round 8 :
Shell round: (2 sc, shell (5 dc), 2 sc) x 6 (24 anchors, 6 shells)
Round 9 :
1 sc in each st, sl st into top of shells to smooth (24)
Round 10 :
Edge ornamental: (sc in next 3, picot, sc in next 2) x 6 (24)
Round 11 :
Fasten off and block this fan to nest into the burgundy fan; centered placement will be noted in assembly section.
— Module B: Fern-Like Leaf (Make 20–28 leaves of assorted sizes) :
Info :
Leaf is worked top-down from tip to base to create a tapered teardrop. Make several sizes: small (10 rounds), medium (14 rounds), large (18–20 rounds) to create natural variation.
Round 1 :
8 sc in magic ring (8) — tip of leaf
Round 2 :
(1 sc, inc) x 4 (12)
Round 3 :
(2 sc, inc) x 4 (16)
Round 4 :
(3 sc, inc) x 4 (20)
Info :
Switch to medium green yarn for main leaf color. For shaded look, change to moss green yarn on the final rounds to create tonal veins.
Round 5 :
1 sc in each st BLO to create a raised ridge along each side (20)
Round 6 :
(4 sc, inc) x 4 (24)
Round 7 :
1 sc in each st; on end of round fold slightly to measure and adjust tension (24)
Round 8 :
Edge detail: *ch4, sl st into next st, sc in next 2* around to create small lobed edges (24)
Round 9 :
1 sc in each st (24)
Round 10 :
(5 sc, inc) x 4 (28)
Info :
For medium size, stop here and fasten off leaving long tail to sew. For a larger leaf continue to Round 18 for fuller shape and to add additional veining stitches.
Round 11 :
1 sc in each st BLO (28)
Round 12 :
(6 sc, inc) x 4 (32)
Round 13 :
Surface slip-stitch veins: working on front of leaf, attach darker green at base and create 6-8 spaced surface sl st lines towards tip. Fasten off base end leaving long tail (32)
Round 14-18 :
For largest leaves: add one additional shaping round every two rounds: Round 14: 1 sc each (32), Round 15: (7 sc, inc) x 4 (36), Round 16: 1 sc each (36), Round 17: decorative picot edge: (sc, picot) repeat (36), Round 18: fasten off and block to shape.
Info :
To give the leaves a natural curl, block with a slight curve using pins. Blend two greens by working the final 1-2 rows in the darker color for depth.
— Module C: Poinsettia Flower (Make 6–8 large poinsettia flowers & a few small buds) :
Info :
Poinsettia consists of a small stuffed center (gold), a round of tiny inner petals (red bobbles optional), and 6 larger cream petals worked separately and sewn onto the center. Petals are slightly cupped with a small line of stuffing in the base for shape.
Round 1 :
In gold yarn: 6 sc in magic ring (6) — center base
Round 3 :
1 sc in each st (12)
Round 4 :
Bobbles around center (optional): *(pc in next st), sc next st* around to create 6 small bobbles. If not using bobbles, 1 sc around (12)
Info :
Lightly stuff the gold center with a small pinch of fiberfill to make it slightly domed. Do not overfill—center should remain flat enough to accept petals.
Petal Construction (Make 6 large petals) Round 1 :
Using cream yarn: ch 8, sc in 2nd ch from hook, hdc in next, dc in next 2, tr in next 2, sl st in next to form top then sl st to base to create first petal foundation. Fasten off leaving long tail for sewing (petal width ~7 sts).
Petal Round 2 :
Re-attach cream yarn at petal base: 1 sc in base, ch2, [hdc, dc3, hdc] across top of petal working into tops of tall stitches, sl st to base (petal cupped shape). Fasten off leaving tail. Repeat for 6 petals.
Info :
Place a very small pinch of stuffing into petal bases only (about size of a pea) and shape with a blunt darning needle to create a gentle cupping. Sew petals evenly around gold center, overlapping slightly so petals form a circular flower.
Assembly Round :
Sew each petal onto the gold center using the long tails. Use ladder stitch or whip stitch working through the base of each petal and into the center ring to keep petals secure. Create a second outer layer of petals (optional) offset by half a petal for fullness—repeat petals as desired (12 petals total for fuller poinsettia).
Finishing :
Stitch in a few gold French knots or small yarn-wrapped beads to accent the center. Lightly press and block to set petal shape. Fasten off and weave ends.
— Module D: Berry Cluster (Make 12–20 clusters) :
Round 1 :
With deep red yarn: ch 2, 6 sc in second ch from hook, sl st to first sc (6)
Round 2 :
Make small bobble: *[pc in next st] around to make 1 bobble cluster; or work 6 sc rounds for compact berry* (6 anchors)
Info :
Work clusters tight; leave a long tail to sew clusters together in groups of 3–5 connected with a short length of green sl st stem. You can use embroidery thread to secure clusters for tiny sturdy berries.
— Decorative Tendrils and Small Sprigs :
Round 1 :
Using moss green: ch 20, turn and sl st back along chain to make a rope-like tendril. Fasten off leaving long tail for placement.
Round 2 :
Create tiny leaflets along tendril by working symmetrical picots: attach yarn along the chain and *(sc, ch3, sl st into chain) every 4th chain* creating small offshoots. Fasten off and weave tail for sewing.
Info :
Make tendrils in different lengths to layer behind leaves and flowers for a natural trailing look. Use a darning needle to tuck tendrils under petals or leaves before final sewing for a clean finish.
— Joining Module: Layout & Connection (This section guides joining fans, inner fans, leaves and flowers into runner panels) :
Info :
Lay out the runner on a large blocking board or flat table. Alternate burgundy fans with inner cream fans layered on top. Between fans, tuck medium/large leaves and secure with sewing for a cascading diagonal composition as pictured. Pin everything before final stitching.
Join Round 1 :
Position one burgundy outer fan flat. Place cream inner fan centered inside it. With matching yarn and tapestry needle, use whip stitch to tack inner fan to outer fan along the sl st round at approx. 12 evenly spaced points. Secure and weave tails (12 attachment points).
Info :
Use 6–8 stitches per fan to join inner to outer if the layers are small; increase to 10–12 for larger fans. Keep stitches small and hidden underneath shell points for neatness.
Join Round 2 :
Attach leaf stems: orient a medium leaf along the center seam of the nested fan so its base lies under the inner fan. Sew leaf base to inner fan using mattress/ladder stitch across 6–8 base stitches. Repeat to add 2–3 leaves per fan cluster, staggering sizes from base to tip.
Join Round 3 :
Sew berry clusters in groups of 3 and attach them at leaf junctions using long tails. Place berries near base of petals and in overlapping leaf cavities for realistic grouping (3 berries per cluster). Secure by threading tail through base of berry and leaf twice.
Info :
Work slowly and pin frequently. Aim for symmetrical but slightly irregular placement so the runner reads natural rather than perfectly geometric.
Join Round 4 :
Sew poinsettia flower centers to the top of inner cream fans (one per nested fan). Use hidden stitches through the gold center ring and secure onto cream fan center area—6 evenly spaced stitches should hold the petals snugly without flattening them.
Join Round 5 :
Connect adjacent fan units along their long edges with invisible slip-stitch joins: align edges so burgundy shells overlap by one shell and join using sl st through corresponding anchor points around overlapping shells. Each overlap typically uses 8–12 sl st depending on shell size.
Info :
If you prefer a continuous crocheted join rather than sewing, use a row of sc across edges with matching yarn then continue to next fan. Sewing allows more control over three-dimensional attachments.
Join Round 6 :
Once fans are joined into a continuous strip length, weave tendrils and small sprigs under overlaps and secure with tiny stitches—this hides tails and fills gaps with texture.
Info :
Keep some sprigs long and flowing to mimic natural trailing greenery; trim or re-pin if they obscure flower centers.
— Final Border & Edging (Applied after all motifs are joined) :
Round 1 :
With burgundy yarn, pick up along outer runner edge and work 1 sc every anchor point to stabilize the join — keep count and adjust by occasionally placing 2 sc into shell tops to maintain even edge (work until the entire outer edge is bordered)
Round 2 :
(sc in next 2, ch3, skip 1, sc in next 2) repeat around to create a small lace looped border (anchor counts vary by runner length)
Round 3 :
Shell scallop: in each ch3 space work (2 sc, 3 dc, 2 sc) to create even scallops around the runner—this emphasizes the wavy silhouette (scallop anchors per space)
Round 4 :
Edge detail: work picots on each scallop tip: (sc, ch3, sl st into top of same sc) across scallops for delicate edging
Round 5 :
Work a final round of slip stitches through the backs of scallops to slightly curl and define the runner silhouette. Fasten off and weave long tails.
Info :
Block the entire runner after edging: spray lightly with water and pin into final wavy shape, spacing scallops evenly. Allow to dry fully to set edges.
— Optional: Decorative Raised Vein Round Across Leaves :
Round 1 :
Using moss green, surface sl st a central vein on each leaf: bring yarn up at base and work 6–10 evenly spaced surface sl sts toward tip. Fasten off and weave tail.
Info :
Surface stitches add realism—use a darker green for subtle contrast. If preferred, use a tiny running stitch with embroidery thread to create finer veins.
— Finishing Touches & Blocking :
Info :
After assembly, test the runner on the table and adjust petal and leaf placement as needed. Add a few extra stitches to secure any loose pieces. Steam-block or wet-block the entire runner and pin into final shape with slight S-curve for visual flow.
Info :
Trim and weave all ends invisibly. For extra hold on flower centers, a tiny dab of fabric glue can secure the very center, but avoid glue where it may stiffen lace.
Finishing this Cream And Burgundy Poinsettia Lace Table Runner is such a joyful moment — watching the layered fans, leaves and flowers come together creates a rich, festive centerpiece. Each stitch contributes to the runner's flow and texture, and blocking brings the whole composition to life. I hope making this brings warmth to your home and becomes a treasured holiday accent! 🌿🎄✨