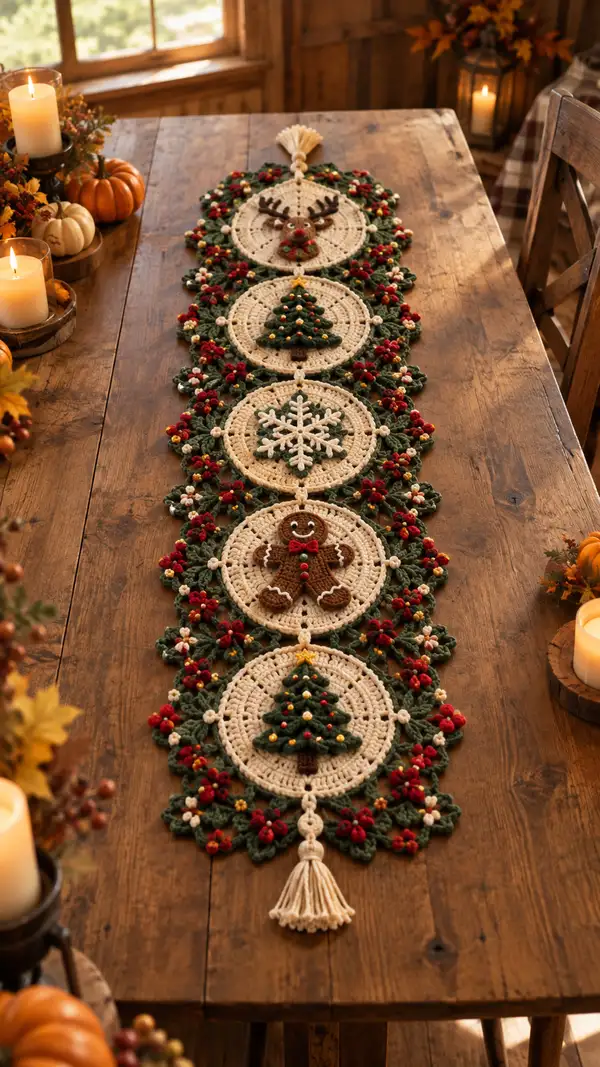
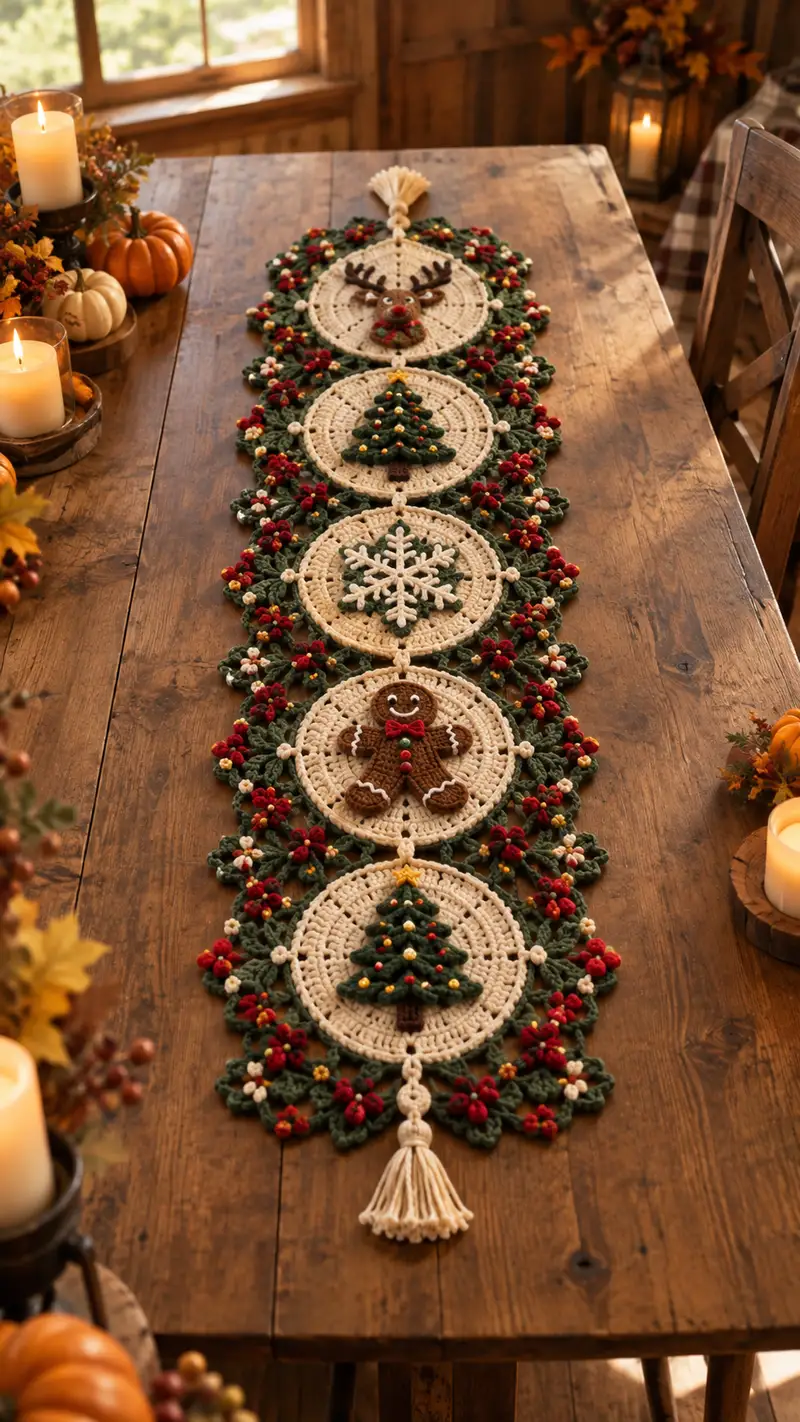
Create a festive cream-and-forest-green table runner made of joined circular medallions with seasonal appliques: Christmas trees, a jolly reindeer, a snowflake and a gingerbread person. Each round medallion is edged with a leafy garland, tiny berries and golden bead accents for a warm holiday centerpiece. This pattern includes full instructions for circle bases, appliques, embroidered details, joining and decorative tassels.
Progress Tracker
0% Complete
— Circle Base (Cream) - Medallion Body :
Round 1 :
Make 6 sc in magic ring (6)
Round 2 :
Inc in each st around (12)
Round 3 :
(1 sc, 1 inc) x 6 (18)
Round 4 :
(2 sc, 1 inc) x 6 (24)
Round 5 :
(3 sc, 1 inc) x 6 (30)
Round 6 :
(4 sc, 1 inc) x 6 (36)
Round 7 :
(5 sc, 1 inc) x 6 (42)
Round 8 :
(6 sc, 1 inc) x 6 (48)
Info :
Keep tension even. These early rounds form a flat disc; check frequently for cupping. If disc cups, work next round with slightly tighter tension
Round 9 :
(7 sc, 1 inc) x 6 (54)
Round 10 :
(8 sc, 1 inc) x 6 (60)
Round 11 :
(9 sc, 1 inc) x 6 (66)
Round 12 :
(10 sc, 1 inc) x 6 (72)
Round 13 :
(11 sc, 1 inc) x 6 (78)
Round 14 :
(12 sc, 1 inc) x 6 (84)
Info :
If you plan to place an applique, lightly mark the center and plan decoration placement now. For medallions in the sample runner, the applique sits centered inside the circle and will be sewn on after the base is complete
Round 15 :
(13 sc, 1 inc) x 6 (90)
Round 16 :
(14 sc, 1 inc) x 6 (96)
Round 17-20 :
1 sc in each st around (96)
Info :
Rounds 17-20 set the working height of the medallion; leave these rounds unshaped so appliques can be positioned on a flat surface. Block medallion flat before adding edging for best results
Round 21 :
Ch 1, *sk 2 sts, 5 dc in next st (shell), sk 2 sts, sc in next st* around to create shell pattern, ending with sl st to join (16 shells, 96 sts base counted as shells across)
Round 22 :
Sl st to center of first shell, ch 3 (counts as dc), 2 dc in same center, ch 1, 3 dc in next shell center, repeat around. Join with sl st (16 shell centers)
Info :
Work shells centered into the spaces formed by previous rounds. This creates a textured base for the wreath edging to attach to
Round 23 :
Switch to Forest Green yarn. Sl st to back of a shell center, ch 1, *sc in each of 3 dc across shell, ch 3, sc in next shell center* around to form foundation for leaf clusters (work tight to maintain shape)
Round 24 :
In Forest Green: *In ch-3 space: (sc, hdc, 3 dc, hdc, sc) - forms a pointed leaf; sl st into next sc between shells; rep around* (16 leaves)
Info :
Leaves are made densely to give a laurel wreath look. Keep your leaves uniformly sized by counting stitches and working into the same relative spots on each shell
Round 25 :
With Forest Green, work a picot or small bump between leaves: sl st to space, ch 3, sl st in top of leaf to create connecting picot. Join and fasten off (16 picots)
Round 26 :
Embellish: With Red yarn, make tiny berry bobbles between leaves. In spaces between leaves: (ch 1, bobble (5 dc bobble) in same st, sl st) x 16. Fasten off and weave ends
Info :
Bobble stitch: work 5 partial double crochets into the stitch, drop loop and pull through on last, yarn over and pull to close the group to form a bobble. Secure bobble at its base with a small sc in cream to anchor if needed
Round 27 :
With small gold yarn or beads, add French knot-like beads by sewing tiny metallic seed beads into the centers of some leaves and shells to mimic ornaments (optional)
Info :
If using seed beads, thread them before crocheting or sew on after blocking. Reinforce beads with a drop of fabric glue for durability
— Reindeer Applique (Top Medallion) :
Round 1 :
Using Brown yarn, make mr, 6 sc in mr (6) - this is the base of the head
Round 2 :
Inc in each st around (12)
Round 3 :
(1 sc, inc) x 6 (18)
Round 4 :
(2 sc, inc) x 6 (24)
Round 5 :
(3 sc, inc) x 6 (30)
Round 6-9 :
1 sc in each st around (30)
Info :
Shape the head slightly oval by adding one round of increases on the face side only when placing features; position eyes around round 7 for a compact look
Round 10 :
(3 sc, dec) x 6 (24)
Round 11 :
(2 sc, dec) x 6 (18)
Round 12 :
(1 sc, dec) x 6 (12)
Round 13 :
6 dec (6). Fasten off leaving a long tail for sewing. Lightly stuff if you wish for a raised applique (optional)
Info :
For the reindeer's snout and cheeks, you will add small circular appliques: make two small cream rounds of 3-4 rounds each and sew centered toward the bottom of the headfor a cute muzzle effect
Antlers - Make 2 :
With Dark Brown, ch 6, sc in 2nd ch from hook and next 2 ch (3), turn, ch1, 1 sc in each of those 3 (3), ch 3, sl st into middle of second row to make a branch, repeat to create 2 to 3 branching points per antler. Fasten off and leave a long tail for sewing (approx 10 sts per antler)
Round 14 :
Sew antlers to top of head matching center line. Add a small red bobble nose (see nose below) sewn firmly at bottom center of head
Nose :
With Red yarn, make mr, 6 sc in mr (6). Round 2: inc around (12). Fasten off leaving a long tail. Optionally insert a small bead then sew as nose at round 7-8 of head.
Eyes :
Use tiny black beads or embroider French knots of black yarn at rounds 7 and 7, spaced 6-8 sts apart depending on expression. Add white highlight with tiny white stitch after placing eyes
Wreath/Collar :
With Forest Green, ch 2, 6 sc in second ch from hook to make a mini wreath. Round 2: (ch 2, sl st in same st) x 6 to make looped leaves. Sew under reindeer's chin. Add red bobble berries and gold beads
Info :
Position reindeer applique centered on a cream medallion so the antlers reach slightly into the leaf border. Pin heavily before sewing. Use the long tail to mattress stitch around the base of the head for secure attachment
— Christmas Tree Applique (Pine Motif) :
Round 1 :
With Forest Green, ch 4, join to form ring, ch 3 (counts as dc), 11 dc in ring, join (12) - this is the top star/starting point
Round 2 :
Ch 1, sc in same st, ch 3, sk next st, sc in next; repeat to form small openwork row (6 loops) to anchor tiers
Tier 1 :
Working downwards, attach in space: (sc, hdc, 3 dc, hdc, sc) in first space to form a small triangle. Move to next space and repeat for lower tiers as you build the tree shape - create 4 tiers decreasing width as you go
Round 3 :
Tier 2: In the next row's central gap, (sc, hdc, 5 dc, hdc, sc) - wider tier
Round 4 :
Tier 3: (sc, hdc, 7 dc, hdc, sc) - wider
Round 5 :
Tier 4 (base tier): (sc, hdc, 9 dc, hdc, sc)
Round 6 :
Trunk: Switch to Dark Brown, ch 1, work 4 sc in a line from base center to form trunk (or make small rectangle by working 2 rows of 4 sc)
Round 7 :
Decorate: With Gold yarn or beads, stitch tiny gold bobbles across tiers: sew in a random, balanced layout. Optional: Make tiny red bobble berries by sewing small red bobbles (see bobble stitch notes)
Info :
Tree tiers are constructed as layered shells attached to open spaces. Pin each tier before sewing to capture triangular shape and symmetry. Use a tiny bit of fiberfill behind the trunk for dimension if desired
— Snowflake Applique :
Round 1 :
With White yarn, mr, ch 3 (counts as dc), 11 dc in mr, join (12)
Round 2 :
Ch 3, *sl st in next, ch 4* repeat to create six spokes, join
Round 3 :
Work along each spoke: in ch-4 space make (sc, hdc, 3 dc, picot, 3 dc, hdc, sc) to create pointed decorative tip. Repeat for all 6 spokes
Round 4 :
Between each main spoke, add small connecting arches: sl st to center, ch 2, dc in next spoke base to join, creating a lacy web. Fasten off and block flat
Info :
Snowflake requires careful blocking to open the arms; pin each tip to a blocking mat and steam lightly to hold shape. Sew centered onto medallion using white thread or invisible stitches
— Gingerbread Applique :
Body - Round 1 :
With Brown yarn, mr, 6 sc in mr (6)
Round 3 :
(1 sc, inc) x 6 (18)
Round 4 :
Increase only at two opposite sides to form shoulders and hips: sc around, but where you want widening, inc once per side (approx 20-22 sts depending on placement)
Round 5-8 :
Work even to build torso height (20-22 sts). For arms and legs, work small attached limbs: ch 3, 3 sc back along chain to form stub limbs; repeat for all four limbs symmetrically
Round 9 :
Using White yarn, embroider piping and icing details: zig-zag lines on arms, legs and head using surface slip stitch or backstitch with tapestry needle
Round 10 :
Bow tie: With Red yarn, ch 5, sc in 2nd ch from hook along, fasten off, fold and wrap with small cream band to form bow. Sew onto neck area
Round 11 :
Buttons: Sew three small red or green beads down body. Eyes: two small black embroidered dots; smile: small white/pale stitch to highlight
Info :
Gently stuff the gingerbread applique to maintain a slightly raised appearance; sew onto medallion so arms sit above leaf border for a 'popping' 3D look
— Decorative Border & Inter-Medallion Connectors :
Round 1 :
With Forest Green, join in any leaf base point and sc across edge joining points to create small chains of ch 6 loops between medallions where connector rings will be placed (work 2-3 loops in each side area)
Round 2 :
At the point where two medallions meet, make a connector: ch 6, sl st into next medallion point to form a small chain ring. Repeat for both top and bottom of every medallion to join into a vertical runner. Ensure connectors sit on same rounds of adjacent medallions to align centers
Info :
Exact stitch counts vary by spacing; place connectors at medallion positions corresponding to round 20-22 so they are slightly outside the cream circle but inside the leaf border. Pin medallions together and ensure connectors are even
Round 3 :
Decorative fringe nodes: At each connector join, make a small 3-sc bobble to echo the berry look. Work evenly and fasten off
Round 4 :
Tassel loop: At the top and bottom medallion ends, work a ch 12 loop secured with sc to provide a tassel hanging loop. Secure and finish
Info :
Count the number of medallions you are joining. The pictured runner uses 5 medallions. If you choose more or fewer, adjust connector placements so spacing remains visually balanced
— Final Edging Detail (All Medallions) :
Round 1 :
With Cream yarn, around last round of leaf border, work: *sc in top of leaf, ch 3, picot, sc in next leaf top* repeat to make delicate lace edge. Fasten off and weave in ends
Round 2 :
With small gold yarn or by sewing small beads, secure bead accents at every 4th leaf. This provides shimmer without adding weight
Info :
Use care when attaching beads; they should be secure so they don't come off with handling. If making for children, omit beads and use yarn bobbles instead
— Tassel (Top/Bottom) :
Round 1 :
Cut 20-30 strands cream yarn twice the desired tassel length. Fold in half, insert fold under loop made earlier and secure with a tight lark's head knot
Round 2 :
Wrap a separate 8-10" length of yarn tightly around the folded strands about 1/3 down from the top and secure with a knot. Trim ends evenly
Info :
Tassels can be brushed out gently with a soft brush to fluff the ends for a softer look. Secure thoroughly to the runner to avoid pulling free
— Assembly & Sewing Appliques On :
Round 1 :
Pin each applique centered on top of the cream medallion. For the tree and snowflake ensure the apex points align with the medallion circumference; for the reindeer center the head slightly towards top
Round 2 :
Using corresponding yarn and a tapestry needle, sew appliques on using small whip or invisible ladder stitch around the applique perimeter. Insert stitches into medallion rounds 12-17 for secure anchoring
Round 3 :
Sew on any beads and bobbles after applique is secure. Reinforce bobbles with a small anchor stitch through the medallion base
Info :
Press gently with a warm steam iron (no direct contact) or use a steam blocking to ensure appliques sit flat and maintain shape. Avoid over-steaming beaded areas
— Extra Decorative Elements & Alternative Variations :
Round 1 :
To add more depth, embroider small swirl lines in cream on the medallion face using surface slip stitch; spacing should be symmetrical around the center
Round 2 :
For sturdier decoration, felt a thin backing disc and couch it to the medallion underside before attaching appliques to reduce wobble
Info :
Consider making each medallion reversible with a simpler design on the back for multi-use. Make appliques removable by sewing with a few long loop stitches that can be undone
Finishing this runner is so satisfying — watching each medallion come together and seeing the appliques add personality is a holiday joy! The warm cream and forest green palette looks timeless on any table and the little red and gold accents sparkle in candlelight. Make one for your home or as a thoughtful handmade gift this season — it's a beautiful centerpiece that shows real craft. 🎄🧶