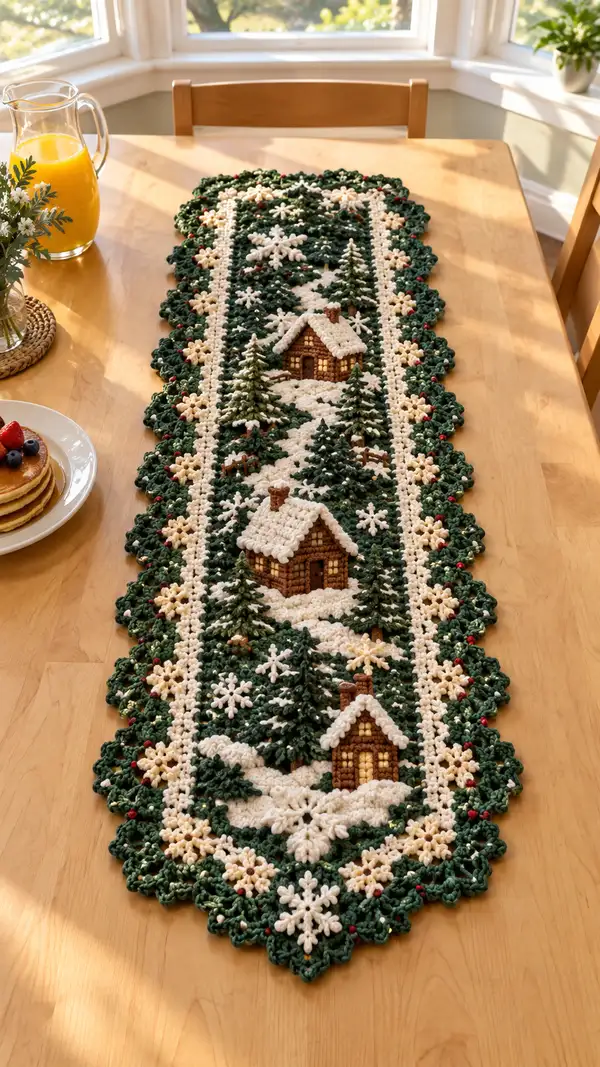
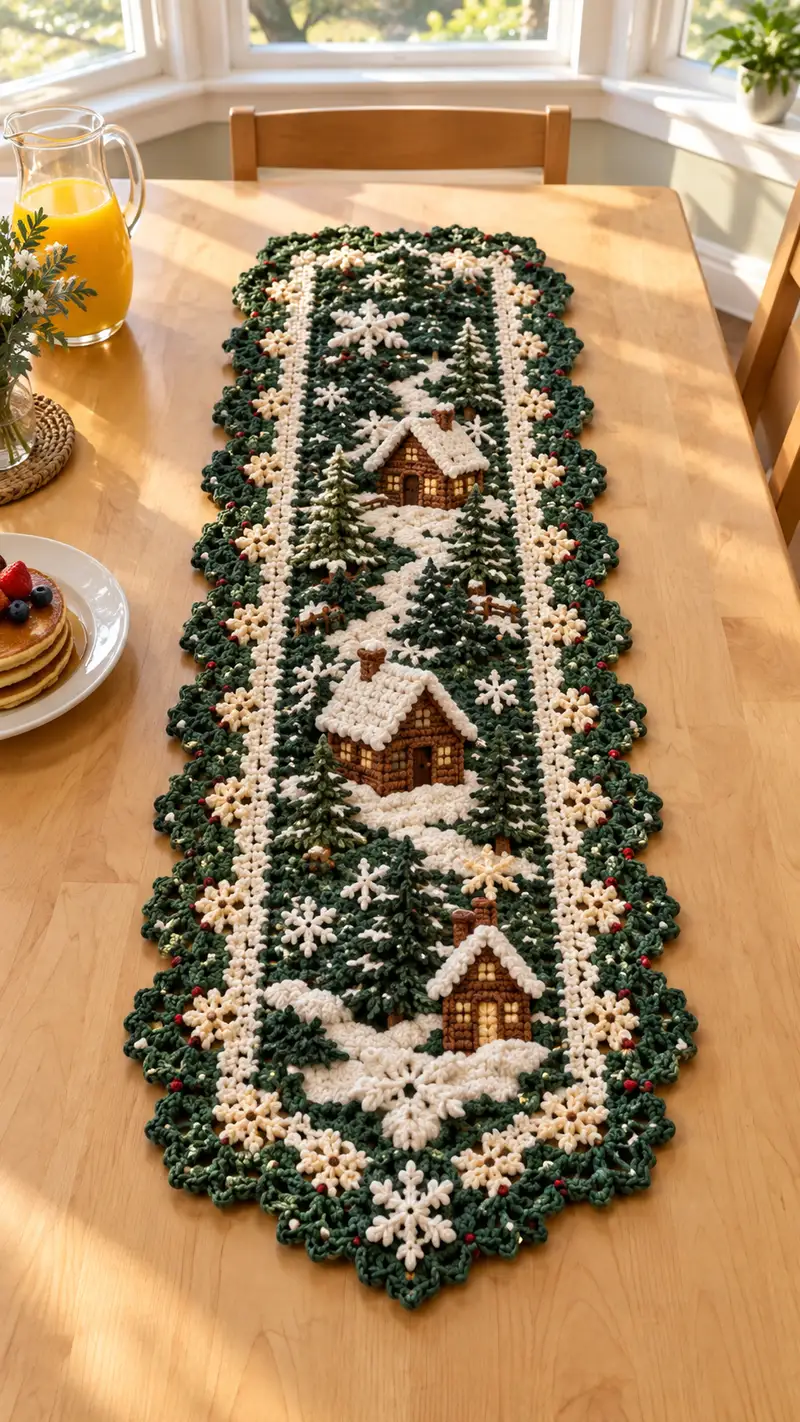
A charming winter village table runner worked in cream and forest green with raised 3D cottages, layered evergreen trees, and delicate snowflake motifs. The scalloped border, tiny red bead accents, and snowy paths create a cozy holiday centerpiece. This pattern uses worsted-weight yarn and textured stitches for a rich handmade look. Follow the step-by-step rounds and assembly instructions to recreate this year-round festive runner.
Progress Tracker
0% Complete
— Runner Foundation (Center Panel) :
Info :
We will work the center panel in joined rounds to create a firm flat base for attaching appliques. Use Forest Green for the background and switch to Cream for the snowy path rows when instructed. Gauge is flexible; maintain even tension.
Round 1 :
With Forest Green, ch 62. Work 1 sc in 2nd ch from hook, 1 sc across to end (61 sc). Turn to join for working in rounds: join with sl st to first sc to make the row continuous (61)
Round 2 :
Ch 1, work 1 sc in each ch around, at ends work 3 sc in last stitch to turn the corner, continue down opposite side working 1 sc in each ch, 2 sc in final corner to join to first st; this forms a long oval foundation. Maintain total approx 122 sc around after corner increases (122)
Info :
When joining the ends to work in rounds, use a stitch marker in the first stitch of each round. This long foundation acts like a flattened tube; keep it flat by working extra stitches in corners as described.
Round 3 :
Ch 1, 1 sc in each st around (122) — even round to build foundation height
Round 4 :
Ch 1, 1 sc in next 6 sts, switch to Cream yarn in 7th st (carry green inside or fasten off), continue 1 sc in cream for 20 sts to begin snowy path, then switch back to Forest Green for 20 sts, repeat sequence so that a central band of cream forms; final stitch count remains 122 (122)
Info :
Place the snowy path centrally by counting stitches from one edge to the other. The runner pictured has two narrow cream rails down each side and a wider cream path in the center — this round establishes color placement.
Round 5-8 :
Work 1 sc in each st around keeping color placement consistent (122). These even rounds reinforce the background and create the flat panel height required for applique attachment.
Round 9 :
Change to Cream for the central path area only. Ch 1, sc across path stitches in cream working 2 sc in each end path corner stitch to slightly mound the snow (path stitches approximately 28 sc, adjust to your counting), work remaining stitches in Forest Green as even sc (122)
Info :
Use BLO on one round of the green background (next round) to create a faint ridge separating the path from surrounding green — this helps appliques sit naturally.
Round 10 :
Ch 1, 1 sc in each st BLO around to create a defined ridge along both sides of the runner (122)
Round 11-14 :
Continue 1 sc in each st around (122). At rounds 12-14 add occasional puff stitches in cream on the path area to build light snowdrift texture: *yo twice, insert hook in st, draw up loop, yo pull through all loops, ch 1 to close puff* spacing puffs every 6th stitch across the path.
Info :
Stuff small amounts of fiberfill under puff stitches through gaps if you want slightly raised snowdrifts. Keep puff density light so runner lies flat.
Round 15 :
Begin placement rounds for houses: 1 sc in each st around but flatten and mark positions for three houses along center path roughly at 1/6, 1/2, and 5/6 length positions. Use pins to mark a 12-stitch wide zone for each house (122)
Round 16-18 :
Work even rounds 1 sc in each st around (122). At round 18, add 1 sc, ch 1, skip 1 st at each house zone to create a subtle pocket for appliques to sit in; maintain counts by adding 1 sc extra opposite the skipped stitch (122)
Info :
If you prefer to join the houses by slip-stitching their bases to the panel later, leave these rounds flat and do not create pockets. The pictured runner has lightly inset houses—use the skip technique for slight recessing.
Round 19-24 :
Work 1 sc in each st around (122). On rounds 20 and 22 place small red beads by sewing with a short yarn tail to mimic holly berries along the outer border placement zone (do not add beads in the direct path). Keep bead count about 30-40 evenly spaced.
Info :
Continue building central panel until the desired height of the appliques base is achieved. We will attach houses and trees starting after Round 24.
— House Applique (Make 3 identical cottages) :
Info :
Each cottage is worked small and stuffed lightly to create a raised cabin. Work in cream for snowy roof trims and warm brown for logs. After finishing, sew windows with gold yarn for the glowing effect.
Round 1 :
With Warm Brown and 3.25mm hook, mr, 6 sc in mr (6)
Round 2 :
Inc in each st around (12)
Round 3 :
(1 sc, inc) x 6 (18)
Round 4 :
(2 sc, inc) x 6 (24)
Round 5 :
(3 sc, inc) x 6 (30)
Info :
These first 5 rounds create a flat circular base for the cottage floor. We will begin building walls up in the next rounds using continuous rounds to create a small box shape.
Round 6 :
1 sc in each st around (30)
Round 7 :
1 sc in each st around (30)
Round 8 :
1 sc in each st around (30)
Info :
Work 3-4 rounds of even sc to reach the desired wall height before creating a roof ridge. Use sl st to join across rounds rather than fastening off so walls are seamless.
Round 9 :
(4 sc, inc) x 6 (36) — slight outward flare at top of wall to allow for roof overhang
Round 10 :
1 sc in each st around (36)
Round 11 :
Switch to Dark Brown for roof base: 1 sc in each st around working BLO to create a neat ridge where roof will sit (36)
Info :
Switching to BLO creates a small ledge so the Cream snow roof sits naturally on top. Add 2-3 rounds of Dark Brown roof base for visible roofing texture.
Round 12 :
1 sc in each st around (36)
Round 13 :
Start roof shaping in Cream: attach Cream yarn to any st on top of roof base, ch 1, then (1 sc, ch 2, skip 1) across to create scalloped roof tiles across one hemisphere of the cottage roof; work 2 full rounds of roof scallops to build height.
Round 14 :
Repeat round 13 to deepen roof scallops (36). After completing roof layers, lightly stuff the top of the cottage through a small opening between scallops and inside the house body through a small side opening; stuffing should be light to keep base flat.
Round 15 :
Make a small chimney: With Warm Brown, mr, 6 sc in mr (6), inc around to 12 (12), 1 sc in each st around for 2 rounds (12). Fasten off leaving long tail for sewing.
Round 16 :
Door and windows: embroider a small door on one wall panel with Warm Brown (vertical rectangle approx 4 sc high by 2 sc wide), use Gold yarn to create 2 small window squares (1 sc x 1 sc) on either side of the door; sew chimney onto roof base offset to one side.
Info :
Make three of these cottages. Vary roof coverage slightly between cottages to create visual interest. Use light felting with gold yarn to tack window glow or tack small seed beads for extra sparkle.
Finishing :
Fasten off leaving long tails for sewing to panel. Sew around the cottage base onto the marked 12-stitch zone on the center path using whip stitch, then add a bit of cream puff stitches at the roof edges to simulate snow.
— Pine Tree Applique (Make 9) :
Info :
Each tree is constructed in layered rounds to create a tapered, 3D evergreen. Work from the trunk upward, making tiers of leaves by alternating treble or double crochet fan clusters. Lightly stuff the trunk and base for stability.
Round 1 :
With Forest Green and 3.25mm hook, ch 6, join with sl st to form ring (6)
Round 2 :
1 sc in each st around (6)
Round 3 :
Switch to Warm Brown for trunk: ch 1, 2 sc in each st around (12) — flatten and fold to form short trunk; work 2 rounds sc for trunk height (12)
Round 4 :
Return to Forest Green: join yarn at top of trunk, ch 3 (counts as first dc), *skip 1 st, (3 dc in next st), skip 1 st, sl st in next st* around to create first skirt of branches — you should complete 6 small fans around (approx 18 stitches worked into fans)
Info :
Create branch tiers by stacking these fan rounds; larger trees use more tiers and larger fans (increase fans to 5 dc clusters on lower tiers).
Round 5 :
Ch 2, work 5 dc cluster into each fan base from previous round with 1 sl st between clusters to offset tiers. This widens the skirt (approx 30 dc clusters)
Round 6 :
Ch 2, reduce cluster sizes slightly: (3 dc cluster) into center of each previous cluster, sl st between clusters to gather and create taper (approx 30)
Round 7 :
Repeat previous pattern for a top tier: (2 dc cluster) x number of clusters to form the tip. Fasten off leaving long tail for sewing (approx 18)
Info :
Make nine trees of varying heights: three tall (5 tiers), three medium (4 tiers), three small (3 tiers). Stuff trunk lightly to keep tree upright; do not overstuff branches.
Finishing :
Sew trees to panel at positions between cottages and at edges. Add tiny cream puff stitches or surface sl st in cream across branches for 'snow'. Optionally sew a few red beads as berries near tree bases.
— Snowflake Motif (Make 24 small + 6 large) :
Info :
Snowflakes are worked flat in Cream. Small snowflakes are 6-point motifs and large snowflakes are 8-10 point motifs with picot tips. These are sewn on top of the panel and border for delicate detail.
Small Snowflake Round 1 :
With Cream, mr, ch 1, work (1 sc, ch 4) x 6 around, join with sl st to first sc — create 6 loops (6 loops)
Round 2 :
Into each ch-4 loop work (sc, hdc, 3 dc, hdc, sc), sl st to join. Fasten off and weave ends (each snowflake approx 6 points)
Info :
Make 24 small snowflakes for the green background and 6 large snowflakes to center on the runner; block each flake carefully by pinning points to a mat and spritzing lightly to set shape.
Large Snowflake Round 1 :
mr, ch 1, (1 sc, ch 6) x 8 around, sl st to first sc
Large Snowflake Round 2 :
In each ch-6 loop work (sc, hdc, 5 dc, hdc, sc), join and fasten off. Add picot (ch 3, sl st in first ch) at the tip of every 2nd dc to create a delicate point. Weave ends and block.
Finishing :
Sew snowflakes to runner with small stitches of cream yarn; place larger flakes centered between cottages and small flakes along the border scallops and background.
— Snowdrift Embellishments (Multiple small puff and popcorn clusters) :
Info :
Use cream yarn to work puff and popcorn stitches directly onto the runner path to simulate piled snow. Make small clusters around cottage bases and tree trunks for natural accumulation.
Round 1 :
At marked snowdrift areas, work puff stitches: yo twice, insert hook, pull up loop, yo and pull through all loops, ch 1 to close; work 1 sc between each puff for spacing.
Round 2 :
Where denser drifts are desired, work popcorn stitches: (5 dc in same st, remove hook, insert hook in first dc, pull loop through) to form a tight bump. Anchor with sc in next st.
Info :
Puff and popcorn clusters add height; place them asymmetrically for a natural look. Avoid overusing or the runner will not lay flat.
— Border Scallop and Corner Detailing :
Info :
The scalloped border is worked around the entire runner after attaching appliques. It alternates Forest Green scallops with Cream star motifs and small red bead holly accents.
Round 1 :
From the foundation edge, with Forest Green, ch 1, work 1 sc evenly around the edge, working (3 sc, ch 3, 3 sc) into each corner to maintain shape. Place stitch markers every 6 sc to map scallop placement. Total edge sc approx 122-128 depending on stretching (approx 128)
Round 2 :
Ch 2, *skip 2 sc, in next sc work (dc, tr, dc) to form a shell, skip 2 sc, sl st in next st; rep around forming scallops (approx 32 shells)
Info :
Shell sizes can be adjusted to achieve the pronounced scallop effect seen. Ensure shells align across both long sides to create a mirrored look.
Round 3 :
Switch to Cream to work star motifs between scallops: Join cream in center of selected shell, ch 1, (sc, ch 3, picot) x 6 to form star points; sl st to base and fasten off. Insert a small red bead at the center of some cream stars to mimic berries (approx 30 cream stars)
Round 4 :
Return to Forest Green, work 1 sc between each star to tidy gaps, then work a final decorative round: *ch 4, sl st in shell apex, ch 4, sc in next base* around to create lace edging. Fasten off and weave ends.
Info :
Block the entire runner gently after the border is complete to set scallops. Use pins and a steam iron at a safe distance or a steam-blocking method recommended for worsted yarn.
— Joining and Assembly Rounds (Attaching All Appliques) :
Info :
Pin cottages, trees, snowflakes, and snowdrifts in place before sewing. Start sewing from center cottage outward to ensure balanced placement. Use matching yarn for invisible joins and small, tight stitches.
Round 1 :
Position first cottage in designated 12-stitch zone and use long tail to whip stitch through cottage base and panel foundation. Stitch through every other sc around the cottage base for a secure seam (approx 12-16 stitches).
Round 2 :
Sew trees at their positions: tuck trunk end into small pocket created earlier and baste around the trunk with matching green yarn, working through one trunk round and the panel to anchor (6-8 stitches per tree).
Round 3 :
Sew snowflakes with 3-4 small stitches hidden into motif centers. Add cream puff clusters along snowdrifts and tack them with a short stitch from the panel center to keep shape stable.
Info :
For the houses, stitch chimney securely with extra passes to avoid chimney flopping. Hide sewing tails by weaving them into the house interior and knotting then trimming close to work.
Round 4 :
Add final surface embroidery: window glow in gold, wooden log markings with darker brown running horizontal lines across cottage walls with small 'V' stitches to imitate logs. Use long tail to embroider fence sections between cottages if desired.
Finishing :
Once all appliques are sewn, block the runner flat, then tack the scalloped edge with small whipping stitches at intervals to maintain shape. Secure any beads with multiple passes of a sharp needle and a small dab of fabric glue if desired.
Info :
After finishing, carefully trim all yarn tails. Light steam-block again if necessary to flatten seams. Your runner is now ready to use as a holiday centerpiece or a winter accent for any table.
Completing this winter village runner is a delight—each little cottage and layered tree adds personality and seasonal charm. The combination of raised appliques and delicate snowflake motifs makes it a special heirloom centerpiece you will be proud to display. Enjoy the tactile process of building the tiny village, one cozy stitch at a time. 🧶🏡❄️