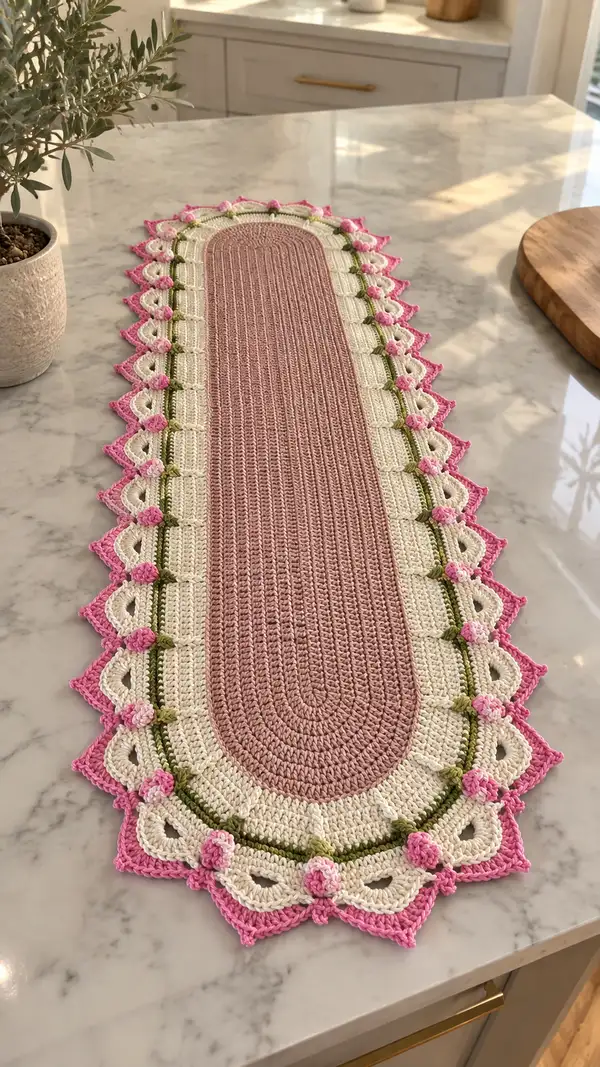
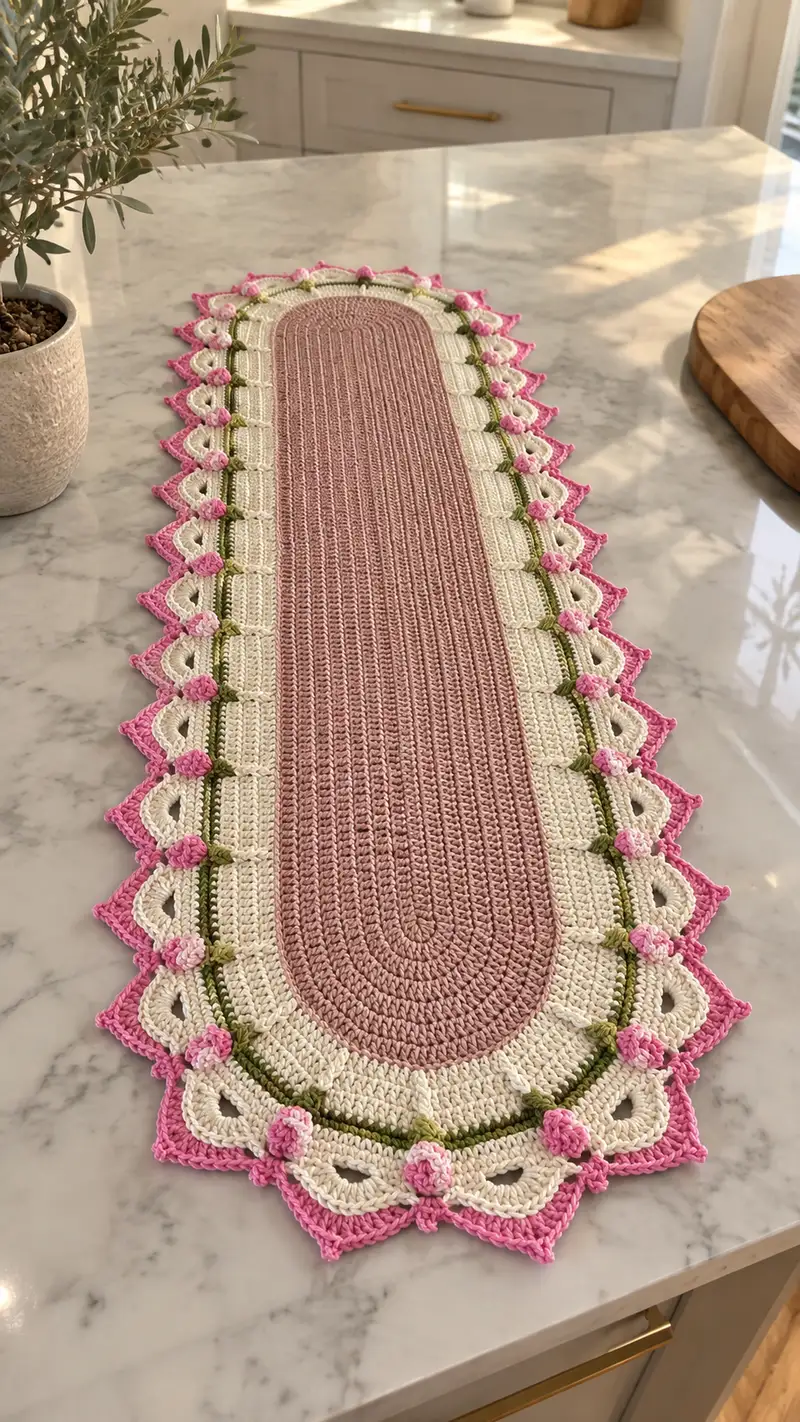
A delicate, vintage-inspired oval table runner with a ribbed dusty-rose center, creamy lace border, olive green ribbon stripe, and tiny 3D pink roses along a scalloped edge. The runner combines simple textured stitches with decorative shells and small rosettes for a romantic, handmade accent. Perfect for dining tables, dressers, or as a gift to brighten a room.
Progress Tracker
0% Complete
— Center Oval (Dusty Rose) :
Notes :
Work center in joined rounds to create a long oval. This section forms the ribbed, textured center. Use dusty-rose yarn. Begin with a lengthwise foundation chain that becomes the straight sides of the oval; increases occur at each narrow end. Maintain a consistent stitch height (we use sc) and create the vertical ribbing with BLO hdc rows later.
Round 1 :
Ch 36, 1 sc in 2nd ch from hook and in next 33 ch (34 sc), work 3 sc in last ch to turn (end of foundation), continue working on opposite foundation chain: 1 sc in each of the next 34 ch, work 3 sc in last ch (join to first sc) — total (34+3+34+3) = 74 sts. Place marker at first sc.
Info :
The 3-sc clusters at each short end create a small curve; we will expand these ends gradually. Mark the first stitch of each round with a removable marker and move it up each round.
Round 2 :
(11 sc, inc) x 6 around — (11+1)*6 = 78 sts. Work evenly; this distributes increases toward both ends.
Round 3 :
(12 sc, inc) x 6 = 84 sts.
Round 4 :
(13 sc, inc) x 6 = 90 sts.
Info :
If you prefer a slightly narrower runner, stop increasing earlier; if wider, continue the increase sequence one more round using (14 sc, inc) x 6 = 96 sts. Keep track of increases to maintain symmetry.
Round 5 :
(14 sc, inc) x 6 = 96 sts.
Round 6 :
(15 sc, inc) x 6 = 102 sts.
Round 7 :
(16 sc, inc) x 6 = 108 sts.
Round 8 :
(17 sc, inc) x 6 = 114 sts.
Info :
At this point your oval should have reached the desired width for the center panel. If you need it wider, continue the pattern (18 sc, inc) x 6; do not exceed proportions of your table. From here we will keep even rounds to build length.
Round 9-22 :
1 sc in each st around (114 sts). Work evenly over 14 rounds to build the runner length. Move marker each round.
Info :
For the ribbed texture visible in the photo, we will now switch to BLO rows using hdc in the back loop only to create vertical ribs. Change stitch to hdc if you want deeper ribs; otherwise use sc BLO for a subtler effect.
Round 23 :
1 hdc BLO in each st around (114 sts). Join with sl st to first hdc, chain 1 at the end to maintain height.
Round 24-38 :
Repeat Round 23 fifteen times (Rounds 24-38) to build the ribbed column across the oval center. Maintain tight tension to keep ribs pronounced and even. (114 sts each round)
Info :
Count your rounds; the photo shows 15-18 ribbed rounds on the panel. You can increase or decrease number of rib rounds to lengthen/shorten the runner. Keep the stitch count constant so the border aligns perfectly.
Round 39 :
1 sc in each st around (114 sts). This creates a clean top edge to transition to the cream border.
Info :
Fasten off dusty-rose and weave in the tail on the WS for a neat join. Block the center lightly if using cotton to flatten any small ripples before starting the cream border.
— Transition & Green Accent Stripe :
Info :
We will add a thin olive stripe to define the border. The stripe sits on top of the cream rounds laterally — it's worked as two rounds in green across the last dusty-rose round area so that it lands just outside the center. Join green yarn with sl st at any point on the perimeter.
Round 40 (Change color to cream first) :
Join cream in any stitch on perimeter with a sl st, ch 1, 1 sc in same st and in each st around (114 sts). Join with sl st and move marker.
Round 41 (Green Accent Info) :
Info : Change to olive green yarn. We will work a very narrow two-row accent. Carry or join green cleanly and keep slack trapped to the WS if you prefer.
Round 41 :
Join green, ch 1, 1 sc in each st around (114 sts). Join and fasten off green after Round 42.
Round 42 :
Join green, ch 1, 1 sc in each st around (114 sts). Join with sl st, fasten off green and weave in ends. This gives two tidy olive rows.
Info :
Change back to cream to begin the lace border. Keep joins tidy - weave ends to underside so they are invisible from the top.
— Cream Lace Border (foundation shells) :
Round 43 :
Join cream at any point, ch 3 (counts as dc), *sk 2 sts, 5 dc in next st (shell), sk 2 sts, dc in next 6 sts across straight sides (use 6 dc evenly) until you reach the curved end; at the curved end work (dc, 3 dc in next st, dc) to form the round corner; continue repeating * around. Stitch count will remain 114 sts but shells create visible spaces.
Info :
The number of dc between shells depends on your oval's even spacing; the pattern above gives a consistent scalloped lattice. Use stitch markers at the center points on both straight sides to keep shells symmetrical.
Round 44 :
Ch 1, 1 sc in top of each dc and in the center of each shell (work 1 sc in each st and 1 sc in center dc of 5-dc shell) — this evens the fabric and creates anchor points for the decorative rounds. Count should return to 114 stitches effectively distributed.
Round 45 :
Ch 3, *2 dc in next sc (forming a raised group), ch 1, sk 1 sc, 3 dc in next st (fan), ch 1, sk 1 sc, 1 dc in next 4 sts; rep from * around. This begins to open the wide lace arches where the small roses will sit. Adjust repeats to keep symmetry; overall counts vary due to ch-spaces but the shell repeat must align with previous round shells. Mark each shell center for rose placement with a removable pin.
Info :
Place pins in the center top of each open arch (approx every 8-10 sts depending on your spacing). There will be equal numbers of arch points along both straight sides and mirrored at both ends.
Round 46 :
Ch 1, 1 sc in each dc and in each ch-1 sp around to stabilize the lacework. This round provides well-defined loops for attaching the next decorative scallop layer. Make sure to land a sc exactly at each arch tip where the rose will attach.
Info :
Fasten off and weave ends on the WS. Count the number of arches/shell centers — this number determines how many 3D roses you will make and attach. Typical runner will have approximately 16-22 arch points depending on length; record that number now.
— Scalloped Pink Edge Layer :
Info :
The bright pink scalloped outer edge is made with 2-3 rounds of shell stitches producing pointed picot-tipped scallops. We will attach to the cream lace by working half-shells that sit over the arch spaces.
Round 47 :
Join bright pink at a marked arch top with sl st, ch 1, 1 sc in same st, *ch 2, sk 2 sts (on cream round), in next st work (3 dc, ch 2, 3 dc) to make a large shell, ch 2, 1 sc in next sc (arch top)* — rep from * around at each arch point. You will create pointed large shells across the perimeter; the number of shells equals number of arch points recorded previously.
Round 48 :
Ch 1, 1 sc in each sc and in the ch-2 points around, *in shell top work (ch 3, sl st in same st) to form a small picot peak, sc in next sc between shells* — rep around. This forms a slight picot peak centered on each scallop.
Round 49 :
Finish edge by working a neat round of reverse single crochet (crab stitch) across the entire outer edge: sl st in next st, working from left to right sl st in each st around to create a firm, twisted edging. Join and fasten off. Weave in ends.
Info :
Blocking the scallops now will help them open and align. Pin each scallop to blocking board and steam or wet-block lightly according to yarn care instructions to set the shape.
— 3D Rose Motifs (Make one for each scallop) :
Notes :
Each little rose is crocheted as a small spiral rosette and sewn into the center of each scallop. Work roses in bright pink. They are made flat and then coiled to form the little rosebud.
Round R1 :
Using bright pink, ch 6, join with sl st to form a ring (or start with magic ring if preferred), ch 1, 6 sc into ring — (6 sts). Fasten join if you prefer a small central disc.
Round R2 :
Ch 1, 2 sc in each st around — 12 sts. (This forms a small disc for the base.)
Round R3 :
Ch 2 (counts as first hdc), *hdc in next st, 2 dc in next st* around — You will build a slightly cupped base. After this round you will begin the petal spiral.
Round R4 :
Ch 1, in next st work (sc, hdc, dc, hdc, sc) to make a full petal, slip to next stitch and repeat petal sequence across around forming a 5-6 petal spiral. The total number of petals will be 5-7 depending on base size.
Round R5 :
Continue around adding larger petals: in each petal base work (sc, hdc, 2 dc, hdc, sc) to create petals with more volume. Do not join at the end; leave tail for sewing. Total petals approx 5-7 forming a 3D rose when coiled.
Info :
To form the rose, coil the strip or spiral from one end, stitching through the base as you roll to hold the shape. You may also use a dab of fabric glue inside for added security but sewing is preferred for durability.
Round R6 (Optional highlight) :
Use a slightly lighter pink to pick up a couple of stitches on the petal tips to create subtle color variation. This is optional and purely decorative.
Info :
Make as many roses as you counted arch points earlier. Each rose takes just a few grams of yarn; use small clamps or pins to hold each rose in place before sewing.
— Small Green Leaves (Make 1 leaf per rose) :
Leaf 1 :
Join olive green at base of rose site, ch 6, in 2nd ch from hook: sc, hdc, 2 dc, hdc, sc in last ch — sl st to base. Fasten off and leave a tail for sewing. The leaf is a small tapered shape that anchors the rose.
Info :
Make one leaf per rose and position them angled outward from the rose center so they stagger along the scalloped edge as in the photo. Pin all leaves and roses before sewing to ensure even spacing.
— Rose Assembly and Attachment :
Info :
Pin each rose to the center point (apex) of each cream arch directly above the olive stripe. Place the leaf slightly to one side and slightly underneath the rose so it peeks out. Once positions are pinned and symmetrical, sew the roses and leaves through the base into the cream underlying round with an invisible whip stitch, taking care to avoid visible stitches on the top right side.
Step :
Using the long tail left on each rose/leaf, stitch through the center of the arch into two or three substrate stitches, then stitch through the rose base to secure. Tie off on the underside and weave long tail through the runner fabric at least 2 inches to secure; trim closely.
Info :
Alternate placing leaves slightly to the left and right along the runner so the foliage reads as a continuous vine. This asymmetry creates visual movement matching the photo.
— Final Picot & Decorative Finishing :
Round F1 :
With bright pink, join at any outer plinth, ch 1, sc in each st and in each ch-sp around but at the tip of each scallop work (ch 3, sl st in 3rd ch) to make a small picot. This gives the fine pointed edge seen in the photograph.
Round F2 :
Fasten off, weave in ends on WS. Using a tapestry needle, bury all tails into the body of the runner and trim. Steam-block the entire runner, pinning each scallop and rose so they sit flat and even.
Info :
Allow the runner to fully dry before removing blocking pins. The final blocking step makes the scallops crisp and the roses sit elegantly on top of the lace border.
— Alternative Scale & Adjustments :
Info :
To make a shorter runner reduce the number of center ribbed rounds (Rounds 24-38). To make a wider runner add more increase rounds in Rounds 2-8 following the same (x sc, inc) x 6 sequence. If you'd like more pronounced roses, add an extra petal round (R6) before coiling.
Care :
Handwash in cool water with mild detergent; reshape while damp and dry flat. Avoid heavy agitation to preserve the 3D roses and picot tips.
You've just created a romantic floral runner that adds instant charm to any surface. The ribbed center, lacy cream border, olive stripe and tiny pink roses come together to make a lovely heirloom-style piece. It's a rewarding project that looks wonderful on a table or dresser, and it's a beautiful handmade gift too. 🧶🌸 Take a moment to admire your work, block it gently, and then enjoy the compliments that will come! ✨