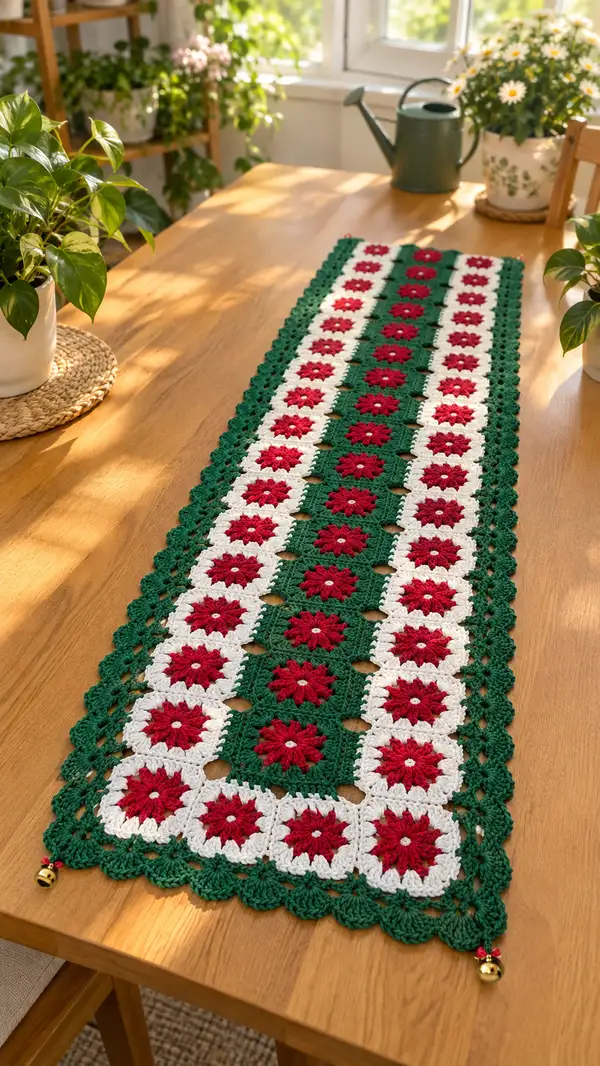
A long, elegant granny square table runner worked in classic Christmas colors — deep evergreen, crisp white and bright red. This design features 3 columns of floral granny squares joined into a long runner, finished with a scalloped green border and tiny bell tassels at the corners. The layout is modular so you can make it longer or shorter by adding or removing rows of motifs. Detailed join-as-you-go instructions and finishing tips included.
Progress Tracker
0% Complete
— Notes & Gauge :
Info :
Gauge: Each finished motif measures approximately 9 cm / 3.5 in square before blocking when worked with worsted weight yarn and a 4.0 mm hook. The sample runner pictured is 3 columns by 11 rows (33 motifs total) and measures approximately 28 cm (11 in) wide by 130 cm (51 in) long after blocking. Adjust number of rows to change length.
Info :
Terminology: Rounds are worked in continuous rounds for the puff-flower center, then joined-to-rounds in traditional round ends for square shaping and join-as-you-go. Use a stitch marker for the first stitch of each round if working continuous rounds.
— Puff Flower Center (Make all centers in red, 1 motif center per square):
Round 1 :
With red yarn, make a magic ring. ch2 (counts as first partial stitch for puff cluster). *Yarn over, insert hook in ring, pull up a loop; yarn over, insert hook in ring, pull up a loop; yarn over, insert hook in ring, pull up a loop; yarn over and pull through all 7 loops on hook (puff stitch made); ch1.* Repeat from * to * 7 more times (8 puff clusters total). Join with sl st to top of first puff cluster. (8 puff clusters)
Info :
Tip: Keep your puff clusters the same height by pulling up loops to the same height every time. Use a small stitch marker to mark the first puff if you plan to count petals later.
Round 2 :
Join white or green yarn (depending on which square you are making — side squares use white, center column squares switch to green in later rounds but begin here with white for a crisp petal surround): ch1, *sc in ch-1 sp between puff clusters, ch2, sc in next ch-1 sp; rep from * around to create a tidy ring that spaces petals evenly. Join with sl st. (16 sc spaces alternating with ch-2 spaces, total approx 32 stitches including ch-2 spaces)
Info :
When changing color, pull up the new color with the final pull-through of the last sl st to keep a tidy color join. Carry the unused yarn behind short stretches if making many motifs in the same color to save ends, but for clean squares we recommend fastening off and weaving in ends.
Round 3 :
With the same contrasting color (white for side squares, or green if you prefer the center squares to have their second round in green), work the round that begins to form the square: *ch3 (counts as dc), 2 dc in next ch-2 space, ch2, 3 dc in same ch-2 space (corner made); 1 dc in each of the next two ch-1 spaces; rep from * three more times, ending with sl st to top of ch3. You will have made 4 corners and even sides between corners. (Count roughly 4 corners and 24–32 dc across sides depending on exact earlier spacing)
Info :
This round creates 4 corner spaces (ch-2) which will be used to square-off the motif in subsequent rounds. Keep corners loose but defined so corners can lie flat after blocking.
Round 4 :
Change to the square main color for the square round (for side motifs this is white; for center column motifs this round will be green). In each corner ch-2 space work: (3 dc, ch2, 3 dc). Along each side between corners work: 1 dc in each stitch space (work a total of 3 dc clusters on each side between corners — if you need to even out, add an extra dc in the middle space so the side reads 7 dc between corner clusters). Join with sl st. (You now have a full square with 4 corners and even side dc groups.)
Info :
After this round your motif should be visually square. If it looks a little round, block it before the next round. Pin it square to a blocking mat and mist lightly; allow to dry before continuing.
Round 5 :
Work one more round in the same square color (white for side motifs, green for center motifs) to bring each motif to the same finished size: *ch1, sc evenly around the square working (sc, ch1) in corner spaces to keep corners flexible, and placing 2 sc in the center of each side group if side seems narrow; rep from *; join with sl st. Aim for a final motif size of roughly 9 cm / 3.5 in square. (Total stitches will vary but average 40–48 sc around.)
Info :
If you want the motifs to have a more lacy look, work this sc round in BLO (back loops only) to produce a raised ridge that helps the lattice join lay flat.
— Adjusting the Center Column Motifs (Green Backgrounds):
Round 6 :
For center-column motifs only: change to deep green yarn after Round 2 (if you started Round 2 in white) or after Round 4 (if you prefer white inner ring). Work an additional round of 3 dc groups in each corner (3 dc, ch2, 3 dc), and dc clusters across sides to make the square a touch larger and to unite with the green lattice that joins rows. This will make the center column motifs read solid green around the flower. (Approx increase to 48–56 dc equivalents depending on how many dc you place on each side.)
Info :
Tip :
These center motifs are visually solid green; ensure you carry color changes neatly and weave in ends or crochet over short tails so the back of the motif is tidy for joining.
— Make the Runner Layout & Motif Count :
Info :
The pictured runner is arranged as 3 columns by 11 rows (3x11 = 33 motifs). The left and right columns are white-framed motifs with red centers; the center column is green-framed motifs with red centers. To customize length, add or remove rows. Make an odd number of rows to keep the center column balanced, or even if you prefer symmetry with a central seam.
Info :
Make the total number of motifs you need using the Puff Flower Center and Square Rounds above: for the sample make 22 white-framed motifs (left + right columns) and 11 green-framed motifs (center column).
— Join-As-You-Go Grid Instructions (Join motifs into 3-column strips):
Info :
We use a join-as-you-go (JAYG) method to create clean joins and to preserve the small decorative openings in the lattice visible in the photo. Work your first row of 3 motifs (left, center, right) as follows, then add subsequent rows by JAYG to the row below.
Row Setup Step 1 :
Lay out the first three motifs in the order left (white), middle (green), right (white). Decide which sides you want joined first (we join along vertical seams between columns then join rows horizontally). Keep the motifs with blocked flat edges for easy joining.
Joining Round A (Join left to center) :
With green yarn (used for lattice), join with sl st into the right-side corner ch-2 of the left motif. ch1, sc into corner ch-2, then *ch2, skip corresponding corner chain on right motif, align edge and sl st through front loop of right motif at even intervals so you make a series of sl sts into the right motif and sc into the left motif (this makes little connecting bars leaving diamond holes). Continue along the side until you reach the bottom corner; finish with sc into corner and sl st to secure. This creates a decorative ladder join leaving the little openings visible in photo.
Info :
Keep your joins loose enough to allow the small square openings between motifs (about 2 ch spaces) but not floppy. Aim for one join every 4–6 stitches depending on motif size to match the photo lattice pattern.
Joining Round B (Join center to right) :
Repeat the same method along the center motif’s right side and the right motif’s left side so the three motifs are attached in a row. After both joins, the row will read as a neat strip of three squares with small diamond gaps at the joins.
Info :
Work all joins along the vertical columns first for a clean look. If you prefer, sew motifs together with mattress stitch instead of JAYG; blocking first helps to keep edges aligned.
— Add Additional Rows (Make total rows = desired length):
Row Join Step 1 :
To add the next row, align the bottom edge of the first-row strip to the top edge of the next-row motifs. Using the same join-as-you-go technique in green, join each square in the new row to the corresponding square in the row above by working sc into the new motif and sl st into the motif already attached, placing ch-2 spaces at corners to keep small decorative gaps. Repeat for all three motifs in the row so the new row is attached across the top.
Info :
Keep track of which motif you are joining to (left/center/right column). Staggering alignment slightly can help produce the lattice diamond shown in the image — the center column squares appear slightly inset visually, so maintain equal spacing and measure between centers as you pin motifs.
Row Join Step 2 :
Repeat adding rows until you reach the number of rows needed. The pictured runner has 11 rows; join rows 2 through 11 in the same way. Each added row requires a repeat of the vertical and horizontal join sequences described above. Block each completed strip if you notice any waviness.
Info :
When your runner is fully joined into a single piece, check for any gaps or twisted motifs and adjust before moving to the border. If seams look uneven, use a few hidden whip stitches to even tension.
— Decorative Scalloped Border (Worked in deep green):
Border Round 1 :
With green yarn, join at any corner with a sl st into the outermost stitch of a corner. ch1; work around the entire runner with 1 sc in each stitch space along the sides, and work (sc, ch3, sc) into each corner to keep corners flexible. Follow edges carefully and keep stitch count consistent along each side. Join with sl st. (This round evens out the edges and prepares for lace rounds.)
Info :
Count your stitches on the long side and short side after this round; both long sides should have equal stitch counts. If you need to adjust, add or skip a few sc evenly across the side to make the final scallop spacing even.
Border Round 2 :
Ch3 (counts as dc), *skip next stitch, (5 dc) in next st, skip next stitch, dc in next st; rep around to create shell clusters. At corners work (dc, ch3, dc) into corner ch-3 space. Join with sl st. (This round creates shell groups spaced evenly around the perimeter.)
Info :
If shell spacing looks crowded at the ends of rows due to motif join points, adjust by using (3 dc) shells in tighter spots so shells maintain an even rhythm around the runner.
Border Round 3 :
Work a tidy single crochet round in BLO to create a defined edge: *sc in each dc and sc around, placing 2 sc in the center stitch of each shell for reinforcement. Join with sl st. (This creates a uniform foundation for the final scallops.)
Info :
Working in BLO for this round adds a subtle ridge that separates the shell row from the scallop finishing round, giving the border more definition like in the photo.
Border Round 4 :
Final scallop: *Ch1, skip 1 st, (sc, hdc, 3 dc, hdc, sc) all into next stitch (make a full scallop), skip 1 st; rep around. At corners work a slightly larger scallop by working (sc, hdc, 5 dc, hdc, sc) into the corner ch-3 space. Join with sl st and fasten off. Weave in ends neatly. (You will have a series of rounded scallops framing the runner.)
Info :
Block the runner flat with pins spaced along the scalloped edge to encourage smooth, even scallops. Spritz lightly with water or use steam-blocking appropriate for your yarn fiber.
— Corner Tassels & Jingle Bell Attachments :
Corner Step 1 :
Cut two 12 cm lengths of narrow red ribbon for each corner. Tie the ribbon through the outermost scallop at the corner and secure with a stitched knot. Thread a small jingle bell onto the ribbon or tie to the ribbon end before knotting.
Info :
Attach bells after blocking to ensure scallops are positioned correctly. Trim ribbon tails to desired length and secure knots with a small drop of fabric glue if desired (optional).
Corner Step 2 :
Stitch the ribbon knot into place with a few small stitches into the scallop back using matching green thread to ensure the bell does not pull free in use. Hide ends by weaving into the final scallop round.
Info :
Test the bells for secure attachment by tugging lightly; reinforce with extra stitches if needed. The bells are decorative and should be firmly attached if the runner will be moved frequently.
— Finishing & Blocking :
Info :
Weave in all ends on the wrong side using a tapestry needle. Use blocking pins to pin the runner square and straight, paying attention to even scallops. Lightly mist with water; allow to dry completely before removing pins. This final step evens stitches and helps motifs sit flat for a polished finish.
Info :
Trim any visible yarn tails close to the fabric after weaving them in. If you carried any yarn inside motifs, carefully trim leftover floats but do not cut too close to secure join points.
— Optional Variations & Additional Decorative Rounds :
Info :
Variation A: Add an extra contrasting round (white or green) around every motif before joining to create a thicker border between squares. Variation B: Replace scalloped edge with a picot edging for a more delicate finish: *sc, ch3, sl st into first ch to form picot* repeat around. Variation C: Add tiny seed beads into the centers of puff petals by sewing them on with matching thread for sparkle.
Info :
Measure your table before deciding final runner length. The pictured runner is intended for a slim table runner placement; to convert to a table center panel just increase column count and adjust border accordingly.
This festive granny square table runner blends traditional colorwork with delicate lace-like joins to create a stunning holiday accent. Each floral motif and scalloped edge adds a handcrafted charm that brightens any table. The modular motif construction makes length adjustments simple — a perfect gift or seasonal home addition. 🎁🧶 Enjoy every stitch and celebrate the details when you finish and display your runner! 🎄