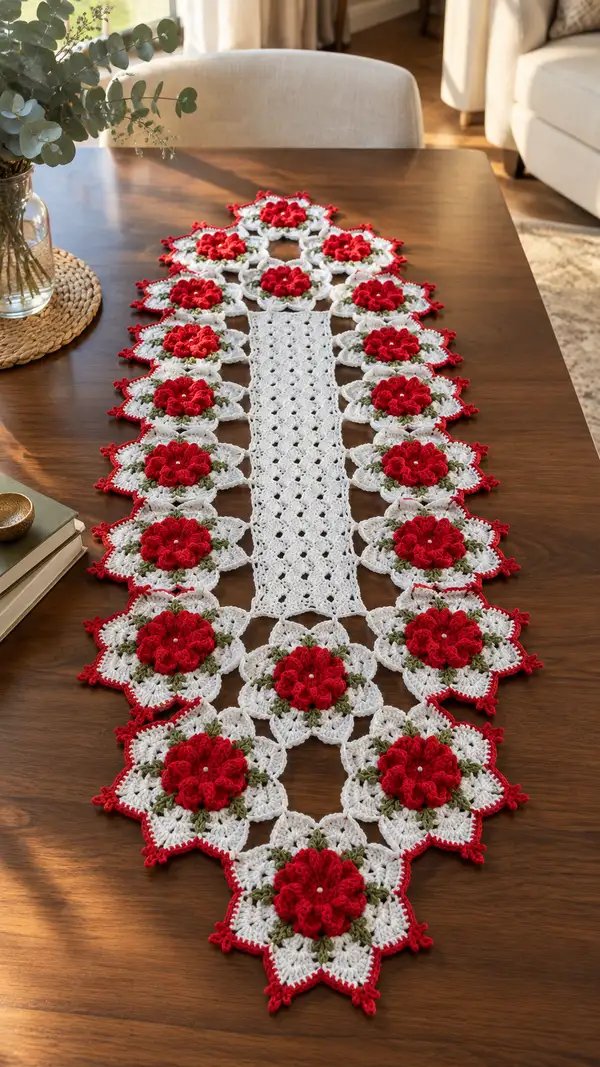
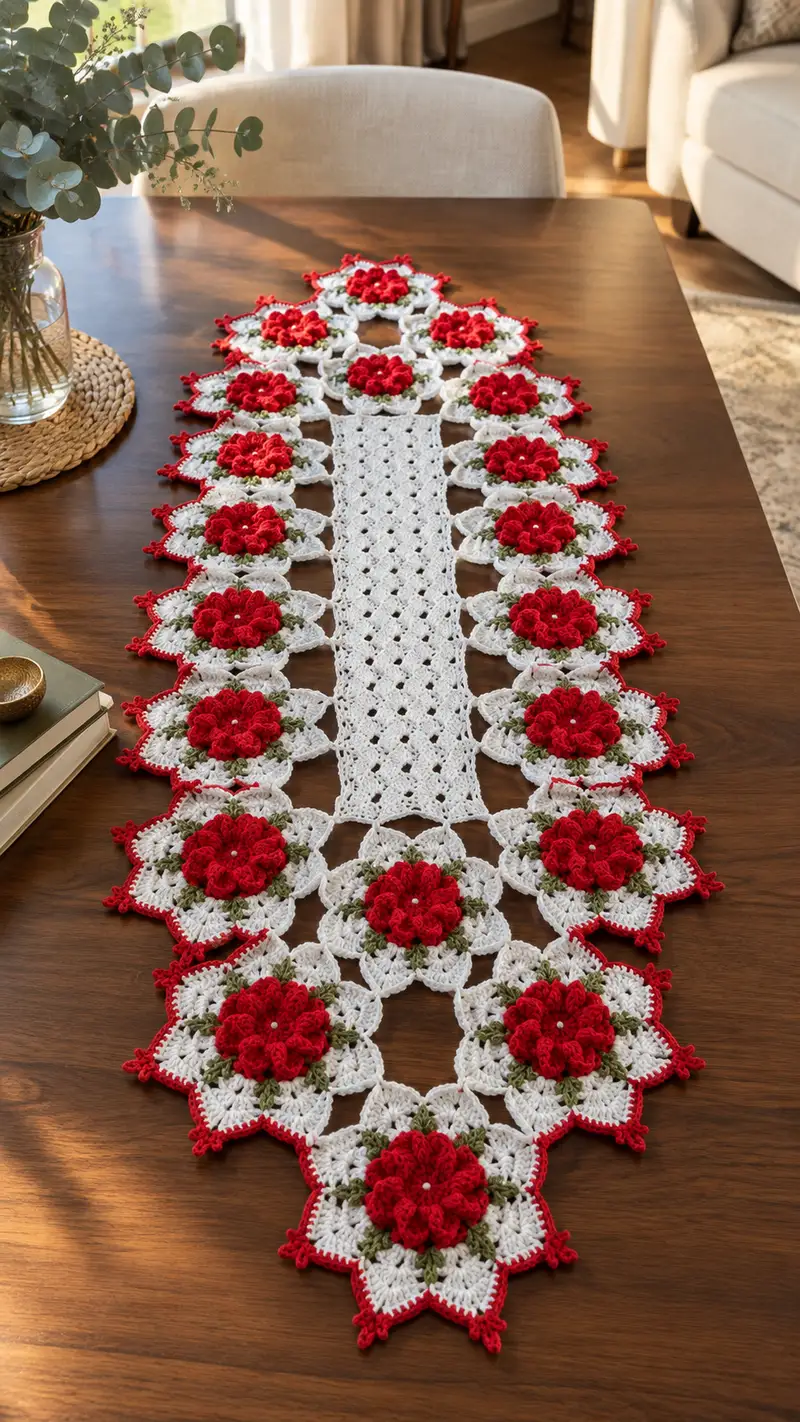
Create a stunning holiday-inspired table runner featuring 3D red rosettes, green leaf clusters and a lacy white connecting panel. This elegant runner combines textured puff petals with delicate shell motifs to form an elongated, scalloped design that dresses any table. The pattern uses repeated motifs joined to a central rectangular panel and finished with a crisp red picot edge. Clear round-by-round instructions make it easy to follow and customize to your table size.
Progress Tracker
0% Complete
— Notes and Gauge :
Info :
Gauge is not critical for this decorative runner, but for proportion replicate motif size. With worsted weight yarn and 4.0 mm hook, each finished rosette motif (point-to-point across the white scalloped edges) measures approximately 10 cm (4") across. Adjust hook size one step up or down to widen or narrow motifs slightly. Work loosely enough for a delicate lacy look but tightly enough to maintain defined puff petals. Block motifs flat before joining for best alignment.
Info :
Abbreviations used: mr, ch, sl st, sc, hdc, dc, tr, puff, BLO, FLO, picot. Puff stitch used here is a 4-loop puff unless otherwise noted: yarn over, insert hook, yarn over pull up (repeat 3 more times to make 4 loops on hook), yarn over and pull through all loops, ch 1 to close puff. Keep counts accurate for symmetry.
— Rosette Motif (Make 24 identical motifs) :
Round 1 :
With red yarn, mr, ch1, 8 sc into mr. Pull ring closed and sl st to first sc to join. (8)
Round 2 :
Ch2 (does not count as st), *inc in next st* around. 8 inc (16)
Round 3 :
(1 sc, inc) x 8. This builds a slightly raised center for petals. (24)
Round 4 :
(2 sc, inc) x 8. Keep stitches even and check counts. (32)
Info :
This inner build creates a firm base so the puff petals sit proud of the motif. Keep tension steady; red puff round will be worked into chain spaces created in the next round.
Round 5 :
*3 sc, ch3, skip 1* around to create 8 ch3 loops for petals. Work exactly 3 sc in each repeat so you have 8 ch3 spaces. (32 sc, 8 ch-spaces)
Info :
Count the ch3 loops; you should have exactly eight. These loops will each hold the puff-petal cluster. Place a stitch marker at the first ch3 space for reference.
Round 6 :
Change to red if you carried a different color. Into the first ch3 loop: join yarn with sl st, ch1, (4-loop puff, ch1) repeat 7 more times into same loop so that the loop holds 8 miniature puffs tightly packed to create the central rose bud. Finish with sl st into base. Note: each mini puff formed as written in abbreviations; the ch1 between puffs keeps them separate. When complete, each ch3 loop will contain a cluster of 6-8 small puffs depending on look desired. Repeat into all 8 loops. (8 petal clusters)
Info :
For consistent petals, maintain uniform height of the puff loops and use the same number of yarn-overs and pull-ups per puff. Pull each puff snug but not tight so petals remain rounded.
Round 7 :
Once all puff clusters are made, sl st to join the last cluster to the start. Secure and fasten off the red if you plan to change color for the leaf round. Weave ends into the back of the petals. (8 group joins)
Info :
Optional: Sew a single small pearl or seed bead to the center of the rosette using a beading needle for a classic finished look. Attach after joining motifs so bead sits in center flatly.
Round 8 :
Join green yarn in the space between two puff clusters, ch1, sc around the base of the puffs working across the top of the preceding sc rounds to secure petals. Work exactly 32 sc evenly around so the rosette becomes a tidy round motif again. (32)
Round 9 :
*Ch3, skip 3 sc, 3 dc in next sc, ch3, sl st in next sc* repeat 8 times to form leaf-point arches around the red rose. This places eight small leaf-shaped shell spaces. (8 shell spaces)
Info :
These leaf arches are a foundation for the olive-green cluster shaping. Adjust ch counts to open or close the arch height for your preferred look.
Round 10 :
Into each arch: join green, ch2, (hdc, 2 dc, hdc) in the center of the arch to form a compact leaf cluster. Finish with sl st to anchor. Repeat in each of the 8 arches. (8 leaf clusters)
Round 11 :
Join white yarn at base of any leaf cluster with sl st, ch3 (counts as first dc), *ch2, skip to next arch, dc cluster (dc, ch2, dc) in center of next arch* repeat to make 8 dc clusters, creating the start of the white scalloped frame. Join with sl st to the top of starting ch3. (8 shell points)
Round 12 :
Working in white, *(ch3, 2 dc, ch3, sl st into next ch2 space of previous round)* around to form crisp points. This round turns the motif into a star-like shape with eight points. Keep clusters even to avoid point mismatch. (8 points)
Info :
Check that your star points are evenly spaced and of similar height. Blocking this round after finishing the motif helps the points lay flat and match neighboring motifs.
Round 13 :
*(Ch4, sl st into base between points), sc in next dc space, ch4, sl st into base between points* repeat to create chain loops that will be used for joining motifs. Maintain 8 chain loops. Fasten off and weave in ends. (8 chain joins)
Info :
Make 24 identical rosette motifs. Block them lightly so the points and join loops are uniform in size. Number your motifs lightly with a removable marker if you plan a specific placement for the points or beads.
— Center Rectangular Panel (one long panel) :
Info :
The center panel is worked back-and-forth in rows to create an open, lacy mesh that complements the motifs. The length of the panel will match the number of rosettes placed on each side; for this runner make the foundation chain length equal to motif-to-motif spacing plus edge allowances. For the sample runner, the panel is 40 cm wide and 110 cm long; use a foundation chain of 110 ch + 3 for turning (approximate—adjust to match your motif join layout).
Row 1 :
With white, ch111 (or adjust to fit your desired length) + 3, dc in 4th ch from hook and in each ch across. Turn. (111 dc)
Row 2 :
Ch3 (counts as dc), *ch1, skip 1, dc in next dc* across to create a simple mesh. Turn. (approx 74 dc and ch1 spaces depending on foundation)
Row 3 :
Ch3, dc in each ch1 space across, dc in top of turning ch. Turn. This converts the mesh to solid row. Repeat Rows 2-3 alternately to build a diamond-like lattice texture.
Info :
Alternate Row 2 and Row 3 for the next 38 rows to create a slightly textured openwork. Keep turning chains consistent (ch3) to maintain even edges. The sample uses 40 rows total for the center panel to reach runner length; adjust by adding or subtracting pairs of rows.
Row 4-40 :
Repeat Rows 2-3 twenty times (or until desired length is reached) maintaining edges with dc in turning ch. At the final row, fasten off leaving a long tail for joining to motifs. Block panel flat and measure to ensure the panel edge spacing matches the motif join points.
Info :
If you choose to make the panel narrower or wider, add or subtract multiples of 2 chains in the foundation. Keep the stitch pattern consistent so edges remain straight for joining motifs.
— Joining Motifs to Panel (Assemble long runner) :
Info :
Plan layout before joining: place motifs along both long edges of the center panel with points facing outward so the scalloped edge frames the runner. For the sample, place 12 motifs on each long edge with two motifs joined at each narrow end to form scalloped points. Use pins to position motifs first, aligning chain join loops to selected panel dc spaces.
Round 1 :
With white, position a rosette along the panel edge so that four of its chain join loops align with the panel dc across a 4-dc repeat. Using a yarn needle or hook, whip stitch or sl st through chain join loops and corresponding panel dc to attach. Use evenly spaced stitches so the motif sits flat. Repeat for all motifs along one side.
Round 2 :
After attaching motifs to one side, attach motifs to opposite side of panel following the same spacing so motifs mirror each other. Use the same method to keep tension consistent and ensure the panel remains flat and not pulled in.
Info :
Where two motifs meet at the narrow ends of the runner, overlap the chain loops slightly and sew both motifs to each other and to the panel so they create a single pointed scalloped end. Use additional slip-stitches across the join to stabilize seams.
Round 3 :
Once all motifs are bashed to the panel but not fully secured, check alignment and block again gently while pinned to hold shape. Then go back and reinforce each join with an additional round of small slip stitches around the chain loop and the panel dc on the right-side for a tidy finish.
Info :
For stronger joins, crochet through both motif and panel with single crochet stitches instead of slip stitch, taking care to keep stitch tension identical to surrounding fabric so the runner lays flat.
— Small Inter-Motif Connectors (Optional for extra stability) :
Round 1 :
With white, join yarn to a small ch-loop between two neighboring motifs, ch6, sl st to corresponding loop on adjacent motif creating a small bridge. Repeat where motifs meet across open spaces to create a strong latticework. Bridges help keep motifs aligned and prevent sagging in the joins. (bridges as needed)
Info :
Work these connectors sparingly — only where large open spaces are visible when runner is laid flat. The goal is to preserve delicate openness while improving stability. You may add connectors across the narrow interior gaps toward the center panel for added support.
— Outer Red Picot Edging and Finishing (Edge all around motifs) :
Round 1 :
With red yarn, join at any outer point on a motif. Work *sc evenly across outer shell points and across small joins; at the tip of each point work (sc, picot, sc)*. Continue around entire runner edge across all motifs and join points. Fasten off and weave ends. This creates a crisp red outline and little decorative picots at motif points.
Info :
When edging across the join areas between motifs, work into both motif and connector stitches to prevent flaring or gaps. Maintain consistent stitch height (sc) so the picot tips align neatly. Use a consistent number of sc between picots to keep spacing uniform.
Round 2 :
For a finished look on the interior seam where motifs meet the panel, work one more round of tiny sc in white over the seam area only (this hides any join stitches made earlier and keeps seam tidy). Alternatively, slip stitch in white for a nearly invisible finish. Weave in all loose ends on wrong side and trim.
Info :
Block the completed runner: pin runner flat to desired shape (gently stretching points to create scalloped edges). Mist with water or use steam (if using acrylic, do not overheat) and allow to dry completely. Blocking ensures all motifs and the panel align flatly and the runner looks professional.
— Optional Decorative Embellishments :
Info :
Sew a small pearl bead to the center of each red rosette after blocking for a classic look. Use a beading needle and short tail of thread, knot securely on the back and melt or hide thread end into weave. Alternatively, embroider small French knots in white for the rosette centers.
Info :
For seasonal variations, switch red to burgundy or pink, and green to sage or mint. Replace pearl centers with tiny gold beads for festive sparkle. To lengthen runner, make additional motifs and extend center panel length accordingly.
— Troubleshooting and Tips (throughout) :
Info :
If a motif edge dips or points do not align when pinned, remove a few join stitches and re-pin before re-securing. Always check both sides of the runner on a flat surface to ensure symmetry. If the runner curves, identify the curve location and remove tension from joins near that area and rejoin more loosely.
Info :
Keep a small jar with all the spare motifs and a swatch to test color joins and picot size before finishing the whole runner. This avoids mismatched edges that are hard to fix after final assembly.
This festive rosette table runner comes together like a series of little handmade jewels, each rosette adding depth and charm to the finished piece. With thoughtful blocking and careful joining, it becomes a striking center for any table and a treasured seasonal accent. The step-by-step motif construction lets you work in small sections, perfect for savoring each stage. I hope this project brings you joy while you stitch and becomes a cherished piece in your home! 🧶🌺