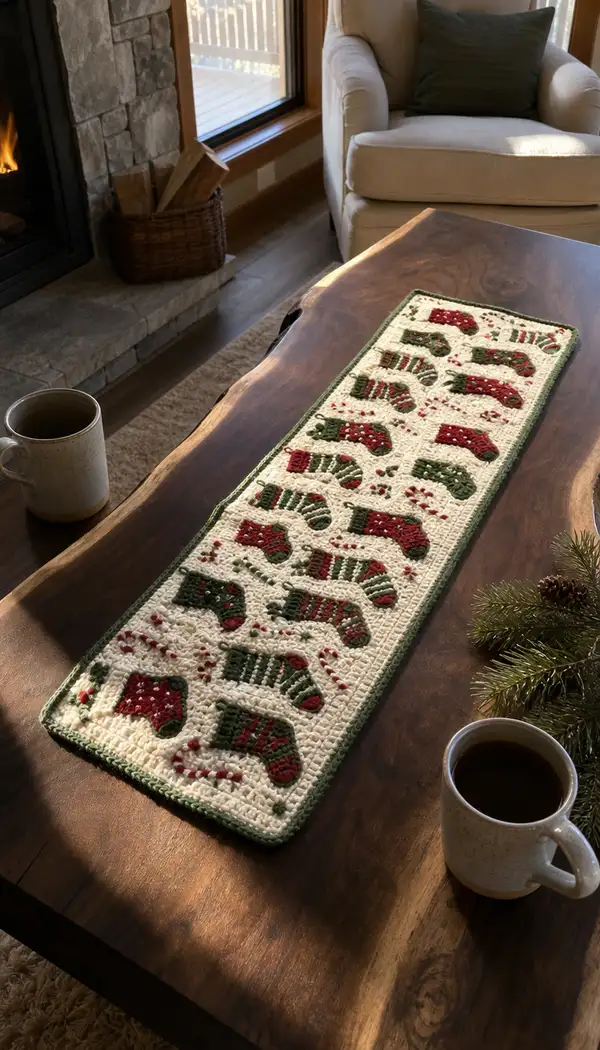
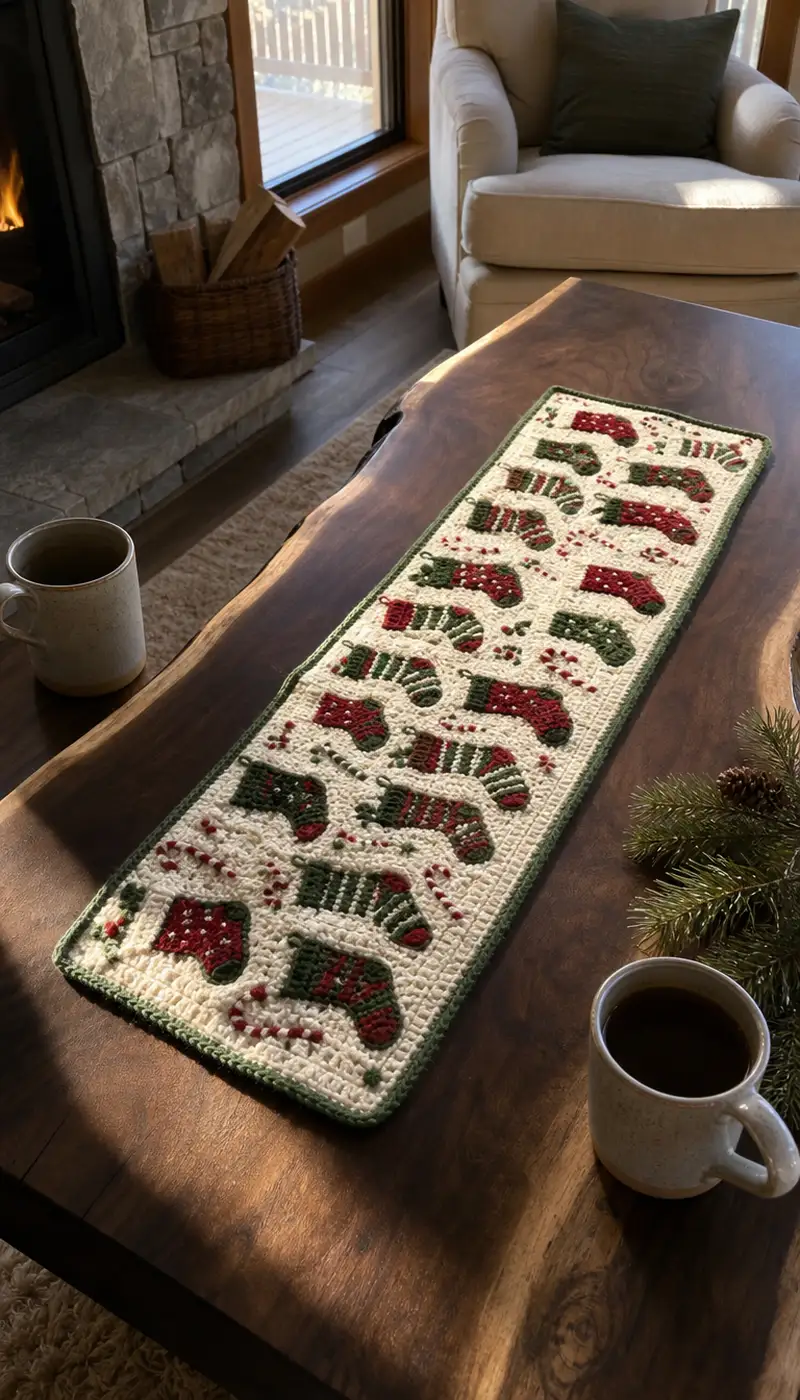
Create a long, cozy Christmas table runner covered in cute red and green stockings on a warm cream background. This pattern uses tapestry single crochet rows (or worked as intarsia appliqued motifs) to build repeated stocking motifs with scattered holly berries and a soft green border. The finished runner is long and narrow — perfect for a coffee table, sideboard, or mantel display — and features tidy color changes and a plush textured surface.
Progress Tracker
0% Complete
— Notes & Gauge :
Info :
This pattern is worked in tapestry single crochet (sc) in rows with color changes. The runner shown measures approximately 36" long x 8.5" wide using worsted weight yarn and a 3.5mm hook. Gauge: 16 sc and 18 rows = 4" in tapestry single crochet; adjust hook size if necessary.
Info :
We recommend working tightly for tapestry so that floats do not show through and the fabric remains sturdy. Use removable stitch markers at row starts if you prefer to keep track of repeats.
— Foundation :
Round 1 :
Ch 57 (this creates 56 foundation stitches across — width = 56 sc)
Round 2 :
Row 1 (RS): 1 sc in 2nd ch from hook and in each ch across. Turn. (56)
Info :
Count your stitches carefully — every row in this runner is 56 sc. If your gauge differs, adjust starting chain in multiples of 8 to maintain motif block width.
— Base Background Rows :
Round 3-6 :
Row 2-5: Ch 1, 1 sc in each st across. Turn. (56)
Info :
These first rows create a solid cream background to anchor the motifs. Keep tension even and carry color neatly behind when preparing to start motifs.
— Motif Set A (Stockings Row Block 1 - Rows 7-28) :
Info :
Each motif block is 8 stitches wide. There are 7 blocks across the row (7 x 8 = 56). In the following rows, sequences are given as 7 repeated blocks; each block's color counts are written as totals that add to 8.
Round 7 :
Row 6: Ch 1, *(8 sc Cream) x7*. Turn. (56)
Round 8 :
Row 7: Ch 1, *(2 sc Cream, 6 sc Red) x7*. Turn. (56)
Round 9 :
Row 8: Ch 1, *(2 sc Cream, 3 sc Red, 3 sc Green) x7*. Turn. (56)
Round 10 :
Row 9: Ch 1, *(2 sc Cream, 1 sc Red, 1 sc Cream, 4 sc Green) x7*. Turn. (56)
Info :
When changing color within a stitch, complete the last yarn over of the previous color with the new color so the change sits neat at the front (tapestry change method). Carry the unused colors behind, catching them every 6-8 stitches if not changing for many stitches.
Round 11 :
Row 10: Ch 1, *(4 sc Cream, 4 sc Green) x7*. Turn. (56)
Round 12 :
Row 11: Ch 1, *(3 sc Cream, 5 sc Red) x7*. Turn. (56)
Round 13 :
Row 12: Ch 1, *(4 sc Cream, 1 sc Red, 3 sc Green) x7*. Turn. (56)
Round 14 :
Row 13: Ch 1, *(5 sc Cream, 3 sc Green) x7*. Turn. (56)
Info :
Place small stitch markers at the boundary between blocks if you want to ensure the motifs remain aligned across the row. That boundary is every 8 stitches.
Round 15 :
Row 14: Ch 1, *(2 sc Cream, 6 sc Red) x7*. Turn. (56)
Round 16 :
Row 15: Ch 1, *(1 sc Cream, 2 sc Red, 5 sc Green) x7*. Turn. (56)
Round 17 :
Row 16: Ch 1, *(3 sc Cream, 2 sc Red, 3 sc Green) x7*. Turn. (56)
Round 18 :
Row 17: Ch 1, *(8 sc Cream) x7*. Turn. (56)
Info :
This block of rows builds the first set of stocking shapes with colorwork that suggests a sock with cuff and toe. The exact colors and placement within the 8-st blocks are simple enough to follow visually—if preferred, substitute Green and Red placements to suit your decorative preference.
Round 19 :
Row 18: Ch 1, *(6 sc Cream, 2 sc Olive) x7*. Turn. (56)
Round 20 :
Row 19: Ch 1, *(6 sc Cream, 2 sc Brown) x7*. Turn. (56)
Round 21 :
Row 20: Ch 1, *(8 sc Cream) x7*. Turn. (56)
Round 22 :
Row 21: Ch 1, *(2 sc Cream, 2 sc Red, 2 sc Cream, 2 sc Green) x7*. Turn. (56)
Info :
Rows 19-22 add small cuff and heel detail colors so that the stocking motif reads more clearly. If you prefer a subtler cuff, use two cream stitches instead of olive or brown at the block edges.
Round 23 :
Row 22: Ch 1, *(8 sc Cream) x7*. Turn. (56)
Round 24 :
Row 23: Ch 1, *(4 sc Cream, 4 sc Red) x7*. Turn. (56)
Round 25 :
Row 24: Ch 1, *(8 sc Cream) x7*. Turn. (56)
Round 26 :
Row 25: Ch 1, *(2 sc Cream, 1 sc Red, 1 sc Cream, 4 sc Green) x7*. Turn. (56)
Info :
If you prefer to avoid carrying three yarns across many stitches, option A is to work each stocking motif as a small applique (see 'Optional Applique Method' section). Option B is to use bobbins or small wraps of each color for manageable floats.
Round 27 :
Row 26: Ch 1, *(5 sc Cream, 3 sc Green) x7*. Turn. (56)
Round 28 :
Row 27: Ch 1, *(3 sc Cream, 5 sc Red) x7*. Turn. (56)
Round 29 :
Row 28: Ch 1, *(8 sc Cream) x7*. Turn. (56)
Info :
At the end of Row 28 you have completed one vertical repeat of motifs. The next rows will add a staggered row of stockings so the pattern reads as alternating columns along the runner.
— Spacer Rows & Holly Berry Accent Rows :
Round 30 :
Row 29: Ch 1, 1 sc in each st across (56). Turn.
Round 31 :
Row 30: Ch 1, *(7 sc Cream, 1 sc Olive) x7*. Turn. (56)
Round 32 :
Row 31: Ch 1, 1 sc in each st across (56). Turn.
Info :
These spacer rows create breathing room between motif bands and are ideal places to embroider small holly berries later with surface slip stitch or French knots in yarn.
— Motif Set B (Staggered Stockings Block 2 - Rows 33-54) :
Round 33 :
Row 32: Ch 1, *Start block offset by 4 sts: (4 sc Cream, 4 sc Red, 8 sc Cream) repeated across to create staggered effect*. Because we are still at 56 sts, pattern is: (4 Cream, 4 Red) x6 then 8 Cream to finish. Turn. (56)
Info :
Offsetting by 4 stitches creates an interleaving of stockings so they do not stack directly above each other. Pay attention to the block break at the end of the row — use a temporary marker to note the dividing point for the repeat.
Round 34 :
Row 33: Ch 1, *(4 sc Cream, 2 sc Red, 2 sc Green) x7*. Turn. (56)
Round 35 :
Row 34: Ch 1, *(2 sc Cream, 2 sc Green, 4 sc Cream) x7*. Turn. (56)
Round 36 :
Row 35: Ch 1, *(2 sc Cream, 6 sc Red) x7*. Turn. (56)
Round 37 :
Row 36: Ch 1, *(8 sc Cream) x7*. Turn. (56)
Info :
Rows 33-36 are the main shaping rows for the staggered stockings. If you are working with multiple small bobbins, keep the floats tidy and catch the unused yarn occasionally to prevent long floats behind the piece.
Round 38 :
Row 37: Ch 1, *(3 sc Cream, 5 sc Green) x7*. Turn. (56)
Round 39 :
Row 38: Ch 1, *(1 sc Cream, 2 sc Brown, 5 sc Cream) x7*. Turn. (56)
Round 40 :
Row 39: Ch 1, *(8 sc Cream) x7*. Turn. (56)
Round 41 :
Row 40: Ch 1, *(2 sc Cream, 4 sc Red, 2 sc Cream) x7*. Turn. (56)
Info :
After Row 40 the staggered row of stockings is well established. Check that the motifs read clearly from a distance — small tweaks to color counts per block (±1 stitch) can be made to enhance the visual silhouette if needed.
Round 42 :
Row 41: Ch 1, *(8 sc Cream) x7*. Turn. (56)
Round 43 :
Row 42: Ch 1, *(2 sc Cream, 6 sc Red) x7*. Turn. (56)
Round 44 :
Row 43: Ch 1, *(5 sc Cream, 3 sc Olive) x7*. Turn. (56)
Round 45 :
Row 44: Ch 1, *(8 sc Cream) x7*. Turn. (56)
Info :
Repeat Motif Set A and Set B alternately down the runner until the piece reaches desired length. The runner in the image uses three repeats of this motif pair plus spacer rows before the border. Continue the pattern sequence to Row 54 to complete the second vertical repeat.
Round 46 :
Row 45: Ch 1, *(4 sc Cream, 4 sc Green) x7*. Turn. (56)
Round 47 :
Row 46: Ch 1, *(8 sc Cream) x7*. Turn. (56)
Round 48 :
Row 47: Ch 1, *(2 sc Cream, 3 sc Red, 3 sc Cream) x7*. Turn. (56)
Round 49 :
Row 48: Ch 1, *(3 sc Cream, 5 sc Green) x7*. Turn. (56)
Round 50 :
Row 49: Ch 1, *(8 sc Cream) x7*. Turn. (56)
Round 51 :
Row 50: Ch 1, 1 sc in each st across (56). Turn.
Round 52 :
Row 51: Ch 1, *(7 sc Cream, 1 sc Olive) x7*. Turn. (56)
Round 53 :
Row 52: Ch 1, 1 sc in each st across (56). Turn.
Round 54 :
Row 53: Ch 1, *(8 sc Cream) x7*. Turn. (56)
Info :
At this point you will have finished approximately two vertical motif repeats. Measure the runner's length and repeat motif blocks as needed — the instructions above define a single motif repeat that occupies ~28 rows; repeating it will add length in equal sections.
— Continuing the Runner (Repeat Pattern) :
Round 55-82 :
Rows 54-81: Repeat Rows 7-54 in order to extend the runner to desired length. Maintain the same color sequences for motifs to keep the pattern consistent. Each full repeat (Rows 7-54) is 48 rows tall; repeat the set once or twice depending on final length desired.
Info :
Work slowly on long projects and make time to weave in ends from every color change after each motif repeat to prevent an overwhelming finishing job at the end.
— Optional: Make Stocking Appliques Instead of Full Tapestry :
Info :
If color carrying is challenging, crochet the runner fully in Cream, then make small 8x10 stitch stocking motifs separately and sew them onto the background. This reduces floats and permits cleaner color blocks.
Round 83 :
Applique Row 1: Make a small rectangle in Red or Green for stocking base: ch 9, join with sl st to form short row and sc across both sides to make 4 rows high (approximately 8 sc x 4 rows). Fasten off leaving long tail for sewing.
Round 84 :
Applique Row 2: With Olive, sc 8 sts across one short side to create cuff, then sew applique onto cream panel using mattress stitch positioning it in the center of a chosen 8-st block.
Info :
Sew appliques in staggered rows to match the runner layout; pin them in place first and check spacing before sewing. Use a blunt tapestry needle and matching yarn for neat invisible seams.
— Embroidery & Surface Detail :
Round 85 :
Embroider small holly berries: Use red yarn and a tapestry needle to make French-knot style stitches (or small satin stitches) in groups of three around the stockings. Space them evenly in the cream spacer areas. Work gently to avoid stretching the fabric.
Round 86 :
Surface slip stitch vine: With dark green yarn and your hook, work a surface slip-stitch (insert hook from front to back and pull up loop, then sl st along the surface) to create tiny holly leaf shapes and vine accents where desired.
Info :
Small surface slip-stitches and bitty embroidered knots add a hand-finished charm and help break up large cream expanses. Keep embellishments light to maintain the runner's flat profile.
— Border (Worked After Panel Complete) :
Round 87 :
Join olive green yarn at any corner with sl st. Round 1: Ch 1, work 1 sc evenly around working 2 sc in the 3 corner stitches (first and last st of the side) to round corners. Work 1 sc in each st along edges. Join with sl st to first sc. (Approx total depends on panel perimeter — maintain even spacing so the border lies flat.)
Round 88 :
Round 2: Ch 1, work 1 sc in each st around, placing (2 sc) in each corner stitch to keep corners rounded. Join with sl st. Fasten off and weave ends. (Panel will have a neat olive edge.)
Round 89 :
Round 3 — Optional Puff Edge: With same green, join and work 1 row of sc, then a row of (1 sc, 1 puff, 1 sc) every 6 stitches for a slightly decorative edge. Puff = yo 4 times, insert hook, pull through loops, yo and pull through all loops. Secure each puff with a sl st behind if desired.
Info :
If you prefer a double border, work a contrasting single crochet row in cream, then finish with olive for a framed look. Blocking the runner flat before adding the border helps keep edges tidy.
— Finishing Touches :
Round 90 :
Weave in all ends using a yarn needle. Trim any excess, and if desired, block the runner to flatten slightly (pin to shape on blocking mat and spritz lightly, let dry).
Round 91 :
Final check: Inspect the wrong side and anchor any long floats with tiny whip stitches to prevent shifting with use and washing. If appliques were used, sew each double and hide tails inside with a few additional stitches.
Info :
For machine washing, place runner in a delicates bag and use cool water cycle. Hand washing in cool water and drying flat will preserve color saturation and fabric stability longer.
This festive stocking table runner brings joyful holiday cheer to any surface with charming repeated stockings and tiny holly accents. The sturdy tapestry crochet fabric keeps the runner flat and tabletop-friendly while the olive border provides a polished finish. Whether used as a centerpiece on your coffee table or layered on a dining table, this runner is a cozy handmade accent worth celebrating. 🧶🎄 Enjoy every stitch and share your holiday-ready creation with friends and family! ✨