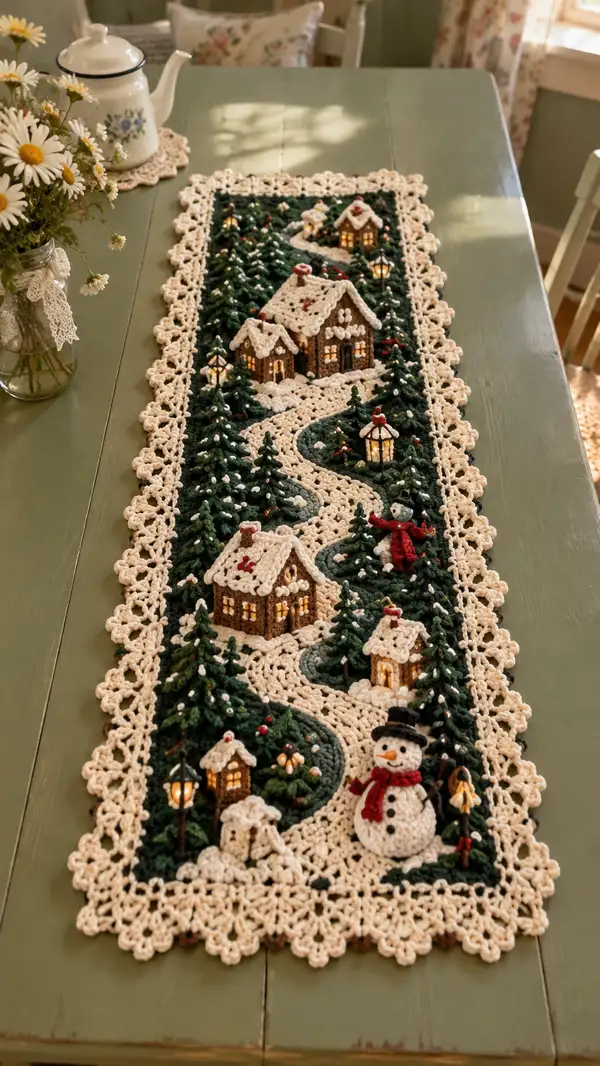
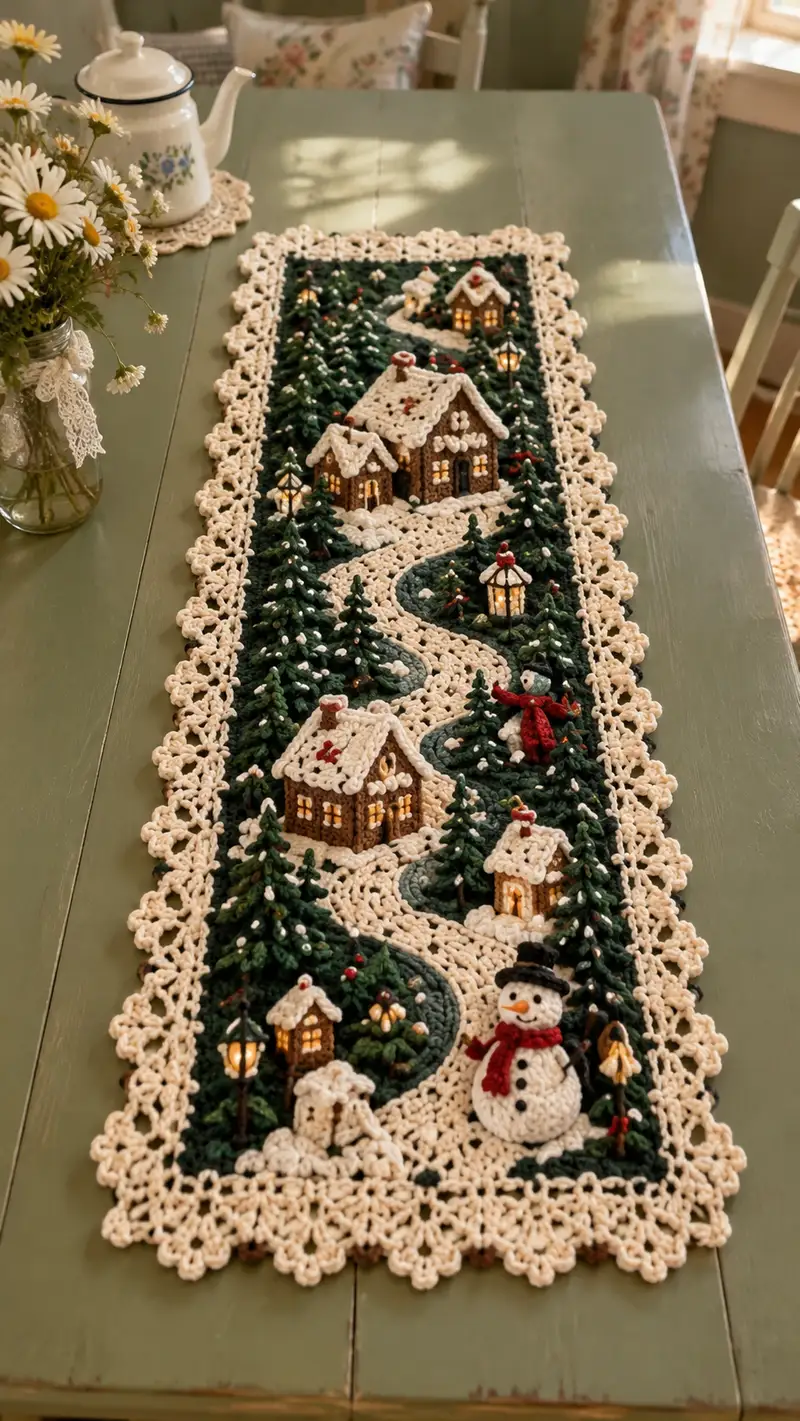
Create a charming winter village table runner featuring forest-green terrain, cream snowy paths and scalloped edging. This richly textured runner showcases 3D cottages, snowy pines, a friendly snowman, glowing lamp posts and a winding cream path — all worked as appliqued motifs and assembled onto a worked background. Perfect for holiday displays or a cozy winter centerpiece.
Progress Tracker
0% Complete
— Background Panel (worked flat in rows) :
Round 1 :
Ch 88. Row 1: Starting in 2nd ch from hook, 1 sc in each ch across. (87 sc)
Round 2 :
Ch 1, turn. 1 sc in each st across. (87 sc)
Round 3 :
Repeat Row 2. (87 sc)
Round 4-6 :
Ch 1, turn. 1 sc in each stitch across for 3 rows total to build a solid base fabric. (87 sc)
Info :
Work these first rows in forest green. Keep tension slightly tighter than your usual gauge so background supports appliques without sagging.
Round 7-12 :
Continue in sc across for 6 more rows (87 sc). At the end of row 12 your panel height will be approximately 3.75-4 inches for worsted yarn using the specified hook.
Info :
If you prefer a wider runner, add chains in multiples of 2 plus 1 (for turning) to the foundation chain. Rows are counted as rounds here to standardize the pattern language across motif sections.
Round 13-20 :
Continue working 1 sc in each st for 8 rows to reach a long flat canvas. (87 sc)
Info :
At the end of row 20, mark the center of the long edge with a removable stitch marker. This helps position the winding path and central village cluster later.
Round 21-30 :
Work 10 more rows in sc to build the base panel depth. (87 sc)
Info :
Block this panel to measurements: approximately 36" long and 9" wide (adjusted by foundation). Blocking evens the stitches and will make attaching 3D appliques easier. Keep the panel flat and lightly sprayed, pin to shape and allow to dry.
Round 31-40 :
Finish the base with 10 final rows in contrasting technique: Row 31 ch1 turn, 1 sc BLO across (87 sc). Rows 32-40: 1 sc in each st (87 sc). The BLO row creates a subtle ridge defining the snow edge where appliques will meet.
Info :
Set the panel aside after blocking. The appliques are sewn on top of this panel; make sure the panel is completely dry before assembly. Keep the RS facing up for positioning.
— Cream Path Applique (work 1 long winding path in sections) :
Round 1 :
Using cream, mr, 6 sc into ring. (6)
Round 2 :
Inc in each st around. (12)
Round 3 :
(1 sc, inc) x6. (18)
Round 4 :
(2 sc, inc) x6. (24)
Round 5 :
(3 sc, inc) x6. (30)
Info :
Create a slightly flattened oval by working these increases; the path sections will be joined to form a winding route. Make multiple segments if needed to shape the curves.
Round 6 :
1 sc in each st around. (30)
Round 7 :
1 sc in next 6 sts, hdc in next 10 sts, 1 sc in remaining 14 sts. (30)
Round 8-12 :
Work 5 rounds of 1 sc around to build thickness. (30)
Info :
Make several of these oval path segments, alternating orientation, then whipstitch them together using invisible seam to create the continuous winding path. Alignment tip: place segments on blocked panel and pin before sewing; leave a small gap for snow drifts where cottages will sit.
Round 13 :
After joining segments, work a round of sc around the joined seam to create a neat edge: join yarn and 1 sc in each st around the full joined path (count varies; approx 180-220 sts depending on length).
Info :
Place the path on the panel using pins — it should begin at the bottom center of the runner and wind toward the top, leaving space for cottage clusters and trees. Use a light dab of washable fabric glue to tack segments in place before sewing if desired.
— Large Cottage (Make 2 different sizes; here is the large house) :
Round 1 :
Using warm brown, mr, 6 sc into ring. (6)
Round 2 :
Inc in each st around. (12)
Round 3 :
(1 sc, inc) x6. (18)
Round 4 :
(2 sc, inc) x6. (24)
Round 5 :
(3 sc, inc) x6. (30)
Info :
These early rounds form the base of the cottage floor. Work tightly so the base sits firm on the panel. Leave a long tail for sewing to the path area later.
Round 6 :
1 sc in each st around. (30)
Round 7 :
1 sc in each st around. (30)
Round 8 :
Work 1 sc in next 6 sts, ch3 (window arch placeholder) skip 3 sts, 1 sc across remaining sts. (remain 30, treat ch3 as decorative)
Round 9 :
Switch to a second color (slightly lighter brown or golden brown) for window surrounds. 1 sc in each st around, placing small gaps where windows should be (use ch2 spaces made in previous round). (30)
Info :
Embroider three or four window panes onto the cottage body after assembly using pale yellow to mimic glowing lights. Alternatively, leave window openings as ch spaces and insert small LED tea lights under the roof later.
Round 10-14 :
Continue 1 sc around for 5 rounds to build wall height. (30)
Round 15 :
Start forming the roof base: join cream yarn at one side, ch1, 1 sc BLO across one half of the house circumference (approx 15 sts) to create a ledge for roof attachment. (15 sc in BLO)
Round 16 :
Work in cream for roof: mr, 6 sc into ring. (6) Fasten off leaving a long tail for sewing. This will be used to create peak pieces to assemble a peaked roof.
Round 17 :
Make 6 roof triangles: each triangle: ch 2, row1: 3 sc in ch2 starting space; row2: ch1 turn, dec, 1 sc; row3: ch1 turn, dec (1 st). Fasten off. Join triangles along the ridge with whipstitch to form a peaked roof covering the BLO ledge made earlier.
Info :
Sew roof triangles so that they overlap slightly and create a scalloped snowy edge. Add a few picot stitches or small popcorns along the roof edge to represent piled snow.
Round 18 :
Use cream yarn to embroider snow drip: working from the roof edges, attach small clusters of 3 sc popcorns spaced evenly (make popcorn by 5 dc cluster then close). Place 6-8 popcorns around roof edge.
Round 19 :
Using pale yellow, embroider windows by sewing small rectangular patches (2 x 3 sc) on house walls or insert tiny fabric or felt behind ch openings. Fill with a little batting if using LEDs for depth.
Round 20 :
Make a small chimney: with brown, mr 6 sc, rounds 2-5: 1 sc in each st for 4 rounds (6). Fasten off leaving long tail and sew to roof top slightly off-center. Add cream top dab for snow using a few sl st and tiny pearl bead to finish.
Info :
Make two versions of this cottage: a full-size and a half-size by stopping wall height at round 11 for the smaller one and using fewer roof triangles. This produces varied scale in the scene.
— Small Cabin (Make 3-4 small cottages) :
Round 1 :
Using brown, mr, 6 sc. (6)
Round 2 :
Inc in each st. (12)
Round 3 :
(1 sc, inc) x6. (18)
Round 4-7 :
1 sc around for 4 rounds to build walls. (18)
Round 8 :
Change to cream for roof: attach cream at one side, ch1 join, 1 sc around half circumference in BLO (approx 9). (9)
Round 9-12 :
Create 3 roof triangles using the method described in the Large Cottage (smaller scale); sew together across the ledge. Add snow dots with cream single beads or tiny French knots using embroidery thread.
Info :
Embellish cabin windows with tiny yellow embroidery or felt inserts. Small cabins are intended to sit near path edges and under trees.
— Pine Tree (Make many: tall, medium, small) :
Round 1 :
With dark green, mr, 6 sc. (6)
Round 2 :
Inc each st. (12)
Round 3 :
(1 sc, inc) x6. (18)
Round 4 :
1 sc around. (18)
Round 5 :
Change to 'petiole' row - ch1, turn and work 1 sc FLO across to create ridge for layered branches. (18)
Round 6 :
Attach a separate green yarn to make the first tier of boughs: ch3, then in same st (shell) 5 dc cluster to form a triangular bough; skip 2 sts, slip to next. Repeat around to form 6 bough petals. Fasten off.
Round 7 :
Join yarn higher up the cone (approx 4 sts in from base) and make second tier of shells: ch3, 6 dc cluster in one st, skip 2 sts, repeat to produce slightly smaller shells. Fasten off.
Round 8 :
For a tall tree, add two more tiers similarly, decreasing shell size each tier. For a small tree, two tiers suffice. Leave a long tail for sewing the trunk and base into the panel.
Info :
To create realistic snow on the trees, dab cream yarn with small French-knot-style stitches or attach tiny white beads at the tips of shells. Stuff trunk lightly using a short tube of brown sc rounds (see trunk instructions).
Round 9-12 :
Trunk: with brown, mr 6 sc, rounds 2-6: 1 sc around to build a 5-6 round trunk (6 sts). Fasten off leaving tail for sewing. Insert a small wire if you want the tree to be poseable, then wrap with yarn for coverage.
Round 13 :
Sew the trunk to the center of the tiers with a few whipstitches. Sew base down to the panel; small trees sit upright when their bottom trunk is sewn flat to the background. Trim any excess tails.
— Snowman (one medium snowman with hat and scarf) :
Round 1 (Body Ball) :
Using cream, mr 6 sc. (6)
Round 2 :
Inc around. (12)
Round 3 :
(1 sc, inc) x6. (18)
Round 4 :
(2 sc, inc) x6. (24)
Round 5 :
1 sc around. (24)
Round 6 :
Start decreasing to form the neck: (2 sc, dec) x6. (18)
Round 7 :
Stuff lightly the bottom sphere, but leave slightly soft. (18)
Round 8 :
For the head (separate piece): mr 6 sc (6). Round 2 inc each (12), round 3 (1 sc, inc) x6 (18), round 4-6 1 sc around (18). Stuff head firmly. Attach to body by sewing base of head to the neck opening with whipstitch across 12-14 stitches.
Round 9 :
Embroider facial features: using black yarn make two French knots or attach small black beads for eyes at approx between round 4 and 5 of head. Use orange yarn to stitch a small cone-shaped carrot nose (3 dc worked into a tiny cone then sewn on).
Round 10 :
Buttons: with black, sew 2-3 small French knots down the body center. Arms: use brown yarn to embroider twig arms or make short sc tubes (mr 6 sc, rounds 2-4 1 sc) and sew to sides.
Round 11 :
Hat: With black, mr 6 sc, inc each st (12). Round 3-4 1 sc in each st (12). Brim: switch to black and sc around in FLO for 1 round to produce brim effect. Fasten off and sew onto head. Add red scarf: ch 30, join ends around neck with a small fringe of 5 short chains on each tail; stitch scarf in place.
Info :
Position the snowman near the front of the runner and sew through the body base to the panel with several passes to ensure it stays upright. Insert a small base washer or cardboard disc if needed to stabilize larger snowmen.
— Lamp Post (Make 3) :
Round 1 :
With black or dark brown, ch 6, join to form a small ring, 6 sc into ring. (6)
Round 2-8 :
1 sc around for 7 rounds to create the post shaft (6 sts). Fasten off leaving long tail to sew to panel.
Round 9 :
Lantern head: with cream, mr 6 sc (6), round 2 inc each (12), round 3 (1 sc, inc) x6 (18). Round 4: 1 sc around (18). Light insert: embroider small yellow square onto lantern face or insert tiny LED under lantern. Fasten off leaving tail.
Round 10 :
Sew lantern head to top of post with tight stitches. Add a tiny red pom on top for a festive topper. Sew post to the panel so lantern faces slightly towards the path.
Info :
Lampposts are best anchored with an extra few stitches at the base and a dab of fabric glue if you will be frequently handling the runner. If using floral wire inside the post, fold and tuck ends so they do not poke through the panel.
— Small Stone Bridge / Footstone (optional) :
Round 1 :
Using cream, ch 12. Row 1: 1 sc from 2nd ch to last, turn. (11 sc)
Round 2 :
Ch1, 1 sc across (11). Turn. Repeat for 6 rows to create a small rounded slab.
Round 3 :
To make arched effect, fold and sew the short ends together offset to produce a short arch shape, then sew into place on the path as a decorative stone.
Info :
Stone piece can be stuffed slightly to create raised texture. Use cream and a few half double crochet ridges to simulate piled snow on the arch.
— Decorative Details: Snow Dots, Berries, Window Lights :
Round 1 :
Snow dots: using cream, make tiny French knot stitches or very small 3-sc popcorns and attach across trees, roofs, and along path edges. Space irregularly for natural look.
Round 2 :
Red berries: with red, stitch tiny knots in groups of 2-3 on tree bough edges and shrubbery. Use a dab of glue to secure if beads are used instead.
Round 3 :
Window lights: use small yellow felt/embroidery to back window openings; stitch in place and, if desired, place a tiny battery LED inside a larger cottage to create glow.
Info :
Use seeded beadwork or tiny pearl beads for snow highlights. Sew beads individually through the background panel to ensure they are anchored well and not loose.
— Border: Cream Scalloped Edge :
Round 1 :
With cream, attach at any corner, ch1, 1 sc evenly around the entire panel edge, placing 2 sc in each corner stitch to avoid puckering. (Place 1 sc every 2-3 rows along long side; counts will vary depending on final panel size.)
Round 2 :
Ch3, skip 1 st, sc in next st; repeat across to form open picot loops around the edge. Adjust spacing so edges lay flat. At corners, ch3, sc to turn corner smoothly.
Round 3 :
Scallop round: *In next loop work (2 sc, 2 hdc, 3 dc, 2 hdc, 2 sc), skip to next loop.* Repeat around to create the scalloped petal motif. Fasten off and weave in ends.
Info :
The border is decorative and helps frame the village. Do a light blocking after the border is attached to shape the scallops evenly.
— Assembly & Positioning (plenty of Info rounds) :
Info :
Before permanently sewing, lay out all appliques on your blocked panel. Start by tacking the cream path with a few temporary stitches, then arrange houses and trees around it. Consider perspective: larger houses closer to the viewer, smaller near the top of the runner.
Info :
Sew each motif using long tails from magic rings or secure yarn and stitch through both motif base and panel with small whipstitches. For stability, sew each motif in at least 6-8 places around its base, and more for larger houses.
Info :
When placing trees, slightly overlap tiers so you see depth. Sew lower tiers first then tack upper tiers with a few hidden stitches to the panel. Add tiny beads to tips last so you do not catch them during sewing.
Info :
To create the illusion of lighted windows, stitch pale yellow felt pieces behind window openings and anchor using a few stitches. For real glow, slip a small flat LED panel under the house before you sew the roof closed, then stitch the roof over it carefully.
Info :
Once all appliques are sewn into position, work the scalloped border onto the assembled runner so it frames the whole scene. Sewing the border after appliques hides many of your joining stitches and gives a clean finished edge.
— Finishing Touches :
Round 1 :
Weave in all ends on the wrong side of the panel. Use extra small stitches to anchor any loose beads or embroidered berries. Trim stray fibers and lightly steam block if necessary.
Round 2 :
If using LED lights, check battery access before final secure stitching. Conceal wires and battery pockets under larger cottages or under the base panel fabric backing if added.
Info :
For washability, spot clean only and remove any battery components beforehand. If you must wash, hand wash gently and re-shape while damp then air dry flat.
Completing this winter village runner is a magical process — from stitching the winding cream path to placing tiny lit windows and snowy pine crowns. Each tiny house and tree adds personality and charm, creating a cozy focal point for holiday meals or winter decor. I love how textured stitches and appliques come together into a miniature landscape you can touch and admire. 🎄🧶✨