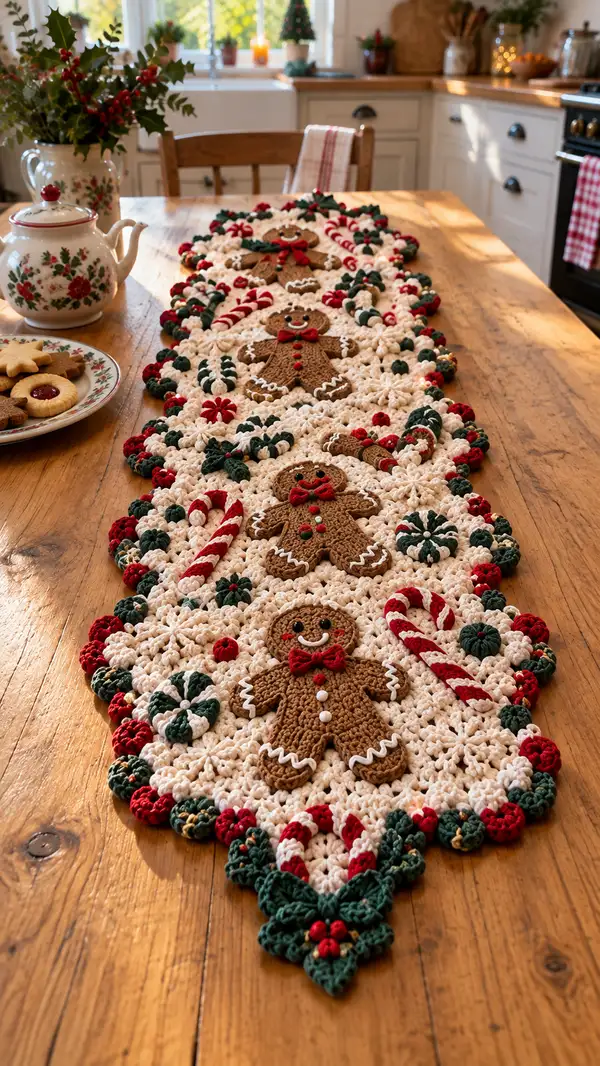
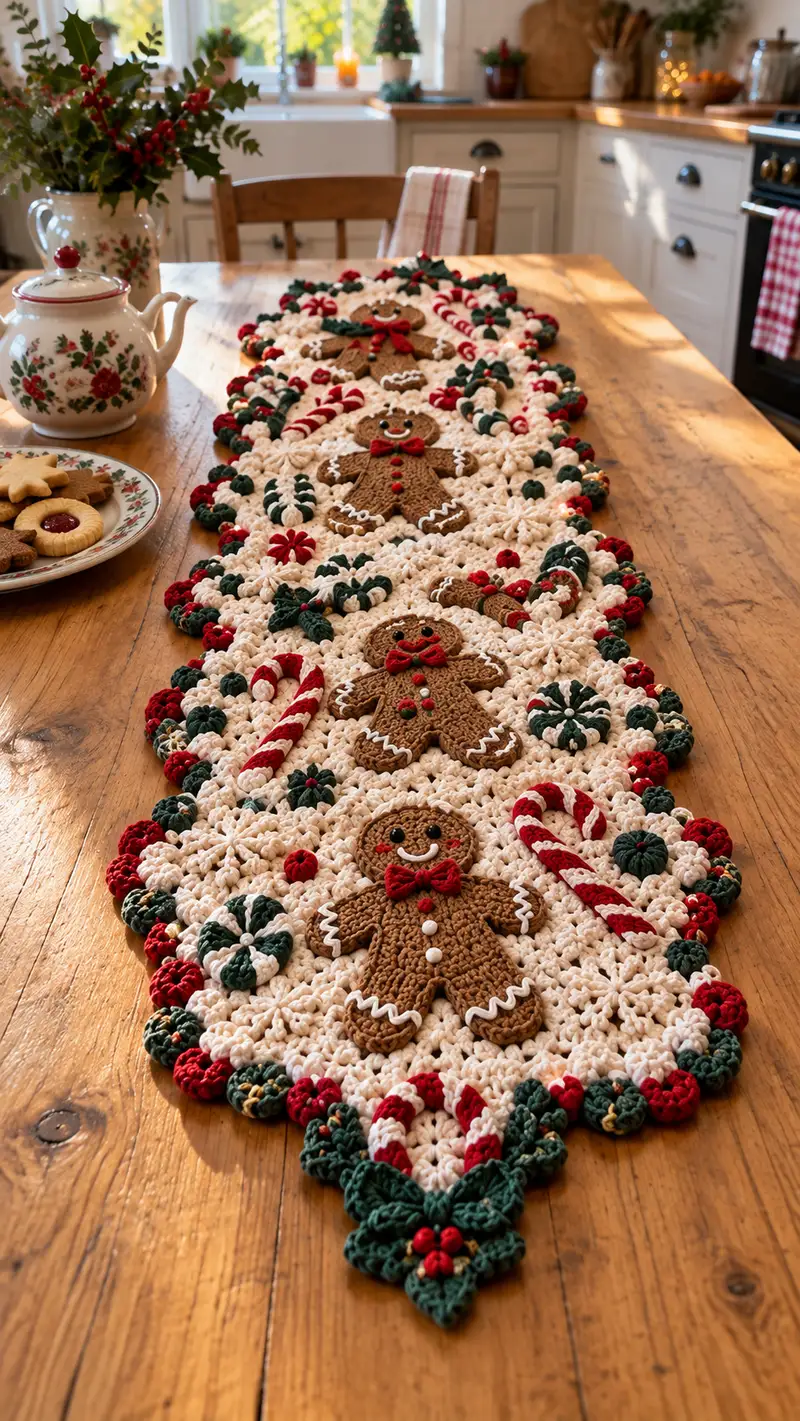
A festive, textured table runner layered with gingerbread appliques, candy cane accents, puff flowers and a scalloped bobble edge. Worked in warm cream with rich brown, deep green, red and touches of gold, this runner brings cozy holiday charm to any table. The pattern uses puff, bobble and cluster stitches for a richly dimensional finish and is constructed from repeat motifs assembled into a long runner.
Progress Tracker
0% Complete
— Notes & Overview :
Info :
This pattern creates a long table runner approximately 11-13in (28-33cm) wide by 46-52in (117-132cm) long using the stated yarn and hooks. Adjust the number of repeated modules to shorten or lengthen. Work motifs flat with right side facing. Join motifs using whip stitch or single crochet join for a slightly raised seam. For durability on a table, consider using mercerized cotton or a cotton blend. "Puff" stitches in this pattern are 5-dc puff unless specified differently; make puffs consistent in height and tension across the piece.
Info :
Gauge note: For the cluster panel rows, 6 cluster groups x 6 rows = approx 10cm square when using 4.5mm hook and worsted cotton; if your gauge is smaller/larger adjust hook size. Use stitch markers each 12-16 clusters to mark motif repeats.
— Stitch Techniques & Tips :
Info :
Puff stitch (5-dc puff): Yarn over, insert hook, yarn over pull up loop, yarn over insert hook, pull up loop (repeat 5 times) — 11 loops on hook. Yarn over and pull through all loops, ch1 to close the puff. Tighten gently. Bobble stitch is worked similarly but finished with ch1 or sl st as directed. Invisible decrease (sc dec): insert hook into front loop of next st and front loop of following st, pull up loop, yarn over and pull through both loops and complete sc to create neat decrease. Always count loops and keep math consistent.
— Main Panel (Cream Cluster Field) :
Overview :
The main panel is made of repeated 9-petaled cluster motifs worked in joined rounds to form an elongated diamond shape. Each repeated tile (called a 'cluster tile') is 12 rounds. You will make 9 tiles in a long strip and 2 extra half-tiles for tapered ends, then join them in a continuous seam to form the runner.
Info :
Make 9 full cluster tiles and 2 half-tiles for tapered ends. If you want a shorter runner reduce number of full tiles. Work in cream for the base.
Cluster Tile — Round 1 :
MR, ch1, 10 sc in MR, pull tight (10)
Round 2 :
(ch3, puff in same st) x10, sl st to first puff top — this creates 10 puff petals around center (10 puffs)
Info :
Make puffs loose enough so they create a visible petal; you will join these petals into the cluster texture.
Round 3 :
Ch1, sc in same st, *ch4, sc in next puff top* around working 10 ch4 loops, sl st to first sc (10 ch4 loops, 10 sc)
Round 4 :
Into each ch4 loop: (3 dc, ch1, 3 dc) forming a shell, sl st to join (10 shells)
Round 5 :
Ch1, sc into center st of shell, *ch3, puff in top of next shell center* around creating 10 puff clusters between shells; sl st to join (10 puffs)
Info :
This round starts the raised texture that will match adjacent tiles when joined. Keep counts exact: 10 puff clusters remain each round.
Round 6 :
Ch2 (counts as hdc), hdc in each sc and in each top of puff around; total 30 hdc approx — work evenly to create a firm foundation (approx 30)
Round 7 :
Ch1, sc in each st around to neaten edge (30)
Round 8 :
Ch3, *puff in next st, ch1, skip next st* repeat across forming 15 small puffs around, sl st to join (15 puffs)
Info :
These puffs on the outer ring form the interlock points for joining tiles. Keep stitch positions consistent across all tiles so joins are neat.
Round 9 :
Ch1, sc in each st and in ch1 spaces, adjusting to maintain continuity (approx 36 sc)
Round 10 :
Ch3, *2 dc in next sc, ch1, skip 1* repeat around to create scallop edges for easier joining (approx 24 scallops)
Round 11 :
Ch1, sc in each st around to tidy (approx 48 sts overall worked as sc/hdc/dc combination)
Round 12 :
Fasten off leaving long tail for joining to neighbor tiles. Block tile gently to flatten and align puff petals.
Info :
Make 9 full tiles and 2 half-tiles. For half-tiles work Rounds 1-8 stopping after Round 10 then fasten off to create tapered end. Use left/right halves mirror-imaged so the runner tapers symmetrically at both ends.
— Joining the Cluster Tiles into Runner Strip :
Info :
Lay tiles right side up in a line: full, full, full... Place half-tiles at each end. Using whip stitch with cream yarn and long tail from tile, join along the outer shell points aligning the outer puffs so seam is nearly invisible. Join through two loops at connection points for a secure seam.
Join Step 1 :
Match adjacent tiles; pick up outer loop of puff from Tile A and corresponding loop from Tile B, whip stitch through both loops across; stitch each connection point with 6-8 tight stitches. Continue for all pairs.
Info :
For strength, make a second pass of surface slip stitches along the seam on the wrong side. Block the whole strip after joining to relax stitches and even the shape.
— Gingerbread Appliques (Make 3 identical gingerbread people) :
Overview :
Each gingerbread is worked flat in worsted brown using 3.5mm hook for crisp shaping. Work head, body and limbs in joined rounds and flatten; pieces are not stuffed — they are appliqued flat onto the cluster field. Each gingerbread uses 28-34 rounds combining increases and shaping.
Gingerbread Head — Round 1 :
MR, ch1, 6 sc in MR (6)
Round 3 :
(1 sc, inc) x6 (18)
Round 4 :
(2 sc, inc) x6 (24)
Round 5 :
(3 sc, inc) x6 (30)
Info :
Eye placement: place two small safety eyes or embroider eyes between Rounds 4 and 5 approximately 4-6 sts apart to give large, friendly expression. If embroidering, use black embroidery thread or small black yarn knots.
Round 6 :
1 sc in each st (30)
Round 7 :
1 sc in each st (30)
Round 8 :
(3 sc, dec) x6 (24)
Round 9 :
(2 sc, dec) x6 (18)
Info :
Begin flattening head shape slightly if desired: fold head in half and place a couple of running stitches at top back to keep it slightly domed but flat for appliqué. Fasten off leaving long tail for stitching to body.
Gingerbread Body — Round 1 :
With brown, ch7, join to form small oval: ch1, sc in 2nd ch from hook and across (6 sc), turn to work opposite side of foundation chain, sc in remaining chs (12 total around).
Round 2 :
Sc evenly around the oval, placing 3 sc in each chain-end to round corners (approx 18 sc)
Round 3 :
1 sc in each st around (18)
Round 4 :
(3 sc, inc) x3 across front to widen chest forming rounded heart shape (21)
Round 5 :
1 sc in each st around (21)
Info :
Mark front center on Row 5; this helps position buttons and bow later. Body width should be proportional to head — about 1.5x head width when flattened.
Arms (Make 2) — Round 1 :
MR, ch1, 6 sc in MR, pull tight (6)
Round 2 :
1 sc in each st (6)
Round 3 :
(1 sc, inc) x3 (9)
Round 4 :
1 sc in each st, ch1, turn to create flat paddle shape (9)
Round 5 :
Sc across and around to shape arm paddle with slight curve: add 2 sc on outer edge to widen hand (11)
Info :
Make arms slightly shorter than body width so they sit naturally on the sides of the gingerbread. Flatten and press lightly. Fasten off leaving long tails for sewing.
Legs (Make 2) — Round 1 :
MR, ch1, 8 sc in MR (8)
Round 2 :
1 sc in each st (8)
Round 3 :
(1 sc, inc) x4 (12)
Round 4 :
Work 4 sc, slip stitch across top to shape foot separation, continue 8 sc to complete (12)
Round 5 :
Sc around to tidy shape; fasten off leaving long tail for sewing (12)
Info :
Assemble pieces small and flat. Place head at the top center of a body, arms at sides between Rounds 4-6 of body (if counting from top), legs at the base spaced evenly. Securely sew all pieces using ladder stitch for invisible joins.
Gingerbread Decoration Rounds — Round 1 :
Using white yarn and small hook, embroider wavy icing lines at edges of arms and legs: pick 3-4 evenly spaced small arcs using chain stitches and sl st to finish.
Round 2 :
Sew two tiny red yarn bows or crochet small bow appliques (ch6, sl st to form loop, ch2, sc in loop, fasten) and attach at neck as bow tie. Add two tiny red bobble buttons on body center (see bobble instructions below).
Info :
If you prefer, embroider a smiling mouth with white or cream thread using backstitch; small black French knots make cute eyes if not using safety eyes.
— Candy Cane Appliques (Make 4) :
Overview :
Candy canes are worked as crocheted tubes then curved and sewn into a cane shape. Use red and cream stripes alternating. Each candy cane is worked in continuous rounds and shaped with gentle flattening before sewing onto runner.
Candy Cane — Round 1 :
With red, ch6, join to work in rounds into tube: sc in each ch to join (6)
Round 2 :
1 sc in each st (6)
Round 3 :
Change to cream: 1 sc in each st (6)
Round 4 :
Change to red: 1 sc in each st (6)
Round 5-12 :
Continue alternating colors each round until tube measures approx 10-12 cm. Maintain 6 sts each round (6)
Info :
For a thicker cane, use 8 sc in foundation chain instead of 6 and maintain the tube size. When finished, fold gently into cane curve and stitch through rounds along inner curve to secure shape. Fasten off and weave tail through inside of tube to close end.
— Peppermint Puff Candies (Make 12 assorted sizes) :
Small Puff Candy — Round 1 :
MR, ch1, 6 sc in MR (6)
Round 2 :
Ch3, 5-dc puff in same st, sl st to next st, *ch3, 5-dc puff in next st, sl st* repeat around for 6 puffs; sl st to join (6 puffs)
Round 3 :
Ch1, sc in each sl st and ch3 space around, fasten off (approx 18 sc)
Info :
Create some puffs using alternating colors (cream/green or cream/red) to make peppermint pinwheel effect. For larger candies work a second puff round externally then sc to finish for a puffier 2-layer candy.
— Holly Leaves & Berries (Make 8 leaves and many berries) :
Holly Leaf — Round 1 :
Ch8, sc in 2nd ch from hook and in next 5 chs (6), 3 sc in last ch (to turn corner), continue along opposite side of chain 6 sc, sl st to join (18)
Round 2 :
Ch1, sc in next st, *hdc, 2 dc, hdc, sc in next 4* around to create pointed lobes for leaf (18 approx)
Round 3 :
Ch1, *sc in next st, sl st in next to create little serration* repeat across edge, fasten off leaving tail for sewing
Berry (Make lots) — Round 1 :
With red, MR, 6 sc in MR, pull tight (6); Round 2: (1 sc, inc) x3 (9); Round 3: sc around (9). Fasten off leaving tail for sewing. For raised berries use a 5-dc bobble on top in gold or cream and secure.
Info :
Sew tiny berries in clusters of 2-4 to holly leaf junctions or to background field to scatter color. Use small amount of yarn and a few secure stitches to prevent loss.
— Bobble & Scalloped Border :
Overview :
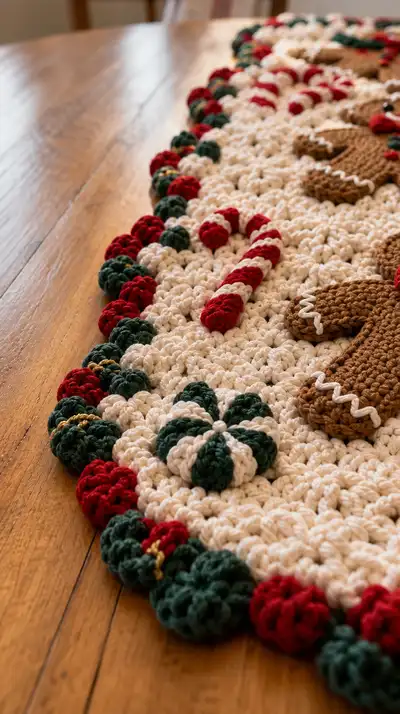
Edge the entire runner in alternating candy red and deep green bobbles set into a cream scalloped chain to echo the photographed border. Border is worked after the entire runner is joined and blocked.
Border Round 1 :
With cream, join at one corner, ch1, sc evenly around runner edge placing 3 sc in tapered corners to round them; do not join, work continuous to keep uniform edge (count will vary; approximate per long side 120 sc, short tapered sides 24 each; total approx 288 sc)
Info :
Note :
Count stitches along the entire perimeter so your bobble spacing is consistent. Use stitch markers every 12 sc to help place bobbles evenly.
Border Round 2 :
Ch3 (counts as dc), *skip next st, (5-dc bobble in next st), ch1, skip 1, dc in next st* repeat around to create alternating bobbles and dc points. Adjust repeat to land bobbles centered on cluster outer puffs. Fasten off cream and switch colors for bobbles as directed below.
Info :
Work bobbles in color sequence: red, green, gold-accent, red, green,... Use a 3.5mm hook when working bobbles in colored yarn for tighter, more defined bobble shape. After placing colored bobbles on top of cream base, secure with a few stitches on the underside to lock colors in place.
Colored Bobble Step :
Join color at the top of the next cream bobble post, make 5-dc bobble in that st, sl st to secure. Fasten off and weave tail through center of bobble to the wrong side and knot to secure. Repeat alternating red and dark green. For gold accent bobbles use metallic thread woven around a green bobble to appear as a highlight rather than a full bobble color change.
Border Round 3 :
After placing all colored bobbles, return to cream and sc through spaces between bobbles to tidy edge. Fasten off and weave in all ends using large yarn needle.
Info :
For a denser look, add a final round of picot edging in red or green: *sc, ch3, sl st into first ch (picot), sc into next 3 sts* repeat around for tiny decorative points.
— Small Decorative Red Puff Clusters (fillers) :
Round 1 :
MR, ch1, 6 sc in MR (6)
Round 2 :
Ch1, 6 small puffs in each st (3-dc puff) worked into center of MR to form rosette, sl st to join (6 small puffs)
Round 3 :
Sc in sl st and in each puff top to tidy, fasten off leaving tail for sewing (approx 12)
Info :
Scatter these small rosettes across the field in pairs or singles to create the dotted red accents seen between gingerbread and candy canes.
— Assembly & Placement :
Info :
After creating all appliques, pin them on the main runner in the arrangement shown in the photograph: evenly spaced large gingerbread figures (three) centered down the runner with candy canes and peppermint puffs arranged between. Place holly clusters at the tapered ends and in-between gingerbread to balance color. Keep symmetric placement along center line.
Sewing Appliques Step 1 :
Position first gingerbread at the lower third of the runner center (approx over Tile 2-3 seam). Using long tail from applique or a new matching yarn, sew applique in place with ladder stitch around perimeter, catching a few background loops and outer edge of applique to secure flatly. Use small whip stitches for arms and legs to hold them down flush on the field.
Info :
Place candy canes angled slightly outward from each gingerbread and stitch along inner curve with small invisible whip stitches to the background. Sew peppermint puffs at approximate compass positions around gingerbread for an abundant decorated effect.
Final Finishing :
Weave in all tails neatly, snip close to work. Lightly steam block entire runner to relax bobbles and puffs, taking care not to flatten the puff textures. If desired, tack a few strategic stitches underneath high bobbles to prevent excessive movement when on a busy table.
Info :
For long-lasting use on a dining table, consider adding a thin non-slip fabric underlay or small slip-resistant pads at intervals underneath the runner to reduce shifting.
— Alternative Size & Customization Notes :
Info :
To make a narrower runner, reduce the number of full cluster tiles; to make a table centerpiece square, construct 3x3 tile panel and edge similarly. Color swap ideas: use soft grey and blush for a modern holiday runner, or go classic navy and gold for a winter formal look.
Info :
To create a washable runner, choose machine-washable cotton yarn and secure all appliques with small, tight stitches; use a wash bag and gentle cycle. Metallic gold should be used sparingly as it may be less tolerant to frequent machine washing.
This gingerbread table runner is the perfect holiday centerpiece — a labor of love composed of textured cluster stitches, joyful appliques and a playful bobble border. Each motif brings a small celebration of handmade charm that makes your table feel warm and festive. 🎄 I hope your finished runner becomes a treasured seasonal item, passed down and enjoyed over many holidays. 🧶✨