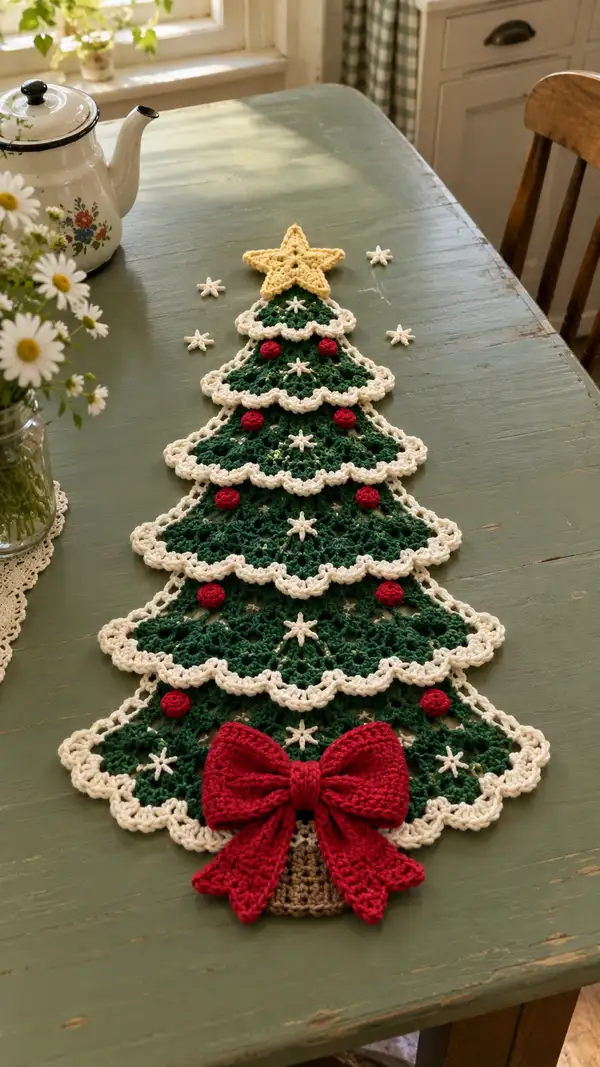
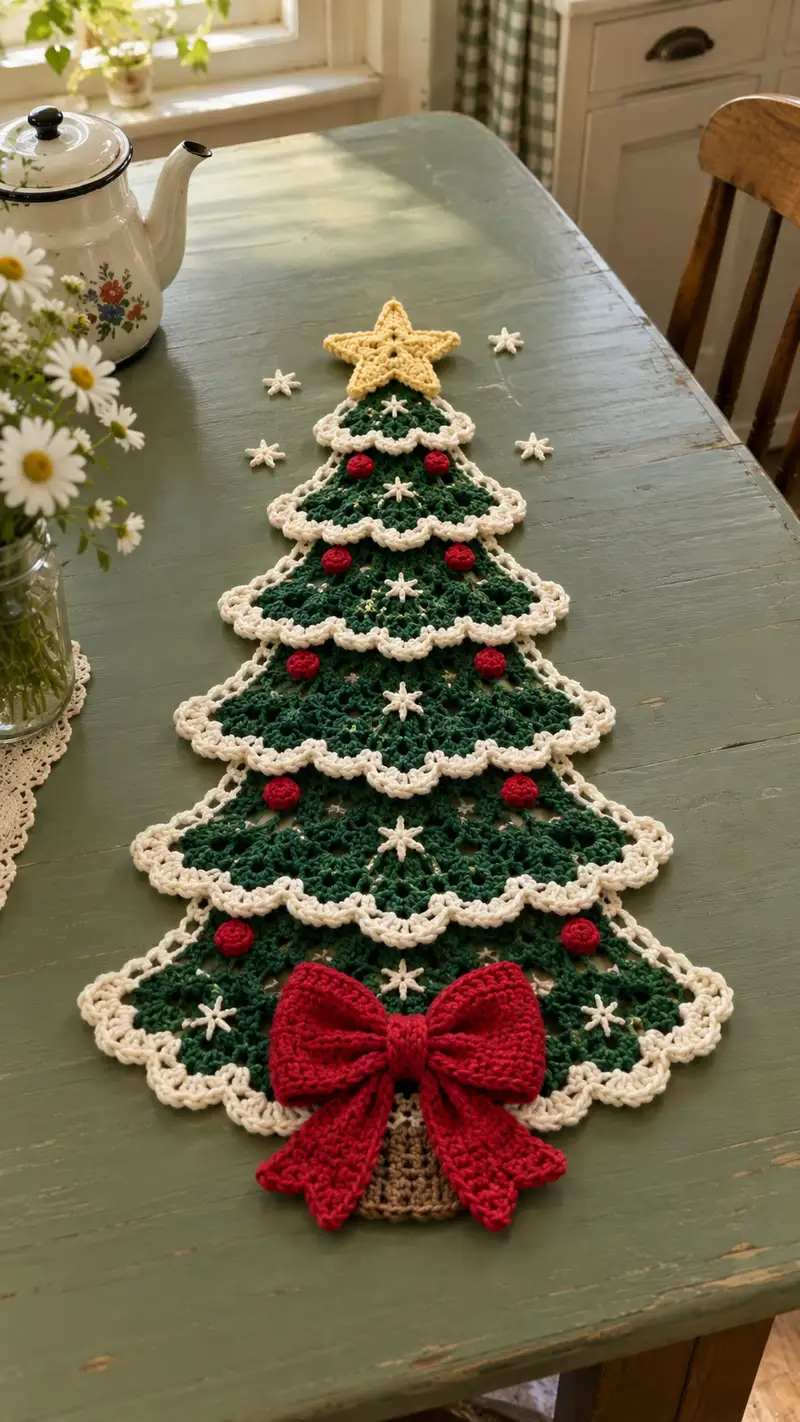
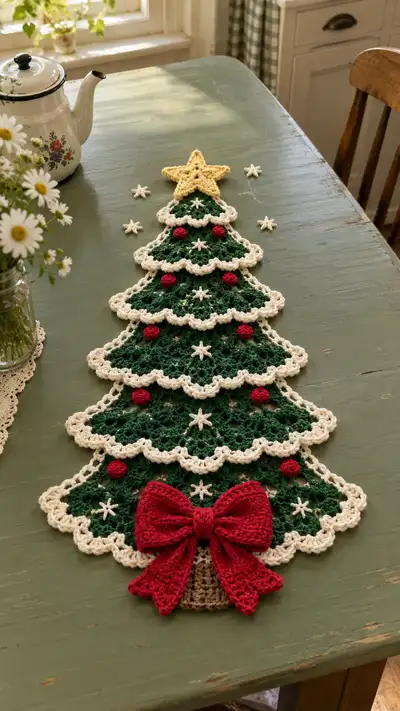
Create a vintage-inspired Green and Cream Christmas Tree Table Runner with layered scalloped tiers, a cream star topper, red bauble rosettes, and a large red bow trunk. This elegant runner is worked in motifs and joined into a tapered tree shape with delicate scalloped edges and embroidered star accents. The pattern includes detailed instructions for the tree tiers, scallop edging, star topper, rosettes, trunk and decorative bow so you can recreate the exact festive look seen in the photo.
Progress Tracker
0% Complete
— Overview and Notes :
Info :
This runner is worked as separate triangular fan motifs for each tier and joined as you go into a tapered tree shape. Each tier is a round-based fan that grows in shells; tiers are worked in forest green and trimmed in cream. The tree has six tiers (Tier 1 = top smallest to Tier 6 = widest base) plus a star topper, six red rosette ornaments, a small trunk piece and a large red bow. You may change the number of tiers to fit your table. Gauge is not critical for a decorative runner but consistent tension is important.
Info :
When working with two colors, carry the unused color along the edge and catch it between stitches, or fasten off and weave tails. Block flat motifs lightly to shape scallops before joining. Use stitch markers to mark the center and edges of tiers for accurate alignment.
— Tier Motif Template (Make 6 tiers, each larger than previous) :
Round 1 :
With green, make a magic ring. Ch3 (counts as dc), work 11 dc into ring; join with sl st in top of ch3 (12 dc total). (12)
Round 2 :
Ch3, dc in same st, *ch2, skip next st, 2 dc in next st* across to end, join with sl st to top of ch3. You will create 6 shell clusters separated by ch2 sps. Count: dc worked = 12 (same as previous) + additional chain spaces forming shells; treat as 6 shells (12 dc). (12 dc in 6 shells)
Info :
Round 2 forms the initial 6 shells. Mark the central front shell as the tree tip for tier alignment. The ch2 spaces will be used to work in later rounds for shell increases.
Round 3 :
Ch3, (2 dc, ch2, 3 dc) in first ch2-sp to form a larger shell at the front, *skip to next ch2-sp, (3 dc, ch2, 3 dc) in ch2-sp* around for each ch2-sp, join with sl st to top of ch3. Each ch2-sp now carries a 6-dc shell (count dc: 6 dc x6 = 36). (36)
Round 4 :
Ch1, sc in same st, *ch3, sk next 3 dc of shell, sc in center dc of next shell* repeat around to create chain arches, join. This round secures shells and forms ch3 arches for next shell placement. Total sc count equals number of shells (6 sc). (6 sc + 6 ch3 arches)
Info :
Use ch3 arches as anchors to place cluster shells in Round 5. Keep the front shell marker to align tiers centrally when joining pieces.
Round 5 :
Ch3, (2 dc, ch2, 3 dc) in first ch3-arch, *(3 dc, ch2, 3 dc) in each ch3-arch* around; join. Shells increased to form a more triangular fan shape. Count dc: 6 shells x 6 dc = 36 dc (same number of shells); however shells become fuller by working into arches. (36)
Round 6 :
Ch1, sc in same st, *ch4, sc in next shell center* around to create larger decorative arches; join. (6 sc + 6 ch4 arches)
Info :
At this point the motif looks like a shallow fan. For tiers 1–6 we will escalate shell counts by adding additional rounds that insert extra shells between existing shells using the ch arches. Each tier will have extra rounds to increase the motif width. Keep the same shell pattern but increase number of placement arches in rounds 7–12 depending on tier size.
Round 7 :
Ch3, work (3 dc, ch2, 3 dc) in every ch4 arch to add shells between existing shells. You now have 12 shells around (12 shells x 6 dc = 72 dc). (72)
Round 8 :
Ch1, sc in same st, *ch5, sc in next shell center* around to set wider arches for scallops. (12 sc + 12 ch5 arches)
Info :
Rounds 7–8 double the number of shells and make the fan significantly wider. For smaller tiers stop here; for larger tiers continue adding shell insertion rounds so the motif increases smoothly. The tier depth is built by alternating shell rounds and sc+chain anchoring rounds.
Round 9 :
Ch3, (3 dc, ch2, 3 dc) in each ch5-arch around (12 shells x 6 dc = 72 dc). (72)
Round 10 :
Ch1, sc in same st, *ch6, sc in next shell center* around to form deep decorative arches for the scalloped cream trim. (12 sc + 12 ch6 arches)
Info :
For Tier sizes you will control how many times you repeat the last two-step pair (shell round + anchor sc+ch round). Tier sizes from top to bottom use the following number of shell insertion cycles: Tier 1 = Rounds 1–6 (small), Tier 2 = add Rnd7–8, Tier 3 = add Rnd9–10, Tier 4 = add Rnd11–12, Tier 5 = add Rnd13–14, Tier 6 = add Rnd15–16. This means the largest tier will have up to 16 rounds of fan building. Keep counts consistent by increasing shells by the same method.
Round 11 :
Ch3, (3 dc, ch2, 3 dc) in each ch6-arch around (24 shells x 6 dc = 144 dc). (144)
Round 12 :
Ch1, sc in same st, *ch7, sc in next shell center* around to prepare for scallop edge. (24 sc + 24 ch7 arches)
Info :
Work rounds 11–12 only for the larger tiers (tiers 4–6). If your tier becomes very wide, you can work fewer shell insertions to keep the runner narrow. The numbers above give a wide, dramatic scallop similar to the photo. Each shell round increases total dc stitches; count shells by centers (24 shells at Round 11 in the largest tier).
Round 13 :
Ch3, (3 dc, ch2, 3 dc) in each ch7-arch around. Count dc: 24 shells x 6 dc = 144 dc. (144)
Round 14 :
Ch1, sc in same st, *ch8, sc in next shell center* around to finalize spacing before cream scallop edging. (24 sc + 24 ch8 arches)
Info :
Stop increasing when the motif fits your tier width. For this pattern: Tier 1 uses Rounds 1–6; Tier 2 uses Rounds 1–8; Tier 3 uses Rounds 1–10; Tier 4 uses Rounds 1–12; Tier 5 uses Rounds 1–14; Tier 6 uses Rounds 1–16. Each tier is made separately following the same construction but stopping at different rounds so the tree tapers.
— Scalloped Cream Edge (Worked around each tier after green tiers are complete) :
Info :
Change to cream yarn. Begin scallop edging by working into the chain arches created in the last green round. The scallop pattern uses dc shells separated by sc anchors. Work the scallop round into the ch arches around the perimeter of each tier.
Round 1 :
Attach cream at a central front shell ch-space: ch1, sc in same sp, *ch1, (2 dc, ch2, 2 dc) in next ch-arch, ch1, sc in next shell center* around; join with sl st. Count: number of small shells equals number of ch-arches created in green round (for example Tier6 had 24 shells so 24 cream shells). (sc count = shell centers; dc count = 4 dc per scallop x shells)
Round 2 :
Ch1, sc in same st, *skip to center of cream shell, (sc, ch3, sc) across the ch2 space between the 2dc clusters to create a raised scallop picot effect* around; join. This forms a ruffled, raised scallop edge. (sc count equals shell centers)
Info :
For a deeper scallop you may add a second cream round of picot and single crochet anchors. Work evenly and block the scallop to make it sit flat. Repeat scallop edging for each tier's perimeter. Make sure the top-most small tier has a scaled-down scallop (fewer ch arches) for proportional appearance.
— Star Topper (Make 1) :
Round 1 :
With cream, make mr, ch2 (counts as hdc), 9 hdc in ring; join with sl st (10 hdc). (10)
Round 2 :
Ch1, sc in same st, *ch3, sc in next hdc* around to create 5 ch3 loops; join. (5 sc + 5 ch3 loops)
Round 3 :
Work a point into each ch3 loop: attach yarn in loop, (sc, hdc, dc, hdc, sc) in each loop to form five pointed petals; join. Each point uses 5 stitches; total stitches = 5 points x 5 = 25. (25)
Info :
Refine point shape by adding a small sl st at tip if desired and blocking points sharply. The star in photo is slightly raised; you can add a hdc surface round around each point or lightly stuff the center with minimal fiberfill to give a gentle dome.
Round 4 :
Ch1, sc around entire star body working 2 sc in base stitches between points to smooth edges; join. Fasten off and weave ends. (approx. 30 sc depending on increases)
Info :
Sew the star to the top of Tier 1 by aligning the front point with the tree center. Secure with matching cream yarn using small whip stitches. Add a small embroidered center if desired for contrast.
— Red Rosette Ornaments (Make 6) :
Round 1 :
With red, mr, ch2, work 11 hdc in ring; join with sl st to top of ch2. (12 hdc)
Round 2 :
Ch1, sc in same st, *ch3, sc in next hdc* around to create 6 ch3 loops; join. (6 sc + 6 ch3)
Round 3 :
In each ch3 loop work (sc, hdc, 2 dc, hdc, sc) to make a small flower petal. There will be 6 petals. Total dc count = 2 dc x6 = 12 dc plus hdcs and scs. (petaled circle)
Info :
These little rosettes sit slightly raised like baubles. Block lightly or shape with fingers. Sew onto tree tiers at designated positions using the green backing stitches. You may stuff very lightly before closing if you prefer a rounder bauble; use very small amount of fiberfill.
Round 4 :
Fasten off leaving long tail for sewing. Weave ends slightly through the underside for stability. Make 6 and space them evenly across tiers 2–6 as shown in photo.
— White Embroidered Stars (Make 7 or more) :
Info :
These small stars are worked flat with surface loops or embroidered after the green motif is blocked. For a crocheted version use a small 3-round star worked with white yarn or use surface embroidery with single strand yarn for bright highlights.
Round 1 :
With white, ch2, 5 sc in 2nd ch from hook; sl st to join to form a tiny ring (5 sc). (5)
Round 2 :
*Ch3, sl st into center to create a point* repeat 5 times to create 5 slender raised points; fasten off leaving tail for sewing. Sew to tree surface at shell centers. (5 points)
Info :
Alternatively embroider 5 straight stitches radiating from a small knot center using white yarn for a delicate star. Position one star approximately on the center of each tier and a few scattered between tiers, matching the photo's placement.
— Trunk Piece :
Round 1 :
With brown, ch8, join to make a small ring for a rectangular trunk base: ch1, sc in each ch around for 8 sc; join. (8)
Round 2 :
Ch1, sc in each st around for 3 rounds to build trunk height; join. (8 each round)
Round 3 :
Switch to BLO on last round for a neat top edge if desired: ch1, sc in each st BLO around; join. Fasten off leaving long tail for attaching to tree base. (8)
Info :
Sew trunk centered at the base of Tier 6 aligning with the center shell. Make sure trunk is proportionate to final runner width; you can add a second round for a wider trunk if you prefer.
— Large Red Bow (Make 1) :
Bow Body - Round 1 :
With red, ch31. Row 1: sc in 2nd ch from hook and across (30 sc). Turn. (30)
Bow Body - Row 2 :
Ch1, sc in each st across (30). Turn. Repeat Rows 2–10 to create a strip 10 rows tall (30 sc each row). After Row 10, fasten off leaving long tail for gathering. (30 x 10)
Info :
Fold the strip into a bow shape by gathering the center. Use the long tail and yarn needle to wrap around the center multiple times to form the bow knot. Tuck and secure ends at the back with small stitches. Add a short tail strip (make 2 tails: ch11, sc back across for each tail) and sew them to the bow back centered under the knot so the bow in photo looks full and draped.
Bow Tail - Round 1 :
With red, ch11, sc in 2nd ch from hook and across for 10 sc; turn. Make two identical tails. Fasten off leaving tails to sew. (10 each)
Info :
Optionally lightly stuff the bow center with a bit of fiberfill before finishing the knot to give fullness like the photo. Securely stitch the bow to the trunk area so the bow sits centered over the trunk top and bottom of Tier 6 scallop.
— Joining Tiers Into Tree :
Info :
Arrange tiers from Tier 6 (largest) at the bottom to Tier 1 (smallest) at the top leaving a small overlap so scallops sit layered. The rows should overlap approximately 1.5–2 inches depending on motif size. Use pins to hold positions before sewing.
Round 1 :
With green tail left on each tier, align Tier 2 under Tier1 and slip stitch or whip stitch through the back loops of the overlapping scallops about every 6–8 stitches, pulling tiers snug but not distorting scallops. Repeat tiers down the tree until Tier 6 is joined. Use matching green yarn for invisible joins.
Info :
Work from top down attaching each tier to the one below. Ensure the front center shell of each tier is aligned along the central vertical axis. Anchor strong at the sides to avoid gaps. A yarn needle and mattress stitch or whip stitch give a flat seam.
Round 2 :
Sew trunk centered under Tier 6 base with brown yarn, tacking along the top edge and a few stitches through the bottom table-facing edge to prevent lifting. Attach the bow over the trunk with the knot centered on the trunk top. Sew rosettes to tiers using long tails, stitching through green fabric and tying securely at the back. Add embroidered or crocheted white stars in the center of several shells as shown in photo. Fasten off and weave ends.
Info :
For a neater edge on joins, you can slip-stitch the underside of scarf layers together in BLO, then run a short cream decorative chain along the join to visually unify tiers. If any scallops flare up, add a few hidden stitches near the base of the scallop to hold shape.
— Finishing and Blocking :
Info :
Block the entire assembled runner flat by spritzing lightly and pinning to shape, emphasizing scallops and star points. Allow to dry completely. Weave in all ends, trim close to fabric. If the bow needs extra security, tack it with small stitches through bow back to trunk and runner material.
Info :
Optional: attach a small non-slip pad or felt under the trunk to prevent sliding on a polished table. If displaying outdoors or on a well-used table, consider a spray starch to keep scallops crisp.
Final Notes :
This pattern uses modular repetition; pay attention to the number of shell insertion cycles for each tier to get the tapered silhouette. Count by shell centers rather than individual dc when tracking motif increases; this simplifies the math and ensures evenly spaced scallops. Enjoy assembling the tiers and embellishing with rosettes and stars to match the photo's vintage look.
This Green and Cream Christmas Tree Table Runner is a beautiful heirloom-style accent that brings a handmade holiday charm to any table. Layering scallops, sweet rosettes, and a plush bow create a warm, nostalgic centerpiece that is both decorative and practical. I hope you enjoy every relaxing stitch while making this runner and sharing it at your holiday table — happy crocheting and joyful decorating! 🎄🧶