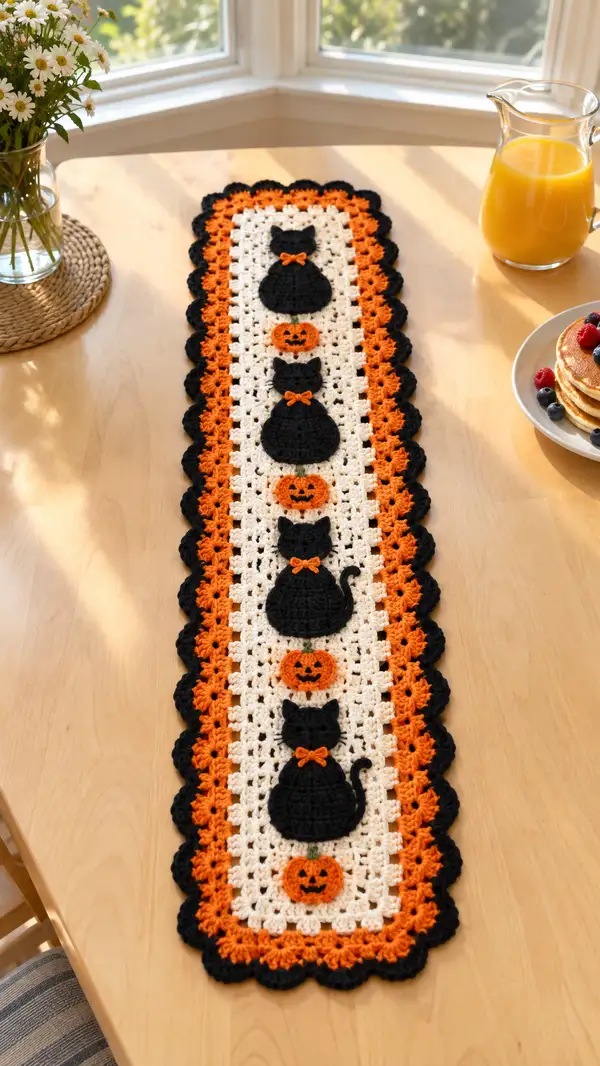
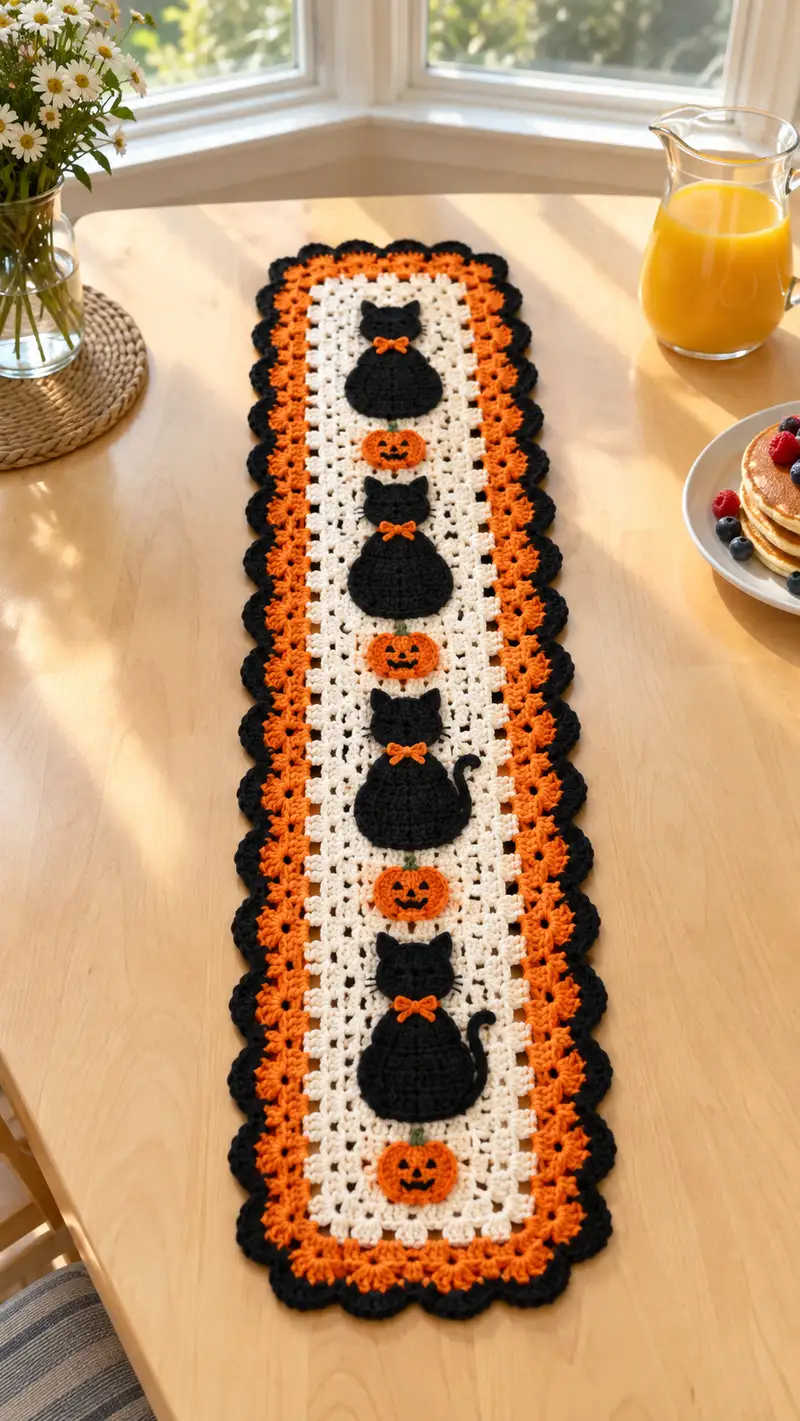
A charming Halloween table runner featuring stacked black cat appliques and smiling jack-o-lanterns on a creamy granny-lace center with bold orange and black scalloped edges. This pattern uses simple granny clusters for a lacy base and worked-appliqued motifs to create a playful, festive centerpiece. Perfect for seasonal decor, the runner is long and narrow — ideal for dining tables or sideboards. Detailed stitch counts, placement guides, and assembly tips are included for accurate reproduction.
Progress Tracker
0% Complete
— Materials & Gauge :
Info :
Gauge is not critical for decorative runner but for approximate finished width aim for 13-15 dc = 4 inches using 5.00mm hook in granny cluster spacing. Runner length below is written to produce approximately 36-44 inches long depending on row counts; adjust starting chain or number of granny rows if you prefer a longer or shorter runner.
— Center Panel (Granny Lace) :
Round 1 :
With Cream yarn, ch 49. This creates the foundation chain for the runner width; you may adjust by adding multiples of 3 + 1 for different widths (49 is recommended for a narrow runner).
Round 2 :
Row 1 (foundation row) - turning chain counts as dc: 1 dc in 4th ch from hook (counts as first cluster dc), *ch 1, skip 2 ch, (3 dc, ch 1) in next chain; rep from * across until you reach the last chain, ending with 1 dc in last ch. Turn. This establishes the first row of granny clusters along the length (approx 16 clusters across including ends).
Round 3 :
Row 2 - ch 3 (counts as first dc), 2 dc in first ch-1 sp, *ch 1, (3 dc) in next ch-1 sp; rep from * across to end, ending with 1 dc in top of turning ch. Turn. Keep clusters centered in ch-1 spaces for an even lace pattern.
Round 4 :
Repeat Row 3 (3 dc clusters in each ch-1 space) maintaining tension and keeping the ends turned with 1 dc in turning ch space. (This is a stable base row.)
Info :
Place stitch markers at both short ends of your panel after Round 4 to mark the corner cluster area for later border work; these markers help you find the center for motif placement later.
Round 5 - 12 :
Work 8 additional rows repeating Row 3 (1 dc in turning ch or last stitch, then 3 dc clusters in each ch-1 space across). After Round 12 you will have a rectangular granny lace panel approximately 8 rows high (repeat more rows if you want longer runner). (Maintain consistent tension so motif placement aligns vertically.)
Info :
At the end of Round 12, measure the panel and mark the vertical centers where the three cat motifs and pumpkins will be placed. Suggested placement from one end: motif center at 3.5 inches from end, next at 12.5 inches, last at 21.5 inches (adjust if you added more rows).
Round 13 - 20 :
Work another 8 rows repeating the granny cluster row pattern to reach a total of 20 rows. This creates the main field of the runner. (1 dc in first/last turning spaces, 3 dc clusters in ch-1 spaces across each row.)
Info :
Before moving to color border, ensure the center panel is a multiple that lines up well with your applique size: measure and adjust rows so that motif centers fall symmetrically along the runner centerline. If needed add or subtract full rows to shift spacing slightly.
Round 21 :
Even row — Repeat Row 3 in Cream (1 dc in corner turning ch, 3 dc clusters in each ch-1 space across). This is the final even cream row that will anchor the orange border.
Info :
Fasten off Cream loosely and weave in ends on wrong side. Block the cream panel lightly if you prefer to smooth the lace before adding the orange border. Blocking ensures even scallop edges later.
— Inner Orange Border (Granny Round Border) :
Round 22 (Border start) :
Join Pumpkin Orange in any ch-1 space on short end with sl st, ch 3 (counts as dc), work 2 dc in same ch-1 sp, *ch 1, (3 dc) in next ch-1 sp around the narrow width of the runner (work clusters across the length sides too) until you reach the corner; at corner work (3 dc, ch 1, 3 dc) into the corner ch-1 sp to create a square corner; continue around until you meet the beginning. Join with sl st to top of starting ch-3. This adds a single round of orange clusters around the cream center.
Info :
When joining the orange border, keep tension slightly softer so the border lies flat against the center panel. If the border pulls inward, block again or add one more cream spacer row before joining.
Round 23 :
Ch 3, 2 dc in same ch-1 sp, *ch 1, (3 dc) in each ch-1 sp around, placing (3 dc, ch 1, 3 dc) in each corner ch-1 sp. Join with sl st to top of starting ch-3. (This builds the orange border thickness.)
Round 24 :
Repeat Round 23 one more time to make a fuller orange band (3 rows of orange in total including join row). This gives the bright inner band seen in the photo.
Info :
If you prefer a narrower orange band, omit Round 24 and proceed to the black scallop. The three-row orange creates a bold stripe that visually separates the cream center from the black scallop.
— Outer Black Scalloped Edge :
Round 25 :
With Black, join with sl st in any ch-1 sp. Ch 1, sc in same space, *skip next ch-1 space, in next ch-1 space work (5 dc shell) into the ch-1 space, skip following ch-1 space, sc in next ch-1 space; rep from * around, placing a sc into each outer ch-1 sp and a 5-dc shell into every other ch-1 sp to create scallops. At corners work shell into corner ch-1 sp to maintain rounded corner. Join with sl st to first sc.
Info :
This creates the large scallop visible in the image. For a tighter scallop use 4 dc shells instead of 5 dc if preferred. Keep shells evenly spaced; you may need to slightly increase sc between shells on particularly long sides to keep shells aligned.
Round 26 :
Ch 1, sc in same st, *ch 3, sc in center dc of next shell to define scallop arches across, ch 3, sc in next sc; rep from * around. Join with sl st. This decoratively spaces and anchors scallops.
Round 27 :
Finish round — Ch 2, in each ch-3 arch work (2 dc, ch 1, 2 dc) to make a mini shell inside the scallop for added texture; sc in sc spaces between arches. Join and finish off. Weave ends and block gently to set scallop shape.
Info :
Use pins to shape each scallop while wet blocking. Allow to dry fully for crisp, even scallops across the runner edges.
— Applique Placement Grid :
Info :
Mark the vertical centerline of the panel. From the top edge of the cream panel (inside orange border) measure down and mark centers for motifs. Suggested centers (from the top inner orange edge): 2.5 inches, 10.5 inches, 18.5 inches — these positions space three cats/pumpkin sets evenly. Adjust if you added more center rows.
Info :
Work each applique flat and block lightly. Pin each applique centered on the cream area then sew with whip stitch using black or orange to match motif edges. Use a few temporary baste stitches to confirm placement and symmetry before final stitching.
— Cat Applique: Body (Make 3 identical) :
Round 1 :
With Black yarn and 4.00mm hook, mr, ch 1, 6 sc in mr (6). Pull ring tight. This forms the bottom center of the cat body (a flattened circle/oval).
Round 2 :
6 inc (12) — (6 sc, inc) x 6 is incorrect for 6 inc; correct: Work 1 sc in each st, increasing evenly to 12 by doing inc in every stitch: 6 inc (12).
Round 3 :
(1 sc, inc) x 6 (18)
Round 4 :
(2 sc, inc) x 6 (24)
Round 5 :
(3 sc, inc) x 6 (30)
Info :
At this stage you have a round that will be the lower portion of the cat body. Maintain flatness by not over-increasing; if your piece cups, reduce increases.
Round 6 :
1 sc in each st around (30) — work a stable even round to set shape, keeping work flat.
Round 7 :
(3 sc, inc) x 6 (36) — gentle outward shaping to create a fuller body base if you want a rounder silhouette; optional if you prefer a slimmer cat, skip this round and work even rounds instead.
Round 8 :
1 sc in each st around (36)
Round 9 :
(4 sc, inc) x 6 (42)
Round 10 :
1 sc in each st around (42)
Round 11 :
(5 sc, inc) x 6 (48)
Info :
This larger circle forms the bottom rounded belly of the cat as a flat applique. If you prefer a smaller applique scale, use fewer increase rounds (stop at Round 8).
Round 12 :
1 sc in each st around (48)
Round 13 :
BLO 1 sc in each st around (48) — working BLO here creates a subtle ridge where the upper body will join and adds a slight raised edge for sewing onto the runner.
Round 14 :
1 sc in first 12 sts, dec across next 6 dec evenly (reduce 6 sts) so formula: (1 sc x12, (2 sc, dec) x6) to shape into a slight waist (42)
Round 15 :
1 sc in each st around (42)
Round 16 :
1 sc in first 10 sts, (dec, 2 sc) repeat across to further define top of body into a rounded shoulder shape (36)
Round 17 :
1 sc in each st around (36)
Round 18 :
Fasten off leaving a long tail for sewing to runner. Weave in short tail on wrong side. Block flat to ensure even shape. These rounds create a tapered body that will accept head and tail placement.
Info :
You can slightly stuff the center of the body with a tablespoon of stuffing to give a gentle lift if desired; keep flat for authentic applique look. If stuffing, sew closed with long tail before attaching to runner.
— Cat Applique: Head (Make 3) :
Round 1 :
With Black, mr, ch 1, 6 sc in mr (6)
Round 2 :
6 inc (12) — work inc in each stitch around to reach 12.
Round 3 :
(1 sc, inc) x 6 (18)
Round 4 :
(2 sc, inc) x 6 (24)
Round 5 :
1 sc in each st around (24)
Info :
Place head so the bottom edge overlaps the top of the body by about 6-8 stitches to create a natural neck seam. You will add ears next; pin the head first to check alignment.
Round 6 :
(3 sc, dec) x 6 (18) — gentle shaping into a rounded head by reducing evenly. This keeps the head relatively flat for applique use.
Round 7 :
1 sc in each st around (18)
Round 8 :
Fasten off leaving a long tail for sewing. Block lightly. Set aside while you make ears and tail.
Info :
For a slightly more pointed cat expression, after Round 6, pinch the top center and work a single sc decrease at the top to create a subtle forehead point; this is optional.
— Cat Applique: Ears (Make 6 — 2 per cat) :
Round 1 :
With Black, ch 4, sl st to join to form ring, ch 1, 6 sc in ring (6)
Round 2 :
(1 sc, inc) x 3 (9)
Round 3 :
1 sc in each st around (9) — shape the ear to a rounded triangle by flattening briefly and sl st to finish, leaving long tail for sewing.
Info :
Pin ears to top edge of head, spacing them approx 6 stitches apart depending on head size. Angle ears slightly outward for the look in the photo.
— Cat Applique: Tail (Make 3) :
Round 1 :
With Black, ch 18 (or length you prefer), turn, sc in 2nd ch from hook and across (17 sc). Tail is a narrow strip that will be curved; leave tail at one end long for sewing. For a chunkier tail use hdc or two sc in each chain creating a wider strip.
Round 2 :
Ch 1, turn, sc across in back loops only (17) — this creates a slight ridge allowing tail to curl naturally.
Round 3 :
Fold tail strip and sew through both thicknesses along one short end to create a tapered tip; fasten off leaving long tail to sew tail to runner behind cat body at a slight curve.
Info :
Bend tail into a gentle S-shape and pin to runner before sewing. Sew through the tail and the body edge for secure attachment; use a few extra stitches if runner will be handled frequently.
— Cat Applique: Bow (Make 3) :
Round 1 :
With Pumpkin Orange, ch 6, sl st into first ch to form small loop. Ch 1, work 6 sc in loop; sl st to join and leave long tail. Pinch center and wrap a short length of orange to cinch bow, secure on wrong side and use tail to sew bow to neck area (between head and body) of cat.
Info :
Bow can also be crocheted as a small 3-row rectangle (ch 8, sc across 3 rows) and cinched; choose whichever method gives desired bow fullness.
— Pumpkin Applique (Make 3) :
Round 1 :
With Pumpkin Orange, mr, ch 1, 6 sc in mr (6)
Round 3 :
(1 sc, inc) x 6 (18)
Round 4 :
(2 sc, inc) x 6 (24)
Round 5 :
1 sc in each st around (24) — flatten slightly and pull center to create a squat pumpkin shape.
Round 6 :
Fasten off leaving tail for sewing. With Green, embroider a small stem: use 5 sc in a tiny chain of 4 to make a short stem and sew to top center of pumpkin.
Round 7 :
Info : Using black embroidery thread or black yarn, stitch a friendly jack-o-lantern face centered on the pumpkin: two small triangle eyes and a smile. Use satin stitch or small straight stitches for clean lines. For best results, pin pumpkin to runner and embroider after it's sewn into place to keep it stabilized.
— Assembly: Pinning & Sewing Appliques :
Info :
With all appliques blocked and ready, lay the runner flat with the wrong side facing up. Using the placement grid marks from earlier, pin the first cat body centered on the cream field so its bottom edge sits approximately 1 cluster row above the inner orange border. Pin the head slightly overlapping the top of the body (about 6 stitches overlap). Pin pumpkin between cats centered on the same centerline. Repeat for the remaining two cat/pumpkin sets. Use at least 6 pins around each applique to keep them flat while sewing.
Round 1 (Sewing Step) :
Sew each applique onto the runner using matching thread and a whip stitch through the BLO ridge created on the body (Round 13 earlier). Take small, even stitches through both applique and the cream ch-1 spaces to make the attachment invisible on the right side.
Round 2 :
Sew ears and bows to the head after the head is attached. Sew tail under the body toward the rear, taking care to secure the tail end through multiple runner stitches for stability. Weave in all tails to wrong side and trim close.
Info :
Make sure bows are centered and identical; place a small dab of fabric glue on the wrong side of the bow knot for extra hold if runner will be laundered frequently.
— Optional Raised Body Technique (Textured Applique) :
Round 1 :
If you want the cats to sit raised off the runner a little, before finishing off each body stitch around its final round with a reverse sl st to create a small ridge. Then place a thin layer of felt or a small square of interfacing on the wrong side between applique and runner and sew through felt to secure — this gives subtle padding without full stuffing.
Info :
Test a small sample before applying felt under all appliques to ensure it doesn't bulk the runner edges or cause puckering when laid flat.
— Finishing Touches & Embroidery :
Round 1 :
Use embroidery floss or yarn to stitch whiskers on the cats: two short straight stitches each side from a seam under head. For eyes you can add tiny French knots in black or a small stitch of white for a catchlight. Use green yarn to stitch pumpkin stems if not crocheted.
Round 2 :
Secure all ends by weaving tails through several stitches on wrong side and trimming. Lightly steam block entire runner to blend seams and flatten any sewing distortions. Press carefully with a cloth over the applique area to avoid flattening textured shells.
Info :
Hand wash gently in cool water with mild detergent if needed, reshape and dry flat. Avoid machine washing as it may distort the scalloped edge over time.
— Alternate Colorways & Size Adjustments :
Info :
To make a longer runner, increase the number of center granny rows in multiples of 4 for even motif spacing, or add more motif repeats. To make a shorter runner, decrease center rows. Swap cream for ivory, or use a neutral gray for a subtler Halloween look. Replace black cats with dark purple for a playful twist.
Info :
To convert this runner into a table centerpiece square, work the center as a larger square (increase foundation chain to desired square width) and maintain border pattern around all sides; applique placement can be adapted accordingly.
This Halloween table runner brings playful charm and handmade warmth to your seasonal display! The combination of lacy granny texture, bold orange stripe, and dramatic black scallops makes a striking centerpiece that is both festive and functional. Each hand-sewn cat and pumpkin applique adds character and personality — a perfect project to celebrate the season and gift to someone who loves handcrafted decor. 🧶🎃 Happy stitching and enjoy watching this runner brighten your table! ✨