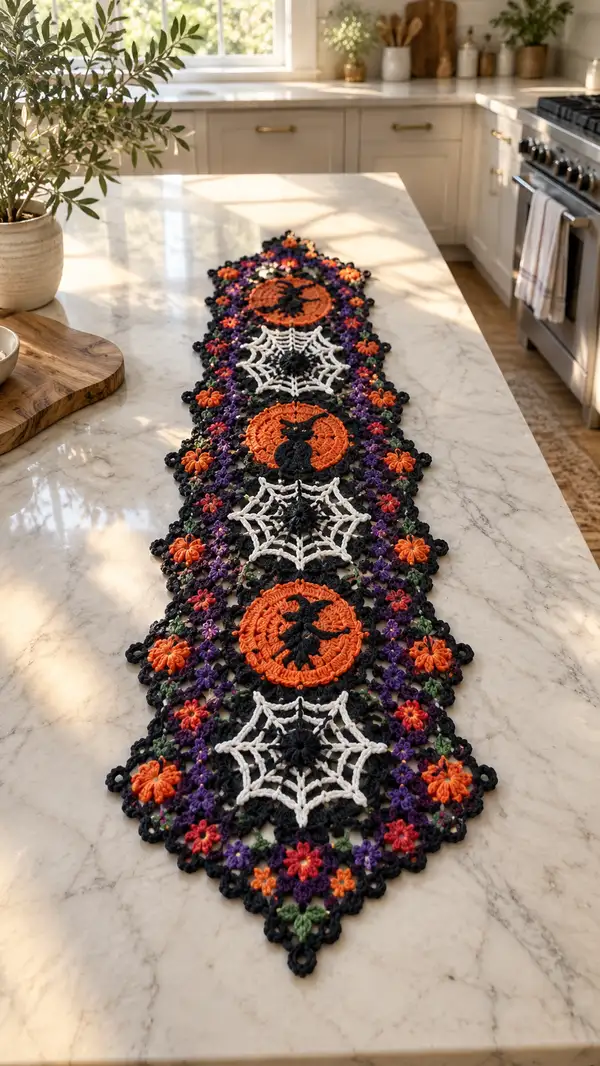
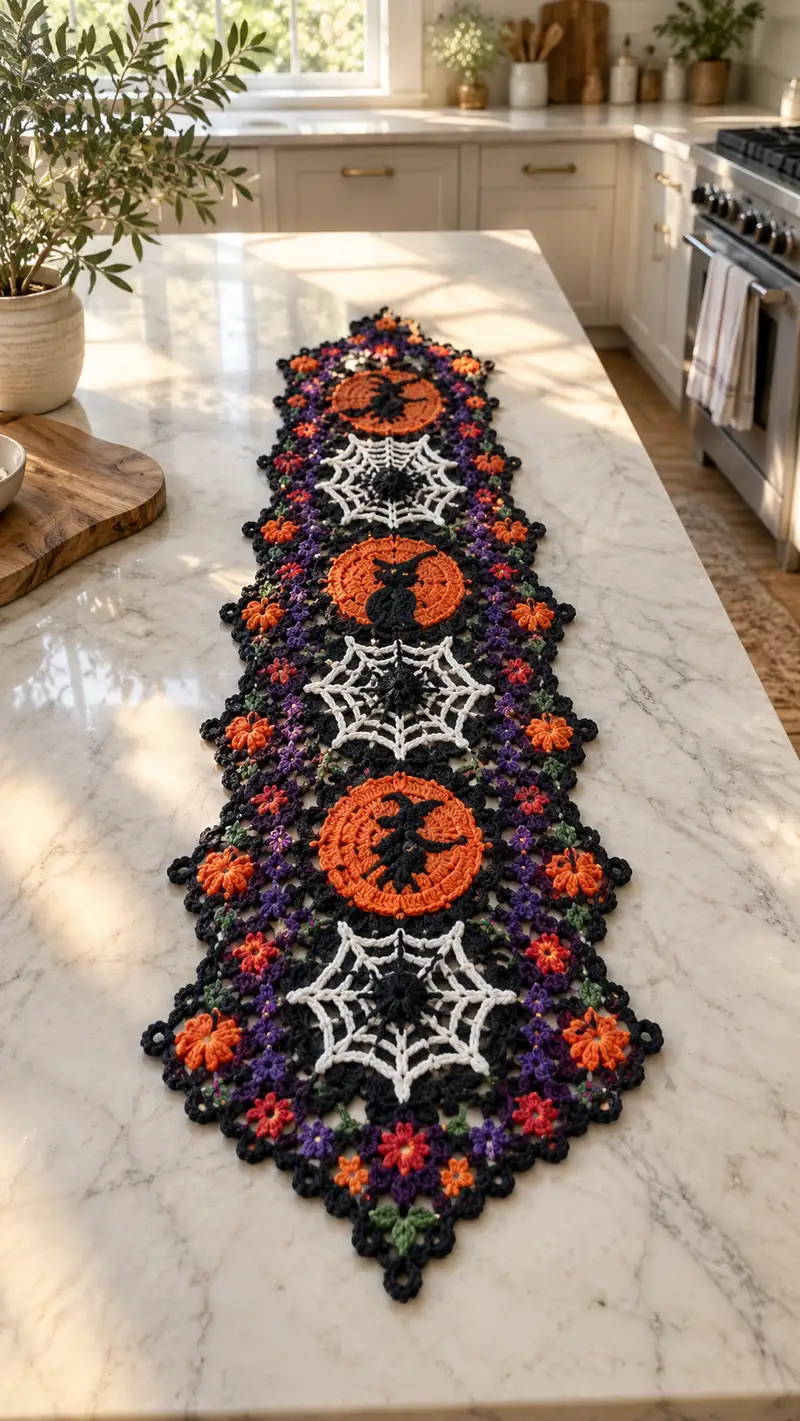
A spooky-chic crochet table runner featuring repeating pumpkin medallions, lacy spiderweb motifs, and colorful floral connectors in classic Halloween colors. Worked in joined motifs with contrast edging, this runner has rich texture from puff stitches, picots, and layered appliqued silhouettes. Ideal for a festive centerpiece, it lays flat and measures approximately 14 x 60 inches depending on yarn and tension.
Progress Tracker
0% Complete
— Overview & Notes :
Info :
This pattern is worked in separate motifs then joined-as-you-go on a black lacy ground. Motifs include: Pumpkin Medallion (worked in orange with black silhouette applique), Spiderweb Medallion (white web on black center), Small Floral Cluster motif (multicolored puff/floral elements), and final Black Lace Border scallops. Adjust motif counts to lengthen the runner. Gauge and tension will affect final size; block motifs before joining for best results.
Info :
Common stitch techniques used: puff stitch (yarn over, insert, pull loop, repeat 4 times, yarn over and pull through all loops then ch1 to close), cluster, picot (ch3, sl st into first ch), and joined-as-you-go slip stitch joins. Keep stitch markers to note round starts on circular medallions.
— Pumpkin Medallion (Make 4 or desired number) :
Round 1 :
With orange, work 8 sc in magic ring (8)
Round 2 :
Inc in each st around (16)
Round 3 :
(1 sc, inc) x 8 (24)
Round 4 :
(2 sc, inc) x 8 (32)
Round 5 :
(3 sc, inc) x 8 (40)
Round 6 :
(4 sc, inc) x 8 (48)
Info :
Place a stitch marker at the first stitch of each round to keep proper count. This creates a flat circular base for the medallion; if the circle ruffles, reduce an increase round, if cupping, add an extra increase round.
Round 7 :
1 sc in each st (48)
Round 8 :
1 sc in each st (48)
Round 9 :
(6 sc, inc) x 6 then (6 sc, dec) x 0 to shape a slightly defined pumpkin ridge (48)
Round 10 :
1 sc in each st (48)
Round 11 :
Start pumpkin ribbing: *ch1, (bp dc around next st, fp dc around next st)* repeat around to create subtle vertical texture (48)
Info :
Use back-post and front-post dc alternating to create a ridged, segmented pumpkin look. Work carefully to keep count consistent — these are elongated post stitches and may slightly alter tension.
Round 12 :
1 sc in each st (48)
Round 13 :
(4 sc, inc) x 8 (56)
Round 14 :
1 sc in each st (56)
Round 15 :
(5 sc, inc) x 8 (64)
Info :
Rounds 13-15 expand the medallion slightly to give room for the black silhouette overlay. Block this piece flat so the applique can be sewn on neatly.
Round 16 :
Work puff stitch accents around: *ch2, puff in next st, ch1, sl st in next st* repeat around (64 puff bases created with ch spaces)
Round 17 :
Visible ridge: 1 sc in each st (64)
Round 18 :
Finish edge: *sc in next 2, picot (ch3, sl st into first ch), sc in next 2* repeat around (64 + picots)
Round 19 :
Fasten off leaving 6-8 inch tail for sewing applique. Weave tail to wrong side and secure. Block flat
Info :
You will sew the cat applique onto the center of this medallion. Centering matters: count from any reference stitch to find the center point, or mark the center with a removable pin.
— Cat Silhouette Applique (Make 4; sewn to Pumpkin Medallion) :
Round 1 :
With black, ch 8, join with sl st to form small ring, ch1 (counts as marker)
Round 2 :
Work 10 sc evenly into ring, join with sl st (10)
Round 3 :
Form base of body: ch1, (inc) x 5 (20)
Round 4 :
(1 sc, inc) x10 (30)
Round 5 :
Start shaping neck: 1 sc in next 6, dec, 1 sc in next 6, dec (28)
Round 6 :
1 sc around (28)
Info :
At this stage you are shaping a compact silhouette. The cat will be stylized — simplified head, body, tail — to read against the pumpkin. Keep edges tidy; fasten off and refasten small yarn tails for legs/tail if you prefer embroidered details.
Round 7 :
Begin head shaping: fold forward 6 sts to form face, join with sl st across to form a small flat head spur (shape approximate)
Round 8 :
With small stitches, create ear points: working along top of head, sc, dec, sc on each side to make two triangular ears. Finish back to body (approximate shaping)
Round 9 :
Create tail: attach yarn at lower back, ch6, sl st back along chain to body to form curved tail. Secure and fasten off
Round 10 :
Embellish silhouette: using surface slip-stitch or small sc, create paw/leg separators and gentle curve for belly if desired. Fasten off leaving long tail for sewing (approx 6-8 inches)
Info :
Because the cat is small and stylized, exact stitch counts are approximate; focus on silhouette shape. Crochet a template first and test sew to the orange medallion; trim or adjust if necessary. You may alternatively cut a felt silhouette and sew it on for crisp edges.
Round 11 :
Sew applique to pumpkin medallion center using whip stitch with long tail, stitch around silhouette edges and secure. Weave in ends on wrong side
Info :
Use small, even stitches to attach the cat to the orange base. If you prefer a raised silhouette, stuff a tiny bit of batting behind it before sewing.
— Spiderweb Medallion (Make 3 or desired number) :
Round 1 :
With black, mr, work 8 sc into ring (8)
Round 2 :
Inc in each st (16)
Round 3 :
(1 sc, inc) x8 (24)
Round 4 :
1 sc in each st (24)
Round 5 :
Change to white. Info: Change to white yarn with sl st at end of round; carry black tucked to wrong side for central star
Round 6 :
Form web spokes: *ch6, sl st into base at every 3rd stitch to make 8 spokes* (8 ch spokes)
Round 7 :
Working into ch spaces only, sl st into first ch space, *ch4, sl st into next spoke ch space* around (creates ring for web) (8 rings)
Round 8 :
*Ch6, sl st into next spoke to continue web; then work (ch3, sl st) clusters between spokes to create webbing* repeat around
Info :
The web is worked from center outward using chains and slip stitches to create the fine look. Keep tension relaxed so the web lays flat but not floppy; block gently after finishing in white.
Round 9 :
Reinforce center: with black, make a small bobble at center by working 5 dc in same st, sl st to secure. Fasten off black and weave ends. White web remains dominant (approx final diameter matching pumpkin medallion)
Round 10 :
Finish web edge: sl st around outermost ch loops to create tidy edge; fasten off and weave ends
Info :
If you want a slightly larger web, add an additional chain-round repeating Round 7 and Round 8 pattern to expand circumference in consistent intervals.
— Small Floral Cluster Motif (Make many — join to create lace ground) :
Round 1 :
With purple, mr, 6 sc in ring (6)
Round 3 :
Ch2, puff in next st, sl st in next, *ch2, puff, sl st* repeat around to create 6 puff petals (12 bases)
Round 4 :
Change to orange for alternating tiny blooms: join orange at one puff base, ch3, in same base make 3 dc cluster to form tiny bloom, sl st to base. Repeat with orange in every other puff for color contrast (3 orange mini blooms)
Round 5 :
Change to green: make leaf anchors between petals by ch4, sc back into base forming small triangular leaf points around motif (6 leaves)
Round 6 :
Finish with black lace ring: with black, join and sl st around outer edge making 12 sl st evenly to create join points for lacy ground
Info :
These small clusters act as the stitching nodes when joining bigger medallions into a continuous runner. Make a surplus of these motifs to intersperse between medallions and form the decorative mesh.
Round 7 :
Optional decorative picots around edge: *ch3, sl st into same st* repeat to produce tiny picot points (12 picots)
Round 8 :
Fasten off and leave long tails for joining (6-8 inches). Weave ends later after joining.
— Black Lace Connector Motif (Make enough to alternate between medallions) :
Round 1 :
With black, mr, 10 sc in ring (10)
Round 3 :
(1 sc, inc) x10 (30)
Round 4 :
Ch4, sl st into next, ch4, sl st into next around to make 15 decorative ch loops (30 alternate loops approximate)
Round 5 :
In each ch4 loop work: (sc, ch3, sc) to create a small arch; at each arch peak work a picot (ch3, sl st into first ch) for detail (15 arches)
Info :
This connector motif is purposely open; it will be used as the primary link between pumpkin and web motifs as well as the small floral clusters. Its loops make excellent anchoring points for join-as-you-go slip stitch connections.
Round 6 :
Finish edge with 1 sc in each st around to tidy (30)
Round 7 :
Fasten off leaving 8-10 inch tail for joining to adjacent motifs
— Join-As-You-Go Method & Motif Layout :
Info :
Layout: The runner alternates Pumpkin Medallion, Spiderweb Medallion, Pumpkin, Spiderweb, Pumpkin (or your chosen sequence). Between each large medallion, place two or three Black Lace Connector motifs and several Floral Cluster motifs to create a wide lacy strip. Pin everything on blocking board according to spacing you prefer prior to joining.
Info :
To join motifs as you complete the final round of a motif: lay new motif right side up and press it to the already-made neighbor so that corresponding black loops/arcs meet. On the final round, when you reach a designated join point, insert hook through the join point on existing motif and complete a sl st (or sc) to connect then continue around. Use sl st joins for flatter finishes, whip stitch if you prefer a more secure sewn join.
Info :
Work on a large flat surface. Use pins to keep spacing consistent — 1/2 inch between large medallions is visually pleasing. If you want a narrower runner, reduce the number of floral clusters between medallions.
— Joining Sequence Example (detailed) :
Round 1 :
When finishing a Pumpkin Medallion, identify 8 equally spaced outer picot points. Align 4 of those points with 4 loops of an adjacent Black Lace Connector motif and sl st through both pieces at each point; then continue to sl st into next picot to secure. After four sl sts, finish the Pumpkin medallion round and fasten off. (Exact stitch count depends on picots; 4-8 sl st joins per side typical)
Info :
For a stronger join use a short whip stitch with black yarn after temporary joining with sl st — this hides the seam and adds durability for table use.
Round 2 :
Join Spiderweb motif to connector motifs by aligning spoke points with connector arches. Use sl st through connector loop and spider spoke loop at 8 points around web. This makes the web appear nested inside the black lace ground
Round 3 :
Insert floral clusters into remaining gaps: each floral cluster will be joined at 3-4 small black sl st nodes using the tail from Round 6 of the cluster. Sew with mattress stitch or sl st as desired to make a continuous lacy fabric
Info :
Take frequent pauses to check runner stays flat. If the runner buckles, remove some joins and adjust spacing. Light blocking after partial joins will help preserve shape.
— Scalloped Outer Border (single continuous border around entire runner) :
Round 1 :
With black, pick up at a convenient point on the runner outermost edge. Work 1 sc evenly around entire outer edge to create a tidy base. Count stitches as you go projecting an approximate total (aim 300-380 sc depending on runner length)
Info :
Maintain consistent spacing when working around complex joins; use pins to hold points flat and avoid pulling too tightly which will pucker the lacework.
Round 2 :
*Skip 2 sc, in next sc work (5 dc, ch3, 5 dc) as a large shell, sl st into next sc* repeat around to form large shells. Adjust number of shells to create even distribution (approx 25-30 shells)
Round 3 :
Between shells, add small picot clusters: in the ch3 space of each shell work (sc, ch3, sl st into first ch) to create tiny decorative points, then sl st to next shell base
Info :
To achieve neat scallops at runner corners, work partial shells (3 dc, ch3, 3 dc) then full shells on flat edges so corners sit pointed and symmetrical. Mark corner centers before starting border for consistent shaping.
Round 4 :
Work a finishing round of sc around the base of each picot cluster to tidy and secure edges. Fasten off and weave all ends. Block the completed runner to final dimensions and press gently.
— Finishing Touches & Blocking :
Info :
Blocking: Soak runner in lukewarm water with mild soap, press out excess water gently (do not wring). Pin the runner flat on a blocking mat, pulling edges to desired shape. Use rust-proof pins and, if helpful, blocking wires to obtain smooth scallops. Allow to dry completely (24-48 hours depending on humidity).
Info :
Weave in ends on the wrong side with a yarn needle. For extra durability, consider sewing a narrow fabric backing or interfacing on high-traffic surfaces to protect lacework from friction on the tabletop.
— Alternate Color or Size Notes :
Info :
To change scale, use a larger hook and heavier yarn to make a larger table runner. Add or remove medallions to lengthen/shorten. Swap orange for a pale pumpkin shade for vintage look, or replace white webs with silver/gray for subtle effect.
Info :
If you prefer a reversible runner, consider crocheting flat medallions and sewing them to a backing fabric before attaching border; this will conceal joins and create a smooth underside.
— Troubleshooting Common Issues :
Info :
If seams gap, remove a few sl st joins and re-space motifs or tighten tension slightly on the joining round. If motifs are not lying flat, steam block gently to relax fibers and then pin smooth while cooling. For uneven circumference on medallions, re-count increase rounds and block again to coax into shape.
Info :
Store runner flat or rolled — never fold sharply to avoid creating permanent creases in the lace. For long-term care, hand wash gently and reshape while damp.
This festive Halloween table runner brings texture, contrast, and playful motifs to your centerpiece. The combination of bold pumpkin medallions, delicate spiderwebs, and tiny floral clusters creates a layered, handcrafted look. Working motif-by-motif is relaxing and very satisfying as the runner grows. 🧶 Pin it, stitch it, and let your home celebrate the season with handmade charm! 🎃