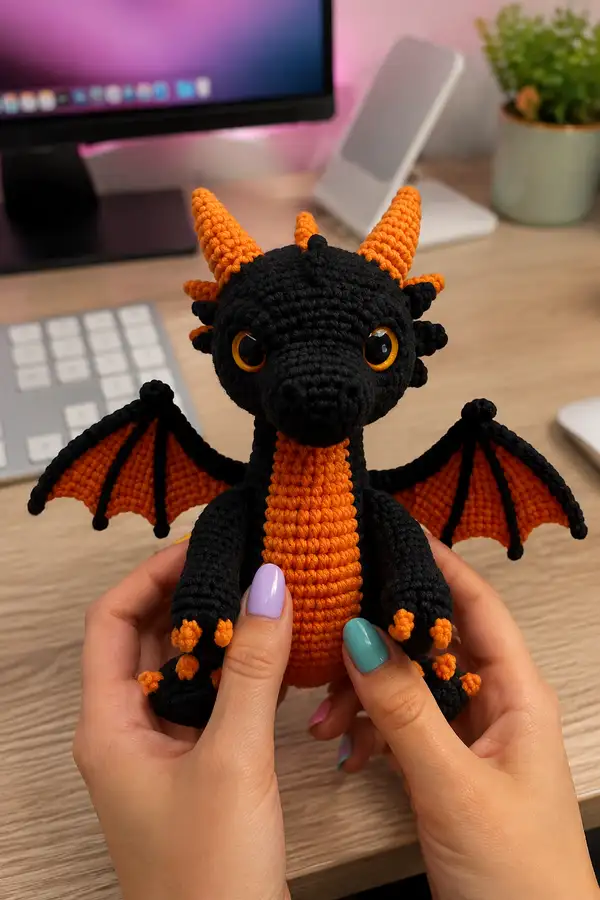
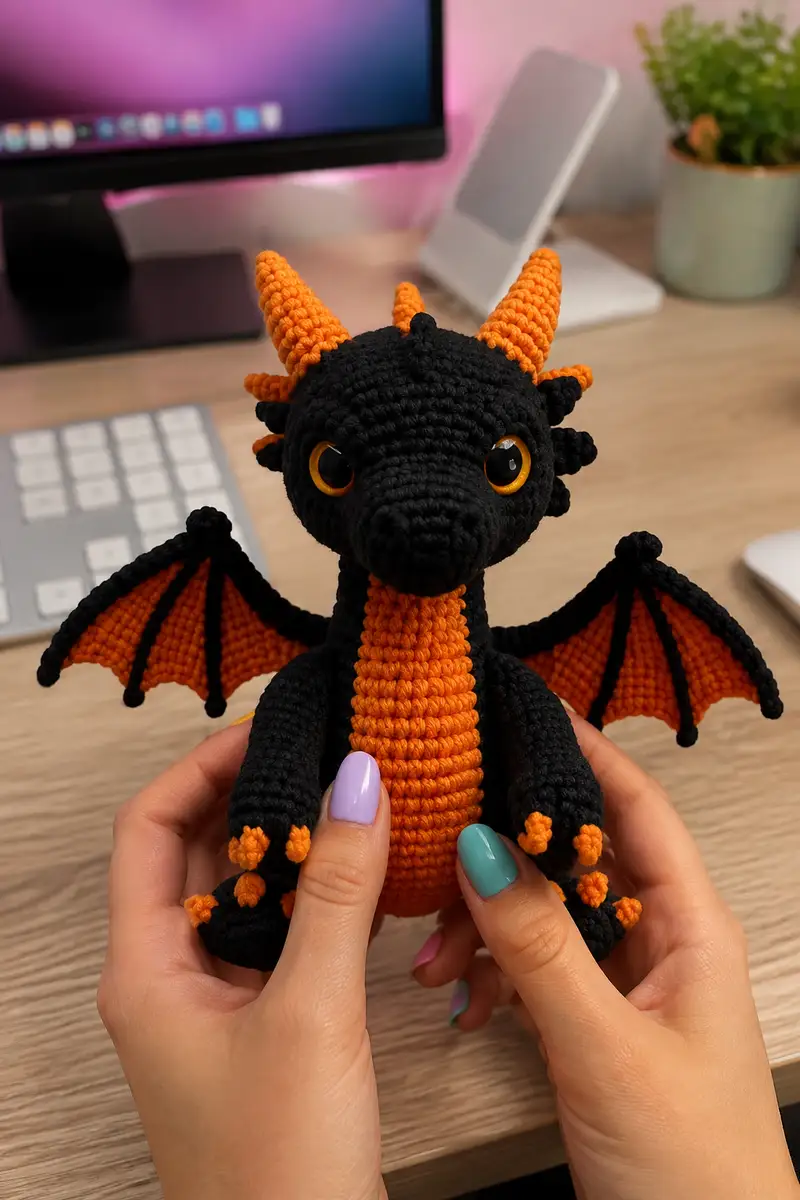
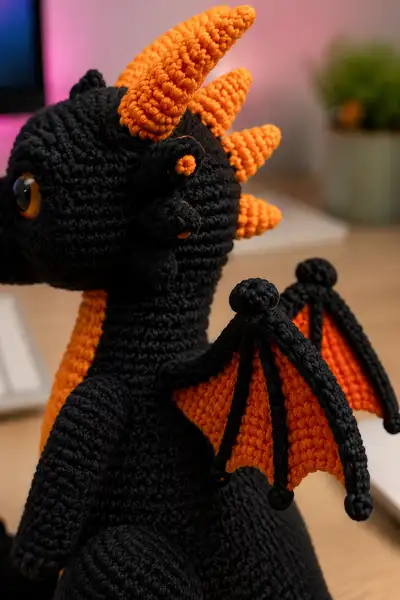
Create a spooky-cute dragon with bright orange accents and deep black body — perfect for Halloween displays or a cuddly seasonal companion. This pattern includes detailed step-by-step instructions for the head, neck, body, limbs, wings, horns, spikes, tail and small finishing details. The finished dragon shows a long neck, expressive amber eyes, pointed horns and articulated wing supports for a dramatic look.
Progress Tracker
0% Complete
— Head :
Round 1 :
6 sc in magic ring (6)
Round 3 :
(1 sc, 1 inc) x 6 (18)
Round 4 :
(2 sc, 1 inc) x 6 (24)
Round 5 :
(3 sc, 1 inc) x 6 (30)
Round 6 :
(4 sc, 1 inc) x 6 (36)
Round 7 :
(5 sc, 1 inc) x 6 (42)
Round 8 :
(6 sc, 1 inc) x 6 (48)
Round 9 :
(7 sc, 1 inc) x 6 (54)
Round 10-14 :
1 sc in each st (54)
Info :
Place safety eyes between rounds 12 and 13. Space them about 10-12 stitches apart for the amber, expressive look shown. Mark the first stitch of each round with a stitch marker to avoid losing your place.
Round 15 :
(7 sc, 1 dec) x 6 (48)
Round 16 :
(6 sc, 1 dec) x 6 (42)
Round 17 :
1 sc in each st (42)
Round 18 :
(5 sc, 1 dec) x 6 (36)
Info :
Begin stuffing the head moderately at round 18. Use small amounts of fiberfill and shape with your fingers to keep the eye sockets and forehead smooth but firm. The eyes should sit neatly without bulging out.
Round 19 :
1 sc in each st (36)
Round 20 :
(4 sc, 1 dec) x 6 (30)
Round 21 :
1 sc in each st (30)
Round 22 :
(3 sc, 1 dec) x 6 (24)
Round 23 :
(2 sc, 1 dec) x 6 (18)
Info :
At this point you can stitch the separate snout/muzzle piece into position (see muzzle section). Keep head slightly understuffed until muzzle is attached so sewing is easier. Fasten off and leave long tail if you prefer assembling before final closure.
Round 24 :
(1 sc, 1 dec) x 6 (12)
Round 25 :
6 dec (6) - leave open for neck or fasten off depending on assembly preference
Info :
If you plan to attach a long neck tube, leave this opening unclosed and attach neck by sewing round-to-round. If you prefer to close the head and add neck later, fasten off and set piece aside.
— Muzzle / Snout :
Round 1 :
6 sc in magic ring (6)
Round 3 :
(1 sc, 1 inc) x 6 (18)
Round 4 :
(2 sc, 1 inc) x 6 (24)
Round 5-7 :
1 sc in each st (24)
Round 8 :
(2 sc, 1 dec) x 6 (18)
Round 9 :
1 sc in each st (18)
Round 10 :
(1 sc, 1 dec) x 6 (12)
Round 11 :
6 dec (6) - leave opening slightly; do not fasten off yet
Info :
Stuff the snout lightly, enough to hold shape but still flexible for sewing. Position the snout centered on the head between the eyes and sew securely using the long tail with ladder stitch, then continue stuffing head fully before closing head opening.
— Neck :
Round 1 :
6 sc in magic ring (6)
Round 3 :
(1 sc, 1 inc) x 6 (18)
Round 4 :
(2 sc, 1 inc) x 6 (24)
Round 5-22 :
1 sc in each st (24) — work 18 rounds to form a long neck tube (Rounds 5-22)
Info :
Work the neck in continuous rounds for a smooth tube; you can change to alternating BLO rows for slight ribbing if you prefer. Keep neck slightly understuffed until head and body are joined, then stuff moderately to allow neck to hold shape. Optionally insert flexible wire for poseability before final stuffing.
Round 23 :
(2 sc, 1 dec) x 6 (18)
Round 24 :
(1 sc, 1 dec) x 6 (12)
Round 25 :
6 dec (6) - leave tail long for sewing to body or avoid final dec if you plan to sew the neck tube open-round to the body opening
Info :
When attaching neck to body, align the neck rounds to a matching body opening round and sew evenly to distribute tension. If you closed the head earlier, re-open or attach the neck to the underside of the head using the same method.
— Body :
Round 1 :
6 sc in magic ring (6)
Round 3 :
(1 sc, 1 inc) x 6 (18)
Round 4 :
(2 sc, 1 inc) x 6 (24)
Round 5 :
(3 sc, 1 inc) x 6 (30)
Round 6 :
(4 sc, 1 inc) x 6 (36)
Round 7 :
(5 sc, 1 inc) x 6 (42)
Round 8 :
(6 sc, 1 inc) x 6 (48)
Info :
We are creating an oval body slightly wider at the base. If you'd like a rounder belly, add one extra round of increases before stabilizing the circumference.
Round 9 :
(7 sc, 1 inc) x 6 (54)
Round 10 :
(8 sc, 1 inc) x 6 (60)
Round 11-14 :
1 sc in each st (60)
Info :
Change to orange yarn for belly stripe now if you want to crochet the belly as an attached panel. Alternatively, work the entire body in black and crochet an orange belly strip to sew on later. Below instructions assume an integrated orange belly panel worked separately and sewn in — instructions for the belly panel follow this body section.
Round 15 :
(8 sc, 1 dec) x 6 (54)
Round 16 :
1 sc in each st (54)
Round 17 :
(7 sc, 1 dec) x 6 (48)
Round 18 :
1 sc in each st (48)
Round 19 :
(6 sc, 1 dec) x 6 (42)
Round 20 :
(5 sc, 1 dec) x 6 (36)
Round 21 :
1 sc in each st (36) - start to position for neck insertion
Info :
Start stuffing the body at round 18-21. Stuff firmly at the bottom to allow the dragon to sit upright. Leave the opening soft where the neck joins so you can sew the neck to the top opening snugly.
Round 22 :
(4 sc, 1 dec) x 6 (30)
Round 23 :
(3 sc, 1 dec) x 6 (24)
Round 24 :
(2 sc, 1 dec) x 6 (18)
Round 25 :
(1 sc, 1 dec) x 6 (12)
Round 26 :
6 dec (6) - Fasten off leaving long tail for sewing base closed and for attaching to any stand or adding weighted pellets
Info :
Before fully closing the body, position the neck tube into the opening, pin evenly and sew round-to-round. Make sure the head is aligned front-center with the belly stripe if you added one.
— Belly Panel (Make 1, Orange) :
Round 1 :
6 sc in magic ring (6)
Round 3 :
(1 sc, 1 inc) x 6 (18)
Round 4 :
(2 sc, 1 inc) x 6 (24)
Round 5-18 :
1 sc in each st (24) — work until belly length matches from under jaw to lower body (approx 14 rounds)
Info :
Sew the belly panel to the front of the body using whip stitch. Stretch slightly if needed so it sits flat. Alternatively, after round 6 you can switch to rows instead of rounds to make a flatter elongated panel to sew on.
— Front Legs / Arms (Make 2) :
Round 1 :
6 sc in magic ring (6)
Round 3 :
(1 sc, 1 inc) x 6 (18)
Round 4-6 :
1 sc in each st (18) - form hand/paw base
Round 7 :
(2 sc, 1 dec) x 6 (12) - start tapering wrist
Round 8-12 :
1 sc in each st (12) - work 5 rounds to form forearm length
Round 13 :
(1 sc, 1 dec) x 4, 4 sc (8) - adjust shape before upper arm
Round 14-18 :
1 sc in each st (8) - work 5 rounds to create upper arm tube
Info :
Stuff the hand/paw firmly but leave the upper arm less stuffed so it joins flush with the body. Mark the front of the upper arm so you attach claws symmetrically. Make small orange claws by making small bobbles (see claws section).
Round 19 :
Fasten off leaving long tail for sewing to the body; position the arm at the side between body rounds 14-18 and sew on securely.
— Hind Legs / Feet (Make 2) :
Round 1 :
6 sc in magic ring (6)
Round 3 :
(1 sc, 1 inc) x 6 (18)
Round 4 :
(2 sc, 1 inc) x 6 (24)
Round 5-8 :
1 sc in each st (24) - shape foot base
Round 9 :
(3 sc, 1 dec) x 6 (18)
Round 10-14 :
1 sc in each st (18) - lower leg
Round 15 :
(2 sc, 1 dec) x 6 (12)
Round 16-20 :
1 sc in each st (12) - upper leg
Info :
Stuff feet very firmly so the dragon can sit. Add a few extra stitches across the base when sewing legs to body to create a flat, stable insertion point — concentrate stitches at the base to avoid wobble.
Round 21 :
Fasten off leaving long tail for sewing to body — attach at base so the knees sit around body rounds 6-10 depending on desired sitting posture.
— Claws (Make 12 small claws; 3 per foot and 3 per hand) :
Round 1 :
5 sc in magic ring (5)
Round 3 :
5 sc (5) - fasten off leaving long tail for sewing; use orange yarn for tip contrast
Info :
Sew three claws onto each paw/foot tip, spacing them evenly. Stitch claws so they point slightly outward as pictured. Add a tiny orange knot on each black foot tip for the orange-tipped spike look if desired.
— Horn Cone (Make 3 large horns) :
Round 1 :
6 sc in magic ring (6) - use orange yarn
Round 3 :
(1 sc, 1 inc) x 6 (18)
Round 4 :
(2 sc, 1 inc) x 6 (24)
Round 5 :
1 sc in each st (24)
Round 6 :
(3 sc, 1 dec) x 6 (18)
Round 7 :
(2 sc, 1 dec) x 6 (12)
Round 8 :
(1 sc, 1 dec) x 6 (6)
Round 9 :
6 sc around (6) - do not stuff too firmly to keep horns slightly flexible
Round 10 :
1 sc in each st (6) - fasten off leaving long tail for sewing
Info :
Sew the three larger horns to the crown of the head: two behind the brow and one central rear. Space evenly and angle them so the front horns curl slightly forward as seen in the image.
— Small Crest Spikes (Make 6-8 small spikes) :
Round 1 :
6 sc in magic ring (6) - use black for base
Round 3 :
Sl st into next st, ch1, sc3 along the ch to form a short raised ridge; fasten off leaving long tail for sewing
Info :
Sew spikes evenly along the head crest and down the neck at approximately every 5-7 stitches to create the stepped ridge visible in the photo. Add a small orange round in the center of the black spike base to mimic the orange-tipped effect.
— Wings — Membrane (Make 2, Orange) :
Round 1 :
6 sc in magic ring (6)
Round 3 :
(1 sc, 1 inc) x 6 (18)
Round 4 :
(2 sc, 1 inc) x 6 (24)
Round 5-14 :
1 sc in each st (24) - work flat increasing length by working rows or rounds until the membrane reaches the desired triangular shape (approx 10 rounds)
Info :
Work the membrane so it forms a scalloped triangular shape. You can create a more pronounced wing by increasing on one or both outer edges in the early rounds to get an elongated wing shape. Keep the inner edge straight for attaching to the wing frame.
— Wings — Fingers & Edge (Make 2 sets, Black) :
Round 1 :
Ch 20, sl st into 2nd ch from hook and sc back along chain to make one rib (19 sc). Fasten off.
Round 2 :
Make 3-4 ribs per wing spaced evenly along the membrane. Each rib is a chain turned back into sl st and sc to create a thick raised bone.
Round 3 :
Join all ribs along the marginal edge of the membrane with sc in each stitch to create a thick black outline. Fasten off leaving long tails to sew to membrane.
Info :
Pin ribs to the wing membrane before sewing. The ribs should create 3-4 channels on each wing creating the look of batlike wing bones. Add a small black bobble at the wing tip: make 6 sc in magic ring and sew in place to mimic the small round tip in the image.
— Tail :
Round 1 :
6 sc in magic ring (6) - use black
Round 3 :
(1 sc, 1 inc) x 6 (18)
Round 4-10 :
1 sc in each st (18) - lengthen tail with 7 rounds for a tapered tail
Round 11 :
(1 sc, 1 dec) x 6 (12)
Round 12-15 :
1 sc in each st (12) - finish length
Round 16 :
(1 sc, 1 dec) x 4 (8)
Round 17 :
1 sc in each st (8) - fasten off leaving tail to sew to body
Info :
Sew small spikes along the top of the tail at regular intervals. Add the final large bobble or arrow-shaped tip by making a slightly larger cone (see horn instructions scaled down) and sewing at the tail tip.
— Small Decorative Bobbles / Wing Tip Balls (Make 4-6) :
Round 1 :
6 sc in magic ring (6)
Round 3 :
Sl st around and fasten off leaving tail for sewing. These are used on wing tips and as tiny scale accents.
Info :
Add these bobbles to the wing tips and along the crest as seen in the photographs. They help define the silhouette and add a finished, playful look.
— Assembly & Finishing Touches :
Info :
Weave in all tails securely after sewing pieces together. Use matching black thread/yarn for invisible seams. Add small embroidered nostrils on the muzzle with a few tight stitches of black yarn. Use a tiny white yarn stitch or fabric paint dot to add eye highlights if you did not use safety eyes with built-in highlights.
Round 1 :
Final checks: re-stuff any areas that softened during sewing and close seams securely. Trim tails but leave long enough to weave into fabric for stability.
This spooky dragon brings Halloween charm with sculpted horns, expressive amber eyes, and dramatic black-and-orange contrast. As you stitch each part, you’ll watch personality emerge — from the curious head tilt to the delicately ribbed wings and tiny orange claws. The modular construction makes assembly fun, and the finished dragon is perfect as a seasonal display, gift, or cuddly companion. 🧶✨🎃