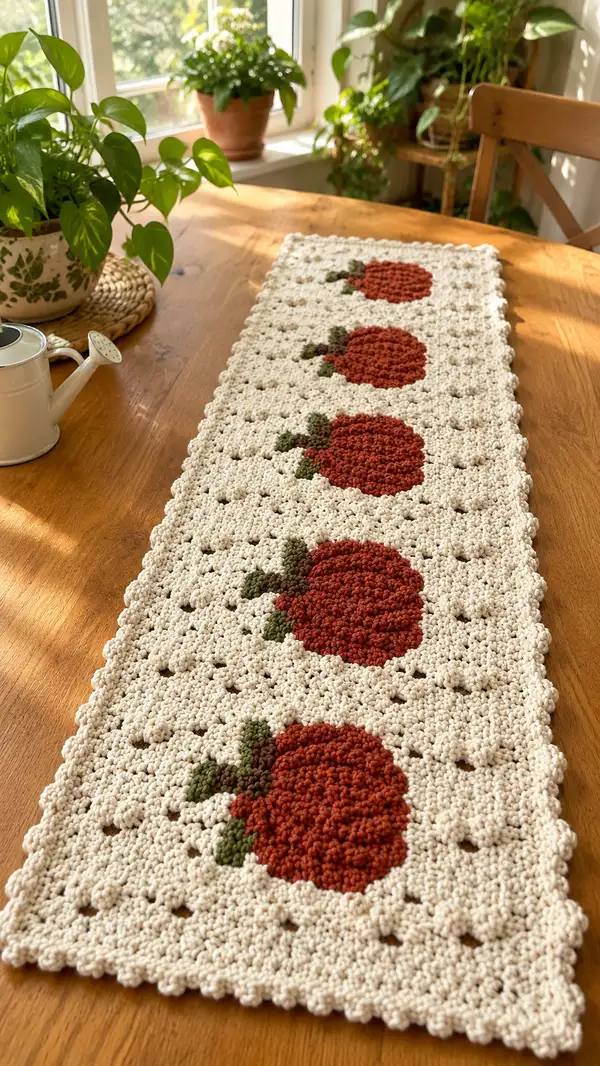
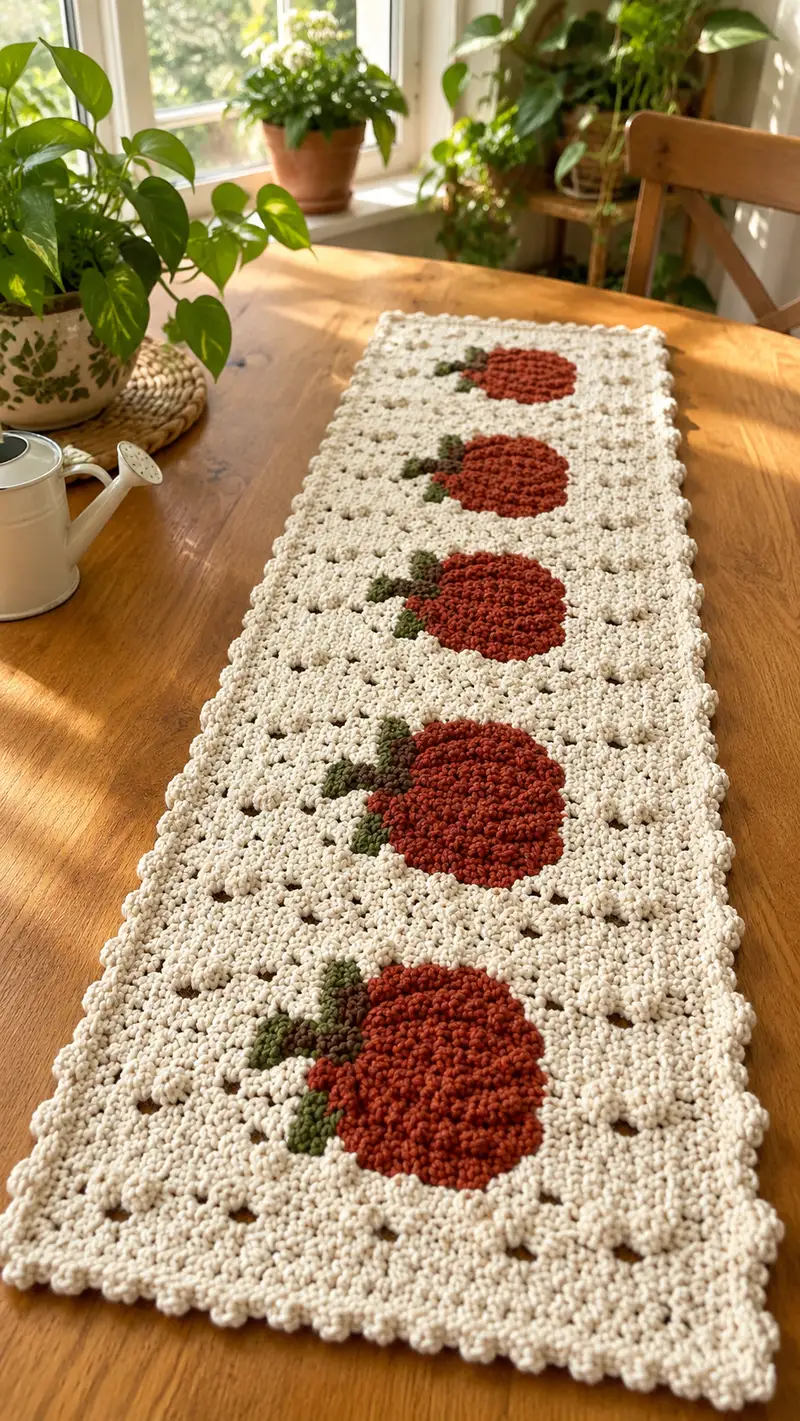
A cozy, vintage-inspired table runner featuring five textured pumpkin motifs set on a creamy neutral ground. Rich rust-orange pumpkins and olive-green stems are worked with puff/bobble texture for a dimensional, tactile finish. The runner is built from repeating rectangular panels joined together, finished with a scalloped shell border for a polished farmhouse look. Perfect for autumn tables, mantel displays, or as a seasonal gift.
Progress Tracker
0% Complete
— Notes & Gauge :
Info :
This runner is constructed from repeating rectangular pumpkin panels worked flat and joined together. The sample photographed shows five pumpkin panels joined end-to-end, with a scalloped border worked around the entire finished rectangle. Gauge is not critical for fit but will affect finished dimensions and yarn required. Sample gauge (worsted weight yarn, 4.0mm hook): 16 sc = 4 inches in single crochet. Panel finished width ≈ 10.5 inches, finished height per panel ≈ 7.5 inches. Adjust hook size if needed to match feel and drape.
Info :
Puff stitch used for pumpkin texture: yarn over, insert hook into stitch, yarn over, pull up loop (repeat yarn over, insert, yarn over, pull up loop) 3 times (total 7 loops on hook), yarn over and pull through all loops, chain 1 to close puff (counts as one stitch). Keep puffs consistent—do not pull loops too tight between pulls. Alternative: use 3dc bobble if you prefer slightly taller texture.
— Pumpkin Panel (Make 5) :
Info :
Each panel is worked flat across 36 stitches. The pumpkin silhouette occupies the central columns (stitches 11–26) and is built using puff stitches in Rust (Color B). The background is worked in Cream (Color A). Rows are worked in single crochet (sc) with color changes made in the last yarn over of the preceding stitch. Carry unused yarn along wrong side or fasten off and weave ends—both methods work; carrying keeps fewer ends to weave at the cost of slightly thicker wrong-side fabric.
Row 1 :
With Color A, ch 37. Sc in 2nd ch from hook and in each ch across. (36)
Row 2 :
Ch 1, turn. Sc in each st across. (36)
Row 3 :
Ch 1, turn. Sc in each st across. (36)
Row 4 :
Ch 1, turn. Sc 4, ch 1, sk 1, sc 26, ch 1, sk 1, sc 3. (36) Info: These ch-1 eyelet accents create the small horizontal openings visible between pumpkin panels—work the chain spaces centered to maintain the repeat.
Row 5 :
Ch 1, turn. Sc in each st across, working into chains as if they were stitches. (36)
Row 6 :
Ch 1, turn. Sc 5, sc into next 26 sts evenly (this centers the pumpkin zone for upcoming puff rows), sc 5. (36)
Row 7 :
Ch 1, turn. Prepare to begin pumpkin shaping. Sc 9 (stitches 1–9), change to Color B (Rust) on final yarn over of 9th sc, puff in next stitch, puff in next 2 sts, sc in next 1, puff in next 3 sts, sc in remaining 36- (9+puffs+1+3+?) adjust counts to total 36 — see row breakdown: Sc 9 Color A (9), change to Color B, puff x 7 across the pumpkin zone occupying 14 sts (7 puffs count as 7), change back to Color A, sc remaining 36-9-7 = 20. (36) Info: Keep puffs firm and consistent; each puff occupies a single stitch space.
Row 8 :
Ch 1, turn. Sc 9 Color A, change to Color B and puff in next 2 sts, sc 2 Color B (these small single crochets help shape the pumpkin sides), puff in next 5 sts Color B, change back to Color A, sc remaining 36-9- (2+2+5)=36-9-9=18. (36)
Info :
At this stage the pumpkin silhouette should begin to read as a circular oval. If your puff stitches are taller or shorter than written, adjust the number of puffs in the central rows by +/– 1 to keep row stitch counts consistent. Use a stitch marker at the center stitch of the panel to maintain symmetry while working color changes.
Row 9 :
Ch 1, turn. Sc 8 Color A, change to Color B, puff x 3, sc x 3 Color B, puff x 4 Color B, change to Color A and sc remaining 36-8-(3+3+4)=18. (36)
Row 10 :
Ch 1, turn. Sc 7 Color A, change to Color B, puff x 2, sc x 5 Color B, puff x 3 Color B, change to Color A, sc rest. (36)
Row 11 :
Ch 1, turn. Sc 6 Color A, change to Color B, sc x 6 Color B across the central zone (for slightly flattened center row), change back to Color A, sc rest. (36)
Info :
Begin stem placement now: after Row 11 we'll build a small stem/leaf area at the top-left of the pumpkin using short color B-to-Color C changes (Color C = Olive Green). The stem sits approximately at stitches 20–23 (count from left). Use a stitch marker to locate the exact column for your panel if desired.
Row 12 :
Ch 1, turn. Sc 6 Color A, change to Color B and puff x 4, change to Color C (Olive) and sc 1, change to Color B sc 3, change to Color C sc 2 (stem clusters), change to Color A, sc remaining. (36)
Row 13 :
Ch 1, turn. Sc 5 Color A, change to Color B puff x 5, change to Color C sc x 3 (building stem), change back to Color B sc x 1, change to Color A sc remaining. (36)
Row 14 :
Ch 1, turn. Sc 5 Color A, change to Color B puff x 6, change to Color C sc x 2 (leaf tip), change back to Color A sc remaining. (36)
Info :
If you prefer a separate appliqued stem, omit Color C stitches here and make Leaf/Stem motifs separately (see separate Leaf/Stem section). Tapestry-style color changes are suitable because the runner is flat; carry unused colors on the wrong side or fasten off and weave ends to keep the right side tidy.
Row 15 :
Ch 1, turn. Sc 5 Color A, change to Color B puff x 6, change to Color C sc x 2, change back to Color B sc 1, change to Color A sc rest. (36)
Row 16 :
Ch 1, turn. Sc 6 Color A, Color B puff x 5, Color B sc x 3, change to Color A and sc remaining. (36)
Row 17 :
Ch 1, turn. Sc 7 Color A, Color B puff x 4, sc x 4 Color B, change to Color A sc rest. (36)
Row 18 :
Ch 1, turn. Sc 8 Color A, Color B puff x 3, sc x 5 Color B, change to Color A sc rest. (36)
Row 19 :
Ch 1, turn. Sc 9 Color A, change to Color B puff x 2, sc x 6 Color B, change to Color A sc rest. (36)
Info :
At this point the pumpkin should round out nicely. If you see a slightly uneven silhouette, adjust puff placement by moving one puff to the left or right on the next row to correct symmetry. Check both edges of the motif to ensure the pumpkin sits centered over the panel.
Row 20 :
Ch 1, turn. Sc 10 Color A, change to Color B sc x 6 across (this flattens the lower pumpkin edge), change to Color A and sc remaining. (36)
Row 21 :
Ch 1, turn. Sc in each st across. (36)
Row 22 :
Ch 1, turn. Sc in each st across. (36)
Row 23 :
Ch 1, turn. Sc 4, ch 1, sk 1, sc 26, ch 1, sk 1, sc 3. (36) Info: Repeat the eyelet row to echo the small openings shown between motif panels; this creates the decorative band visible in photo.
Row 24 :
Ch 1, turn. Sc in each st across. (36)
Row 25 :
Ch 1, turn. Sc in each st across. (36)
Row 26 :
Ch 1, turn. Sc 36. (36) Info: If you want a slightly taller panel or a larger pumpkin, continue in Color A for additional even rows to increase panel height by rows of your choice before proceeding to joining.
Row 27 :
Ch 1, turn. Sc in each st across. (36)
Row 28 :
Ch 1, turn. Sc in each st across. (36)
Row 29 :
Ch 1, turn. Sc in each st across. (36)
Row 30 :
Ch 1, turn. Sc in each st across. (36) Info: Fasten off. Make 5 identical panels for the runner photographed (or make more to lengthen runner). Weave in ends or leave long tails for join-as-you-go joining as described next.
Info :
Panel counts summary: Width = 36 sts; Height = 30 rows (sample). Pumpkin center columns occupy approximately stitches 11–26. For accurate placement, count stitches and use markers to denote column 11 and 26 before starting Row 7. Adjust puff counts if your puffs occupy more space — maintain total 36 stitches per row by substituting single crochets as needed.
— Leaf / Stem Applique9 (Optional, Make 5 or Work In-Panel) :
Round 1 :
With Color C (Olive), ch 6. Sc in 2nd ch from hook, sc next 3, 3 sc in last ch; rotate to work along opposite side of foundation chain: sc next 3, sl st to first sc to join. (10) Info: This small oval makes a compact leaf; you can sew this in place for a raised stem instead of in-panel colorwork.
Round 2 :
Ch 1, sc in same st, sc across the oval edge working 2 sc in three corner sts to keep shape (approx 14 sc around). Fasten off leaving tail for sewing. (14)
Round 3 :
For a textured tiny stem, with Color D (brown) ch 4, sl st in 2nd ch from hook and in each remaining ch to make a small braid-like stem. Fasten off and leave tail for sewing. Info: Sew leaf and stem to panel top-left of pumpkin or use in-panel color changes instead.
— Join-as-you-go Panel Joining :
Info :
Lay panels right sides up in order. We will join panels along the short edge (the top/bottom edges of each panel) using a simple whip-stitch or join-as-you-go single crochet seam. The sample runner shows panels joined end-to-end so pumpkins align along the centerline. Place panels together so that the eyelet rows align horizontally between panels.
Round 1 :
With Color A and right sides together, align Panel 1 (leftmost) and Panel 2 (next). Insert hook through last row edge of Panel 1 and first row edge of Panel 2; sl st through both edge loops across 36 stitches to join, working 1 sl st in each corresponding st. (36 sl st) Info: Sl st join produces a low-profile seam; if you prefer a raised seam, use sc or mattress stitch with tapestry needle.
Round 2 :
Repeat joining for remaining panels (Panel 2 to 3, Panel 3 to 4, Panel 4 to 5) until all panels are joined lengthwise. Weave in joining tails neatly on wrong side. Info: Check that pumpkin motifs align vertically and horizontally as you join; if misaligned, unpick and shift panel by one or two rows/stitches before finalizing seam.
Round 3 :
Once all panels are joined, press lightly (steam-block or pin wet) so seams lay flat. Measure total finished size—sample with 5 panels ≈ 36–40 inches long x 9–10 inches wide depending on gauge. Info: If you want a runner longer than sample, add additional panels and repeat join steps.
— Body Fill Rows & Edge Preparation :
Round 1 :
With joined runner right side up and Color A, attach yarn at one short end corner, ch 1, sc evenly along the short edge across, placing 1 sc in each row end. For sample that is 30 rows high, work 30 sc evenly along the end to create a neat edge. (30 sc) Info: Count rows carefully and place sc evenly to avoid gathers—use increases (2 sc in a st) at corners if needed.
Round 2 :
Rotate and sc evenly along the long side across 5 joined panels: work 1 sc in each stitch across the long edge (approx panel count 5 x 36 = 180 sts). Work 1 sc in the corner stitch to continue. (approx 180 sc) Info: Use stitch markers every 10–20 sts to help keep even counts and reduce counting errors for long edges.
Round 3 :
Continue sc evenly on remaining short end (matching Round 1), then sc evenly across the final long side to return to starting corner. You will have completed one round of sc around the entire runner. (Perimeter count varies; maintain evenness) Info: This first sc round evens up the raw joining edges and prepares for decorative border rounds.
Round 4 :
Ch 1, sc in each st around working 3 sc in each corner stitch to maintain a flat perimeter. (Even stitches around) Info: If your perimeter tension seems too tight and causes the runner to curl, work this round in hdc to give slightly more flexibility.
Round 5 :
Ch 1, sc in each st around, maintaining 3 sc in corners. Fasten off temporarily. Info: At this stage your edges should be neat and ready for the scalloped shell edging that provides the finished look visible in the photo.
— Scalloped Shell Border :
Round 1 :
With Color A, attach yarn to any sc on perimeter. Ch 1, sc in same st, *skip 2 sts, (5 dc, sc in next st, 5 dc) in next st (shell made), skip 2 sts, sc in next st; rep from * around. Adjust placement at corners: where a shell would sit awkwardly, work 3 dc clusters instead and continue. Join with sl st to first sc. Info: Shells create the scalloped floral edge visible in the photographed runner—space shells evenly to keep the scallops uniform.
Round 2 :
Ch 1, sl st to center of first shell (3rd dc), *ch 2, sc in next sc between shells, ch 2, sl st in center dc of next shell to create a picot-like decorative link; rep around. Join and fasten off. Info: This optional picot round adds a subtle lacy binder between scallops like the photo’s delicate edging.
Round 3 :
For a fuller scallop, replace Round 2 with another shell round: *sc in next sc between shells, skip next ch-2, (7 dc) in center of shell, sc between shells; rep. Join and fasten off. Info: The photo shows a modest scallop—choose the shell density that best matches your preference.
Info :
We recommend trying the shell pattern on a small swatch to see which shell density most closely matches the photograph. If your shells are too large they will overpower the pumpkins; if too small, they will look delicate and refined.
— Optional Surface Embroidery & Texture Enhancements :
Info :
To reinforce pumpkin definition, you can embroider subtle ribbing lines on the pumpkin surface using backstitch in Color D (darker rust or brown) starting at the top center and working outward to the sides. Use 2-3 short lines per pumpkin to suggest ridges in the pumpkin skin.
Round 1 :
Using tapestry needle and Color D, bring yarn through at top-center of pumpkin and stitch outward in short backstitches across the raised puff stitches—keep stitches short to avoid flattening puffs. Repeat 2–3 times per pumpkin. Info: Embroider sparingly—too much embroidery will obscure puff texture.
— Finishing Touches :
Round 1 :
Weave in all yarn ends neatly on the wrong side using a tapestry needle. Trim close but avoid cutting too near the knot. Block gently if desired: pin to shape on a blocking board and spray lightly with water or use a steam iron at a distance to relax fibers. Allow to dry fully before use. Info: Blocking evens the edges and helps the scalloped border relax into a smooth curve.
Round 2 :
Optional: Add small felt pads under runner corners to protect table surfaces, or add matching centerpiece decor made from leftover yarn. Info: Store runner flat or loosely rolled to retain scallop shape.
Info :
How to adjust runner length: For each additional pumpkin panel you want to add, repeat the entire Pumpkin Panel section and join to the existing assembly with the Join-as-you-go method. Keep the scalloped border counts consistent by ensuring perimeter stitch counts scale proportionally with each added panel.
This Harvest Pumpkin Table Runner is a delightful seasonal project that brings warmth and texture to your autumn table setting! Each textured puff pumpkin adds tactile interest and a handcrafted fall charm to your home decor. The repeatable panel construction means you can customize length easily, and the scalloped edge gives a handmade finish that photographs beautifully. 🧶🍂 I hope you enjoy making and gifting this cozy piece—happy stitching and happy fall! 🎃