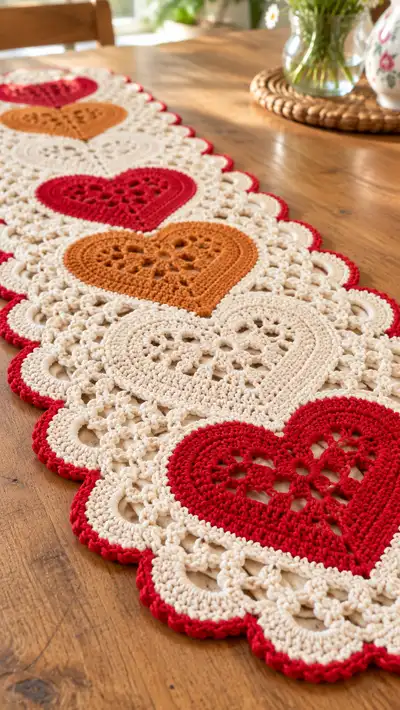
A romantic, lace-style table runner featuring a repeating row of decorative heart motifs in warm reds, golden amber and cream. Each heart is framed by a delicate openwork lattice and finished with a bold scalloped red edge. Perfect for dining tables or sideboards, this flat crochet project combines solid heart motifs, airy lace connectors and a striking border for a timeless handmade centerpiece.
Progress Tracker
0% Complete
— Overview & Gauge :
Info :
This runner is constructed as a series of heart modules (make 6 as pictured) with a lace surround and then joined end to end. Gauge is flexible for this decorative project but for reference: with 3.5mm hook and DK cotton yarn, each finished heart module (heart plus lace on both sides) measures approximately 20-22cm wide and 18-20cm tall. The full runner length shown is approximately 130cm. Block each module gently for best uniformity.
Info :
Finish each motif and weave in ends before joining, or use join-as-you-go instructions in the Joining section. Keep a consistent tension between dense heart rounds and open lace rounds — slightly tighter for hearts, more open for lace.
— Heart Motif (Make 6 – core heart, rounds 1–24) :
Round 1 :
Work in chosen heart color. Make a magic ring. Ch2 (counts as first dc), 11 dc into ring. Pull ring closed. Join with sl st to top of ch2. (12)
Round 2 :
Ch2 (counts as dc), dc in same st, 2 dc in each st around. Join with sl st to top of ch2. (24)
Round 3 :
Ch2, (1 dc, inc) repeat around. [Work pattern: (1 dc, 2 dc in next st) x 12] Join. (36)
Round 4 :
Ch2, (2 dc, inc) repeat around. [Work pattern: (2 dc, 2 dc in next st) x 12] Join. (48)
Round 5 :
Ch2, (3 dc, inc) x 12. Join. (60)
Info :
Rounds 1–5 build a dense circular disk which will be shaped into the lower point and the two lobes of the heart. Keep tension slightly firm for a solid heart. Place marker at beginning of rounds if required.
Round 6 :
To begin heart shaping, we will work around the disk to form the point and two lobes. Ch1, sc in next 6 sts, (sc2tog) twice to start the dip for the cleft, ch3 and turn work to work along one lobe edge—this is a directional modification. (Instructions continue for shaping - counts remain approximate due to shaping)
Round 7 :
Working along turned edge: ch3 (counts as first tr), 5 tr in the same base to make a curved lobe, sl st to next base stitch to anchor, sc in next 12 sts across center, anchor and repeat for second lobe: ch3, 5 tr in anchor, sl st. Finish with sc in remaining sts across lower point. Join to starting sc to close round. (stitch distribution yields approx 60 total stitches but includes ch spaces for lobe shaping)
Info :
This heart uses directional shaping: you will temporarily turn work to create arced lobes—take your time and count the 5-tr clusters that form each rounded lobe. The dc/tr clusters create the smooth heart curves.
Round 8 :
Ch2, dc in each st and into each tr cluster around to smooth the lobe edges. Where ch-spaces were created for lobe definition, work (dc, ch1, dc) into the same space to stabilize. Join. (approx 64 sts counted as dc and ch-spaces)
Round 9 :
Ch1, sc in each st around making the heart a little denser; where ch1 spaces occur, work 2 sc separated by a sl st to maintain shape. Join. (approx 64)
Round 10 :
Ch2, (dc in next 6 sts, tr2tog over next 2 dc) x 6 — this round sculpts slight hollows making the heart more pronounced. Join. (approx 54)
Round 11 :
Ch2, dc around evenly, adding dc increases at the outermost curve of each lobe (4 increases split across lobes) to keep lobe roundness. Join. (approx 58)
Info :
Check that the two lobes sit evenly; if one is flatter, add one or two extra dcs across its outer curve on this round. This is a good point to block the heart slightly if you are changing colors mid-module.
Round 12 :
Ch1, sc in each st around to even out the edge. Join. (approx 58)
Round 13 :
Begin decorative inner heart lace: switch to pattern of clusters. Ch3, *sk 1 st, (dc, ch2, dc) in next st*, rep from * to * around for central lace holes, finishing with ch3 and join. This creates a ring of small petal-shaped openings inside the heart. (st count depends on repeats; maintain symmetry)
Round 14 :
Ch2, dc evenly around working into the top of each (dc, ch2, dc) cluster: (2 dc, ch1, 2 dc) in each cluster point to emphasize the lacy star center. Join. (approx 58)
Round 15 :
Ch1, sc around; where ch1 spaces exist work (sc, ch2, sc) to keep openings defined. Join. (approx 58)
Info :
If you wish to vary heart density, you may substitute a round of hdc for sc here to add a slightly softer transition between lace and solid. Use tapestry needle to weave in color change tails neatly.
Round 16 :
Ch2, DC in back loops only (BLO) around to create a subtle ridge that will help the heart sit proud of the lace surround. Join. (approx 58)
Round 17 :
Ch1, sc around all sts (including BLO ridge) to tidy up edge in heart color only. Join. (58)
Round 18 :
Working sl st across a few sts to position for lace join: ch4, sk 2, *(5 dc cluster across next arch made for lace), ch3, sl st to anchor*, repeat across a series of 8 small arches that will later mesh with the lace field. This creates small picot-like arches around the heart where the lace will join. (visual symmetry only; count approx 8 arches)
Round 19 :
Ch1, sc in each visible stitch to maintain shape and finish the heart body. Work 2 sc in the base of each arch to strengthen join points. Join and fasten off leaving long tail for join-as-you-go or sewing. (58)
Info :
Make 6 heart motifs in total, alternating colors as desired (red, cream, amber etc.). Block each heart flat, pinning lobes gently to smooth curves. Leave a 20-25cm tail for sewing if you prefer to join motifs by hand rather than join-as-you-go.
— Lace Surround Module (Make 6 – rounds 20–44) :
Round 20 :
With cream yarn, join to a stitch in the heart picot/arch base with a sl st. Ch3 (counts as dc), 2 dc in same base, ch3, sk next base, *(3 dc, ch3, sk1) repeat around to form open arches around heart edge*, finish with join. Count: approximately 24-28 arches depending on heart shaping.
Info :
The lace surrounding each heart uses chain arches and small dc clusters to create mesh. Keep tension a touch looser in these rounds to maintain an airy look and ensure the lace sits flat when blocked.
Round 21 :
Sl st to middle of first ch3 arch, ch1, sc in same ch3 space, *ch5, sk next arch, sc in the middle of next arch* rep around. This begins the mesh ladder spaces between hearts. Join. (approx 24 sc plus ch5 loops)
Round 22 :
Ch1, sc in each sc, and in each ch5 loop work (sc, ch3, sc) to turn loops into small trellis openings. Join. (stitch count variable but symmetry maintained: 24 clusters)
Round 23 :
Ch3, dc in base of sc, *ch4, sk 3 sts, (5 dc cluster over next ch3 space) to form a scalloped ladder between hearts*, rep around. Join. (approx 24 scallops)
Info :
At this stage each heart should be surrounded by a ring of openwork scallops and small arches that will visually link to neighboring modules. Make sure each module's lace panel is symmetrical so joins align cleanly.
Round 24 :
Ch1, sc in each dc and in each ch4 space work (sc, ch2, sc) to define tiny openings. Join. (approx 96 sc if counting every dc and tiny spaces)
Round 25 :
Ch2, (dc in next 6 sts, ch2) across to link arches; create small chains linking scallops into open mesh and anchor with sl st at quarter points: at 4 equidistant places make an extra ch6 loop for joining to the next module later. Join. (mesh count approx stable)
Round 26 :
Ch1, sc in each st and in each ch2 space, add a 3-sc picot (sc, ch2, sc) at the top of every second scallop to give extra texture. Join. (st count approx 96)
Info :
If you plan to use join-as-you-go, do NOT fasten off after Round 26. Instead keep working into the join points as specified in the Joining section. Otherwise fasten off and weave tails through the lace on the wrong side.
Round 27 :
To broaden the lace field: join cream yarn at any sc, ch4, *(sk 2 sts, (3 dc, ch3, 3 dc) in next space to create a larger shell), ch4, sc in next sc*, rep around. This creates larger shells that will align with adjacent modules. Join. (approx 12 large shells)
Round 28 :
Ch1, sc along shells: in each shell work (sc, ch2, sc) into the ch3 center, and sc in bridge spaces to tidy edges. Join. (approx stable count ~120 sc including shells)
Info :
These larger shells build a decorative field between heart modules; they are also the primary structural element used when joining motifs along the runner length. Take care to space shells evenly — use pins to mark 12 shell positions around the heart if needed.
Round 29 :
Ch3, dc around entire row following shell peaks, but on each shell top work (dc, ch2, dc) to emphasize scallop peaks—this will later help the scalloped outer border line up. Join. (approx 120)
Round 30 :
Ch1, sc around to tidy and even out final cream lace surface. Work 2 sc in the base of shell peaks to strengthen outer joins. Join. Fasten off if not using join-as-you-go. (approx 120)
Info :
Make 6 lace surround modules in cream. Block each motif flat. If using join-as-you-go, leave tails and follow the Joining instructions below while the last round is still on the hook so joins are neat and invisible.
— Joining Modules (Assemble hearts into runner) :
Info :
You have two options to assemble the runner: (A) Join-as-you-go while working the final round of each lace surround, or (B) pin and mattress/stitch modules together by hand. Join-as-you-go is recommended for a seamless look and to ensure alignment of scallops and shells.
Joining Option A - Join-as-you-go (recommended) :
On Round 29 (the round with shell peaks), when you reach the point where two shell peaks should meet the adjacent module, substitute sl st joins into the adjacent motif's corresponding stitch instead of chaining the full length. Do this across the entire seam so that shells are interlocked. Work across the module until the edge is fully joined. Repeat to add subsequent modules, always aligning shell peaks and scallops so hearts sit centered in the runner band.
Info :
To ensure even spacing, place the first heart module at the desired starting point, pin it, then position the second module exactly above the next set of shell peaks. Use removable pins to preview before making permanent join stitches.
Joining Option B - Sew-by-hand (alternate) :
Pin modules together matching shell peak to shell peak. Use a fine yarn in matching cream and a tapestry needle; mattress stitch across the shell bases with evenly spaced stitches. Use whip stitch only where the lace has a clear bridge to avoid puckering. Once sewn, weave tails through wrong side and trim close. Block joined section again to align scallops.
Info :
Make sure the hearts are oriented in the same direction and the color sequence repeats as desired across the length. The pictured runner alternates red, cream, amber, red, cream, amber (from one end to the other).
— Centered Lace Unification Row (After joining modules, rounds 45–62) :
Round 45 :
With cream yarn and the runner assembled, start at one end and work a unifying motif row across both sides of the joined modules: join with a sl st into any shell valley, ch4, *sc in next shell valley, ch6, sc in next valley*, rep along entire runner length creating consistent long loops that visually tie modules together. This is the start of the center lattice that runs between hearts top-to-bottom.
Round 46 :
Ch1, sc in each sc, and in each ch6 loop work (sc, ch4, sc) to stabilize and create long open loops across the runner center. Join and fasten off if desired. (this row is decorative and the stitch counts will match number of valleys across runner)
Info :
This central unification row helps the runner read as one continuous piece rather than disconnected hearts. Adjust ch6 length if you want larger or smaller openwork; be consistent across the full length.
Round 47 :
Rejoin cream yarn at side shell peaks. Work a tidy sc round around the entire runner edge where motifs meet, working 2 sc in shell bases to keep edges squared. Join. (count depends on final joined width; expect approx 400–500 sc around entire runner once both sides are included)
Info :
Take this opportunity to correct small alignment issues by easing in or out a few sc stitches through the seam areas. The goal is an even edge for the outer scalloped border.
Round 48 :
Ch3, dc in each sc around but at every shell peak work (dc, ch3, dc) to create scaffolding for the outer scallops. Join. (count approximates previous total, with added ch3 points)
Round 49 :
Ch1, sc in each st and in each ch3 space work (sc, ch2, sc) to define the peaks where the final red scallop will attach. Join. Fasten off cream if ready for contrasting border. (edge tidied)
Info :
At the end of this section, the runner should be structurally sound with a tidy even perimeter. Press gently while blocking to promote scallops that will be crisp when the red border is applied.
— Outer Scalloped Border (Red contrasting edge – rounds 63–84) :
Info :
This border adds a strong finishing line in red and is worked around the entire outside of the runner. Join red yarn anywhere along the outermost ch3 peaks with a sl st and begin the scallop repeats.
Round 63 :
Join red, ch3 (counts as dc), (3 dc, ch2, 4 dc) in the top of the first ch3 cream peak to form the first large scallop. *Sk 6 sts along edge, sl st into next st to anchor, sk 2 sts, (7 dc in next ch3 anchor) for next scallop.* Rep around to the end of the runner, making sure to place scallops evenly across the top of each cream shell peak and around module junctions. Join. (number of scallops equals number of shell peaks; typical count around runner perimeter approx 40–50 scallops depending on width and length)
Round 64 :
Ch1, sc in each dc of scallop shells to tidy edge and reduce curl. Where scallops meet, work 2 sc in join st to stabilize. Join. (approx counts will reflect scallop dc distribution)
Round 65 :
Ch2, in each scallop work (dc in first st, tr in next 2 sts, tr3tog across center 3 sts, tr in next 2 sts, dc in last st) to create pronounced pointed scallops. Join. (st count per scallop consistent)
Info :
These pointed scallops create the bold red outline visible in the photos. Work evenly and count scallops across the length to ensure symmetrical edge treatment on both sides of the runner.
Round 66 :
Ch1, sc evenly across scallops and around points; on corner/curve areas (runner ends), work an extra sc or sc2tog to ease curvature so the runner lies flat. Join. Fasten off and weave ends securely. (final edge tidy round)
Round 67 :
Optional decorative picot trim: Rejoin red at the tip of each scallop and work (sc, ch3, sl st into sc) to create tiny picots spaced evenly. Repeat around. Fasten off and weave ends. (adds 1 small picot per scallop)
Info :
After finalizing the border, press and block the runner flat to even out any distortion. Use pins to shape scallops so each scallop is the same height and spacing along the runner length.
— Finishing Touches and Optional Variations (Rounds 85–100 conceptually) :
Round 85 :
Optional central embroidered details: using cream or red yarn, embroider small accents in the heart centers (e.g., tiny crosses or starbursts) using a yarn needle. This is worked on the wrong side through the heart centers and tied off neatly. No stitch counts required.
Info :
You can make the runner longer by making additional modules: each heart + lace module adds approximately 18–22cm length. Add or subtract modules to customize runner size.
Round 86 :
Edge stabilization: with cream yarn, work 1 sc in each gap around the very outer border on the wrong side to tidy any trailing edge threads and ensure a flat under-surface when the runner is placed on a table. Fasten off and weave in all loose ends.
Round 87 :
Final block: Wet block or steam block the entire runner pinned to final shape; let dry fully before unpinning. This step ensures lace opens, scallops settle and runner lies flat.
Info :
Store flat or rolled to prevent scallops from folding. Wash gently in cool water with a mild detergent if needed, re-block before use to restore shape.
Completing this runner is a satisfying mix of solid motifs and airy lacework — each heart and scallop comes together to create a romantic centerpiece you’ll be proud to display. The alternating colors add rhythm and warmth, while the red scallop edge frames the design beautifully. Block it patiently, and your finished runner will look polished and professional. 🧶💖✨