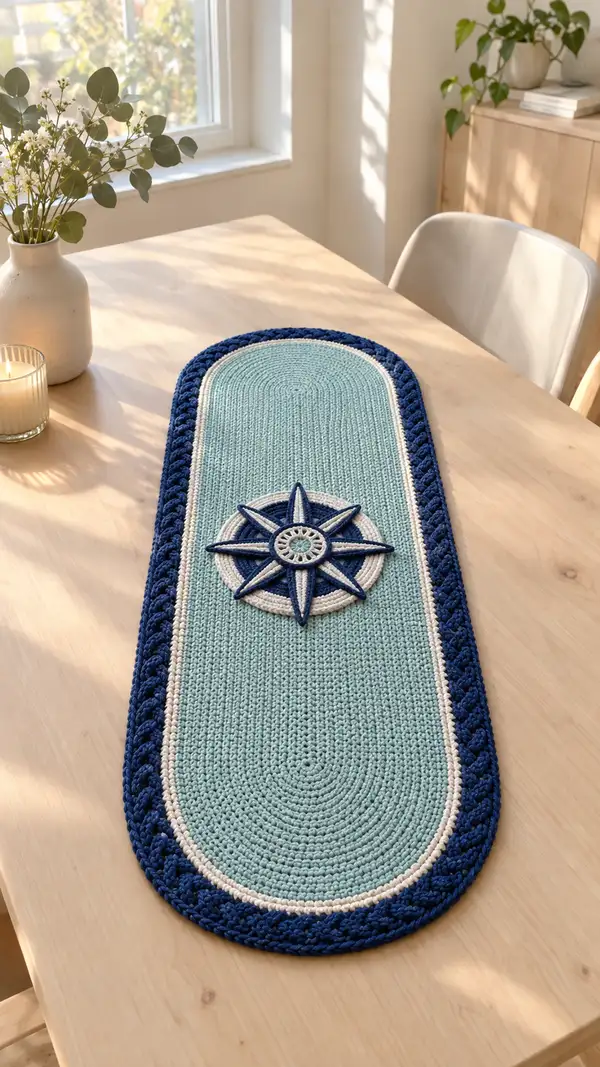
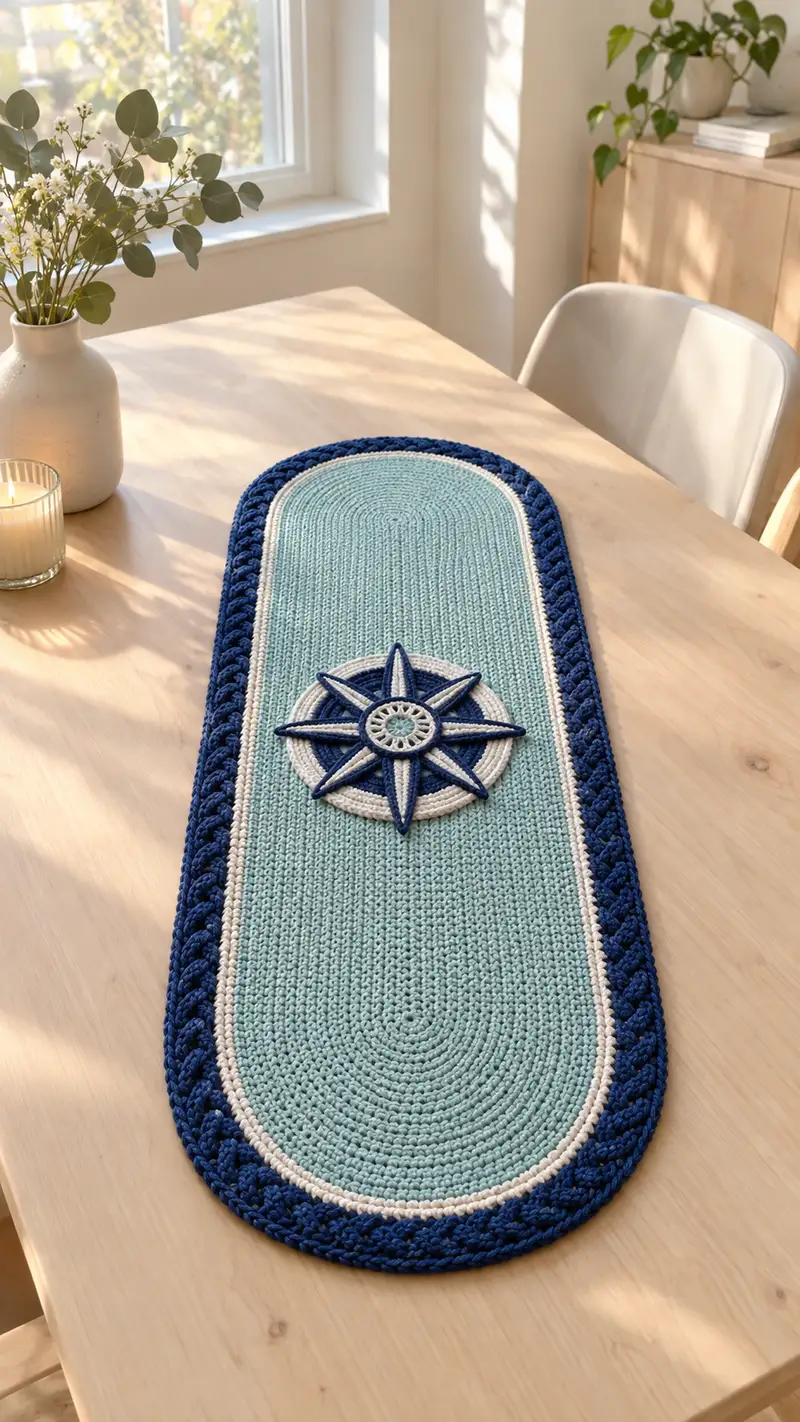
A long, elegant crochet table runner featuring a sea-glass mint center, crisp ivory piping and a deep navy braided edge with a raised nautical compass medallion at center. Worked flat in joined rounds with textured edging, this runner adds a handcrafted coastal touch to any table. The compass appliqu�9 is layered for dimension and stitched securely to the runner for a polished finish.
Progress Tracker
0% Complete
— Runner Base (mint center) :
Info :
This runner is worked in joined rounds in a flat spiral to create an elongated oval. Use a stitch marker at the first stitch of each round. Work tightly enough that you do not see stuffing or table through the stitches. The main center color shown is a soft sea-glass mint. Gauge is not critical but keep hook and tension consistent for a flat result.
Round 1 :
6 sc in magic ring (6)
Round 3 :
(1 sc, 1 inc) x 6 (18)
Round 4 :
(2 sc, 1 inc) x 6 (24)
Round 5 :
(3 sc, 1 inc) x 6 (30)
Round 6 :
(4 sc, 1 inc) x 6 (36)
Round 7 :
(5 sc, 1 inc) x 6 (42)
Round 8 :
(6 sc, 1 inc) x 6 (48)
Info :
By round 8 you have a round disk. To begin shaping the oval, we will add increases at two opposite 'end' zones in subsequent rounds. Place removable stitch markers at the three increases you will use to define the ends; these markers will help you place increases consistently.
Round 9 :
1 sc in each st (48)
Round 10 :
(7 sc, 1 inc) x 6 (54)
Round 11 :
1 sc in each st (54)
Round 12 :
(8 sc, 1 inc) x 6 (60)
Info :
At this stage the disk is increasing evenly. We will now convert to an oval by concentrating increases on the opposite ends of the circle rather than all around. Identify four opposite points spaced evenly; two points will be the 'ends' of the oval where you will place cluster increases every other round.
Round 13 :
1 sc in each st (60)
Round 14 :
Work even rounds, placing 1 extra sc (increase by 1) at each of the two end zones: *sc in next 13 sts, inc in next st; rep from * twice (total 62)
Round 15 :
1 sc in each st (62)
Round 16 :
Work even rounds, placing 1 extra sc at each end zone again: *sc in next 15 sts, inc in next st; rep from * twice (total 64)
Info :
Watch the fabric to ensure it remains flat; if the edges ripple slightly, skip one increase in the next increase round or work one additional even round to settle the fabric.
Round 17 :
1 sc in each st (64)
Round 18 :
Add increases at the two semicircular ends more frequently now to start elongating: *sc in next 7 sts, inc in next st; work across to the opposite end and repeat (add total 4 inc across whole round) (68)
Round 19 :
1 sc in each st (68)
Round 20 :
Repeat Round 18 pattern placing increases in the two end zones: (72)
Round 21-24 :
1 sc in each st for 4 rounds (72)
Info :
We are now establishing a long oval core. Continue alternating a shaping round that adds small increases at each end followed by several even rounds to allow the fabric to settle. This method keeps the runner flat and elongates only at the ends to create smooth semicircles.
Round 25 :
*sc in next 9 sts, inc in next st; rep across first half of round; sc across to opposite end and repeat (add 4 inc) (76)
Round 26 :
1 sc in each st (76)
Round 27 :
Repeat Round 25 (80)
Round 28-31 :
1 sc in each st for 4 rounds (80)
Info :
Measure the runner width now; the narrow finished width of the visible runner is approximately 20-22cm (8-8.5in) for the center panel in this example. If you'd like a wider center, continue adding increases at the end zones following the established rhythm until desired width is reached.
Round 32 :
*sc in next 11 sts, inc in next st; rep across ends (add 4 inc) (84)
Round 33 :
1 sc in each st (84)
Round 34 :
Repeat Round 32 (88)
Round 35-40 :
1 sc in each st for 6 rounds (88)
Info :
Continue working even rounds to build the length of the runner. The center length in the photo is achieved by working many even rounds without further increases until desired runner length is reached. Count your rows to know how long the runner becomes; the sample runner has approximately 70 even-length rounds total including ends and shaping rounds.
Round 41-52 :
1 sc in each st (88) - work 12 rounds to extend the center length (88)
Info :
When your runner has reached the approximate desired length (measuring along the center from one semicircle to the other), begin shaping the opposite end by mirroring your earlier increase sequence to create the second rounded end. Continue to place your end-zone increases in the same positions used earlier.
Round 53 :
*sc in next 11 sts, inc in next st; rep across ends (add 4 inc) (92)
Round 54 :
1 sc in each st (92)
Round 55 :
Repeat Round 53 (96)
Round 56-60 :
1 sc in each st for 5 rounds (96)
Info :
You should now have a long oval with smooth ends. If your edges have slight waves, work one additional even round and then proceed. Fasten off mint color at end of round 60 leaving a 20cm tail for weaving in or for joining to the ivory pipe round.
— Inner Piping (ivory) :
Info :
Switch to ivory/off-white to add a neat piping row that separates the mint center from the navy braid. We will work single crochet rounds along the edge picking up both loops of the edge. Join with sl st at any point and work in joined rounds for a tidy strip.
Round 1 :
Join ivory with a sl st to any outer loop at edge. Ch 1, *sc in next 10 sts, 2 sc in next st to increase at the curve; continue around placing 2 sc at each semicircular end point to keep the piping flat. Work to join (96)
Round 2 :
1 sc in each st (96)
Round 3 :
1 sc in each st BLO (96) - this creates a neat ridge for the braid to sit against
Info :
If you prefer a thinner piping, work only one round of ivory and proceed to the border. The sample uses two rounds for visual separation.
— Braided Outer Border (navy) :
Info :
The braided border is made with a repeating crossed double-post cluster worked in navy. We will work several rounds of texture using front and back post stitches to simulate a chunky braid. Use the same stitch count as the piping to maintain even placement.
Round 1 :
Join navy with sl st to any st on the ivory ridge. Ch 2 (counts as hdc), *skip next st, (fpdc around next st, bpdc around next st) repeat across; end with hdc in last st and join (96)
Round 2 :
Ch 2, work fpdc around the fpdc from previous round and bpdc around the bpdc to create interlocking texture; join (96)
Round 3 :
Repeat Round 2 to deepen relief and create a chunky braid (96)
Info :
For extra bulk, add a fourth round repeating the post pattern. The pictured runner has a pronounced rope-like border achieved by three rounds of post stitches. Fasten off and weave in ends on the wrong side.
— Compass Medallion - Base Disk (ivory) :
Info :
The compass medallion is assembled from a layered disk foundation in ivory, a mint backing disk, an inner navy star, and raised navy/ivory star points. Work the disk first, then the star layers, then the raised points. Medallion is worked in the round and attached to the runner surface with mattress stitch and surface slip stitch accents.
Round 1 :
MR, 8 sc in MR (8)
Round 3 :
(1 sc, inc) x 8 (24)
Round 4 :
(2 sc, inc) x 8 (32)
Round 5 :
(3 sc, inc) x 8 (40)
Round 6 :
1 sc in each st (40)
Round 7 :
Switch to mint for a thin backing ring: join mint with sl st, ch 1, sc in each st around (40)
Round 8 :
1 sc in each st (40) - fasten off mint, leaving a tail for sewing
Info :
This layered disk (ivory center + mint backing ring) will give the compass a crisp outline against the runner. Make sure the disk lies flat; if it cups, add one additional sc round in mint to flatten.
— Compass Star Background (navy) :
Info :
The star background is a solid navy disk worked to the same diameter as the ivory disk, then the eight-point star will be built across it with surface stitches and raised tubes for dimension.
Round 1 :
MR, 8 sc in MR (8)
Round 3 :
(1 sc, inc) x 8 (24)
Round 4 :
(2 sc, inc) x 8 (32)
Round 5 :
(3 sc, inc) x 8 (40)
Round 6 :
1 sc in each st (40)
Info :
Leave long tail for sewing if you plan to stack the navy disk under the ivory disk for a layered effect. Alternatively, use slip stitch to join the two disks centered on top of one another.
— Inner Ring Detail (ivory) :
Round 1 :
Using ivory, join to the center of the navy disk with a sl st, ch 1, make 24 sc in the center ring area to create a narrow inner band (24)
Round 2 :
1 sc in each st (24)
Info :
This small inner ring will be the base on which the compass points converge. Work tightly to maintain shape. Fasten off leaving a long tail for sewing the layers together and anchoring the star points.
— Raised Compass Points (make 8) :
Info :
Each compass point is worked as a long, tapered tube using front-post stitches and increases/decreases to shape to a point. Work in navy for the outer half and switch to ivory for the inner spine detail where indicated. The points are later surface-stitched onto the navy star disk to create a raised eight-point compass.
Point 1 - Round 1 :
With navy, ch 21 (this will be the length of the point). Sc in 2nd ch from hook and across back to create a flat strap: sc 19 (19)
Point 1 - Round 2 :
Ch 1, turn, sc in each st across (19)
Point 1 - Round 3 :
Ch 1, (sc2tog) across first and last pairs to begin taper: dec at each tip—work: dec, sc 15, dec (17)
Point 1 - Round 4 :
Ch 1, sc in each st (17)
Point 1 - Round 5 :
Ch 1, dec, sc 13, dec (15)
Point 1 - Round 6 :
Ch 1, sc in each st (15)
Point 1 - Round 7 :
Ch 1, dec, sc 11, dec (13)
Point 1 - Round 8 :
Ch 1, sc in each st (13)
Point 1 - Round 9 :
Ch 1, dec, sc 9, dec (11)
Point 1 - Round 10 :
Ch 1, sc in each st (11)
Point 1 - Round 11 :
Ch 1, dec, sc 7, dec (9)
Point 1 - Round 12 :
Ch 1, sc in each st (9)
Point 1 - Round 13 :
Ch 1, dec, sc 5, dec (7)
Point 1 - Round 14 :
Ch 1, sc in each st (7)
Point 1 - Round 15 :
Ch 1, dec, sc 3, dec (5)
Point 1 - Round 16 :
Ch 1, sc in each st (5)
Point 1 - Round 17 :
Ch 1, dec, sc 1, dec (3) - fasten off navy leaving long tail to sew
Info :
Make 8 identical tapered points. These are long narrow strips tapered toward the tip. After making the navy outer points, we will add the inner ivory spine by surface stitching or crocheting an inset ridge along the center of each point.
Inner Spine (ivory) - Round 1 :
Using ivory, with yarn needle and stranded yarn, surface stitch a chain of single crochet height down the center of each point: attach at base and run a chain of slip-stitches or surface sc in the center for the full length to create contrast. Fasten off and weave ends.
— Center Rosette and Hub :
Round 1 :
With ivory, MR, ch 3, (12 dc) into MR and join with sl st (12) - this makes a small rosette hub
Round 2 :
Ch 1, *sc in next st, ch 3, skip next st; rep around to create 6 open loops, join with sl st (6 loops)
Round 3 :
With navy, work a round of sc around the base of the rosette, then use surface slip-stitch to outline and define the hub. Fasten off leaving long tail for sewing to disk center.
Info :
Sew the hub to the center of the ivory inner ring, then position the navy star disk over it. The eight raised points are placed evenly around the hub; space them by counting stitches (40-st round has 40 sts, position points every 5th stitch to get 8 equal spaces).
— Attaching Points and Finishing Medallion :
Info :
Place the navy disk on the runner center and baste temporarily with long contrasting thread. Position the ivory disk centered over the navy. Using the long tails, sew the layers together through the small inner ring making sure to center perfectly. Next, arrange 8 navy tapered points evenly around the disk spaced every 5 stitches on the 40-st disk base. Use mattress stitch to sew the base of each point to the disk, curving each point slightly outward for a dimensional compass look. Add the ivory inner spine by surface stitching along each point's center.
— Decorative Surface Slip Stitch and Final Border Touches :
Round 1 :
With navy, work a round of surface slip stitch around the ivory piping to create a crisp separation line. Work 1 sl st in each sc of the piping. Fasten off and weave in ends.
Round 2 :
Optional: add a final small scallop inside the piping with ivory: join, *sc in next st, skip 1; rep across to create a small decorative inner edge. Fasten off.
Info :
Steam-block the runner gently on a flat surface to set the shape. For cotton yarn, pin lightly and use a damp cloth with low iron or a gentle hand-steamer at a distance. Allow to dry fully before removing pins.
— Notes on Sizing and Adjustment :
Info :
If you want a longer runner, continue working even rounds in the mint center before adding the second semicircle shaping. To make the runner narrower or wider, adjust the number of increase rounds during the initial shaping phase. For a table runner that fits a narrow console, reduce the number of center even rounds; for a dining table runner, add more even rounds and possibly increase the center width slightly.
Assembly Instructions
- Block the runner flat before sewing the medallion to ensure accurate placement and a smooth surface.
- Center the medallion on the runner by measuring equal distance from each rounded end; pin in place with several pins through the wrong side to hold while sewing.
- Use the long tail from the medallion layers and a yarn needle to sew the ivory base disk to the mint backing using small invisible mattress stitches through both layers and the runner surface (sew through rounds corresponding to the disk's edge).
- Position each of the 8 compass points evenly around the medallion (every 5 stitches on the 40-st disk). Sew each point base to the navy disk with small, secure stitches; add a second pass to reinforce tension points.
- Add the hub rosette last: sew the small ivory rosette to the center and tack down the ends of the point bases beneath it to hide join stitches.
- Weave all remaining yarn tails through several stitches on the wrong side and trim close. Use a dab of fabric glue on hidden tails if extra security is desired.
- If you used a thin felt backing or light padding under the medallion, stitch it in place at the same time you sew the disk to prevent shifting.
- After assembly, check the runner edges and weave in any loose braid or piping ends; trim and tidy up for a clean finished look.
Important Notes
- 💡Use stitch markers consistently at the beginning of each round to avoid counting errors and maintain proper shaping.
- 💡Work the runner on a flat table or lap to monitor flats and curves; blocking after assembly helps a lot with flatness.
- 💡Stuffing or backing behind the medallion should be minimal to keep the runner usable for tableware; a very thin felt circle is sufficient if you want slight elevation.
- 💡For a neat medallion attachment, baste layers with contrasting thread first to hold placement then sew permanently.
- 💡Maintain consistent tension throughout the large even rounds to prevent waves; use the same hand position and hook throughout.
- 💡When switching colors, carry the unused yarn if you want fewer ends to weave in; otherwise break yarn and leave long tails for a cleaner edge.
- 💡If the braided border puckers, reduce the number of post rounds or add an additional piping round in ivory to ease the transition.
- 💡Keep a notepad with your counted rounds so you can reproduce or modify the runner dimensions later.
This nautical compass table runner brings coastal style to your dining space with a handmade charm that�s both decorative and durable. The layered compass medallion adds a tactile focal point while the braided navy border gives crisp definition. Whether you place it on a breakfast nook table or a console, it�s a thoughtful project that rewards with a polished, professional finish. Happy stitches and calm seas as you crochet—don�t forget to share a photo of your finished runner! 🧶🌊
What is the finished size of this runner?
Based on the shown stitch counts and worsted cotton yarn with a 4.0mm hook, the finished runner measures approximately 32-36in (81-92cm) long and 8.5-9in (21-23cm) wide for the center panel. Adjustments to the number of even rounds will change length proportionally.
Can I use different yarn weights for this pattern?
Yes. Thicker yarn will yield a larger, chunkier runner and may require a larger hook; thinner yarn will produce a smaller, more delicate runner. Adjust the number of rounds to maintain proportions and keep tension slightly tighter for a firm fabric.
Do I need to attach the medallion permanently?
For a secure finish, sew the medallion permanently using mattress stitch and hidden stitches. If you want a removable decorative mat, baste with removable thread so it can be taken off for washing.
How much yarn will I need?
Approximately 300-350g of worsted weight cotton in the main mint color, 130-160g navy, and 50-70g ivory, depending on exact runner length. Always have extra for color matching and tension variations.
Can I machine wash this runner?
If using 100% cotton yarn, it is generally washable on a gentle cycle and can be laid flat to dry. Always check yarn manufacturer care instructions and consider handwashing delicate decorative pieces to protect the medallion.
How can I avoid curling or rippling?
Work even tension, add even settling rounds without increases after shaping, and block the runner flat. If ripples persist, add another even round rather than increasing in the affected area.
Can I make a longer runner for a dining table?
Yes—simply extend the number of even sc rounds in the central section before beginning the mirrored end shaping. Keep track of counts so both ends mirror symmetrically.
How do I get the braided border to look uniform?
Use front and back post double crochet (fpdc/bpdc) consistently for each braid round and ensure your post stitches are worked into the correct post from the previous round. Blocking after finishing helps the braid lay flat and even.
Stay in the Loop!
Get notified when we release new free crochet patterns and join our crafting community!