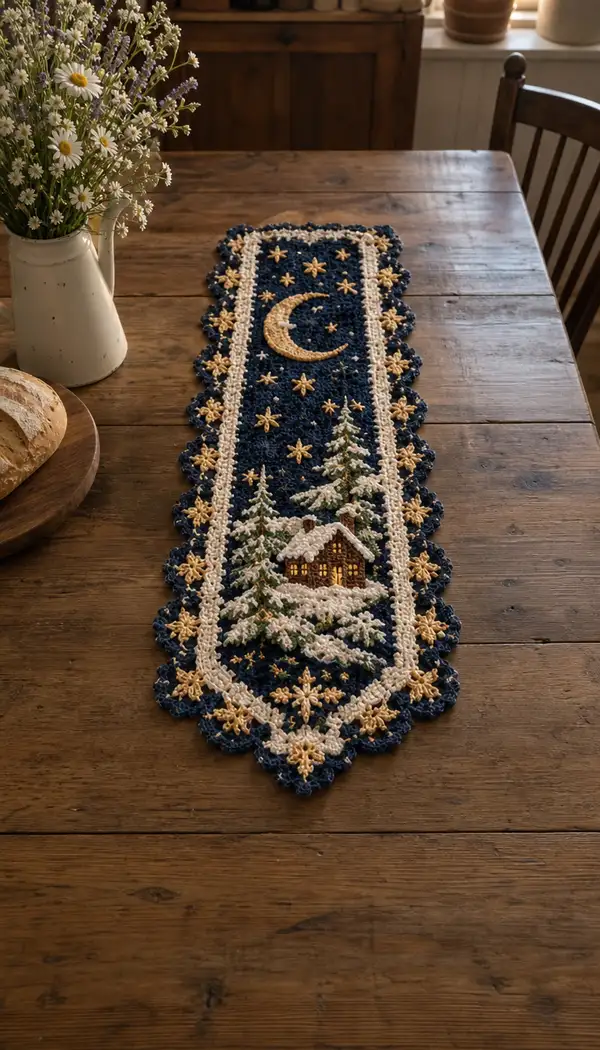
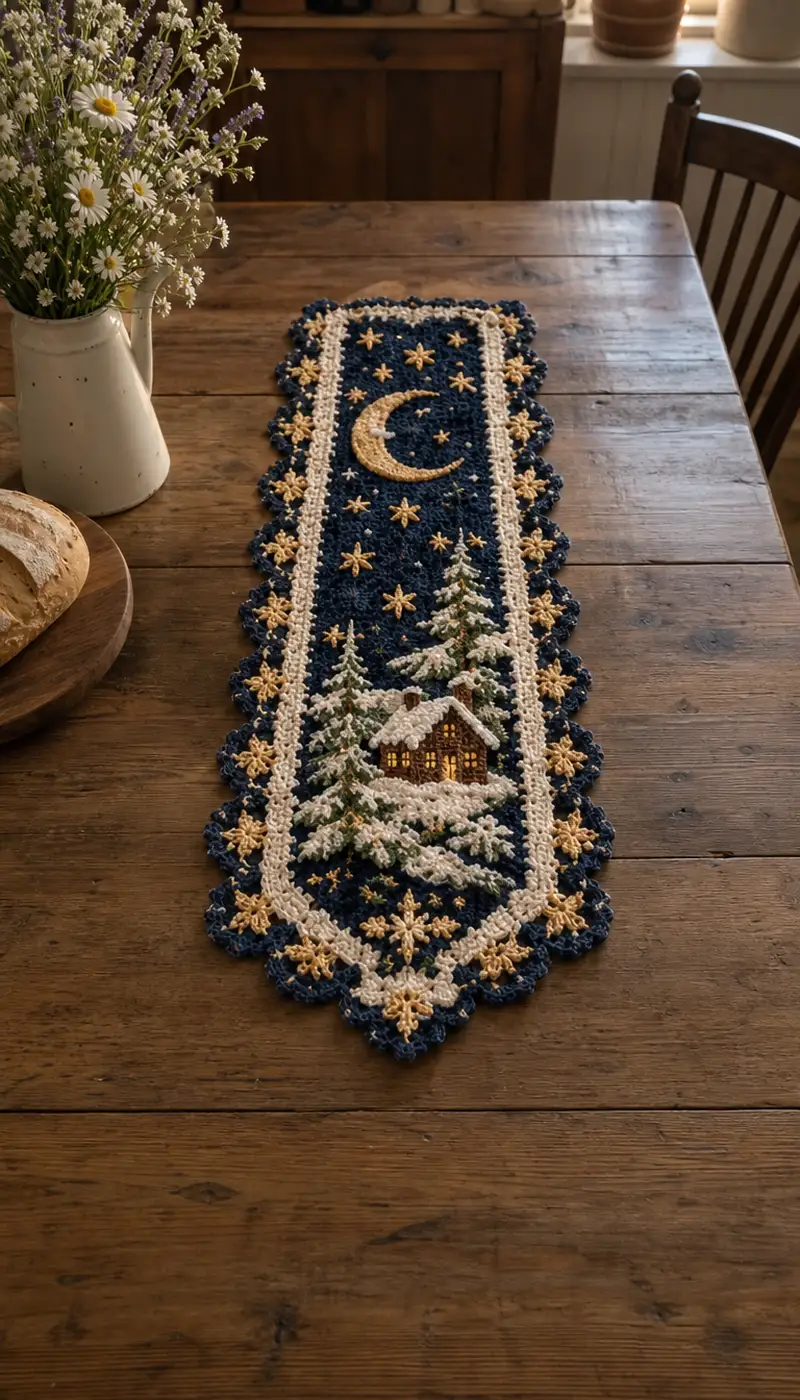
A cozy, lacy table runner inspired by a moonlit winter cabin scene — deep navy background, creamy scalloped border and golden star accents. The runner combines a delicate openwork shell panel with appliqued moon, stars, snowy cabin and evergreen trees for dimensional charm. Perfect as a centerpiece on a wooden table or a seasonal gift for someone who loves rustic winter décor.
Progress Tracker
0% Complete
— Materials & Gauge :
Info :
Gauge: 4 shells x 6 rows = 2in (5cm) in shell pattern using 3.5mm hook — check gauge to ensure final runner length approximates 32-36in (81-91cm) by 8-10in (20-25cm). Adjust chain length to lengthen/shorten runner proportionally. Work tightly enough so appliques sit cleanly on the lace panel without sagging.
— Center Panel (worked flat in rows, treated here as Rounds for consistent numbering) :
Round 1 :
With navy, foundation chain 121 (this creates 40 shell spaces across). Ch1 does not count as a st. Row base: dc in 4th ch from hook (counts as first dc and ch-1 space) then *ch1, skip next ch, 3dc in next ch; rep from * across to last 3 ch, ch1, skip next ch, dc in last ch — end with 40 cluster shells across. (Counts vary by spacing; you should have 40 shell clusters and 41 ch-1 spaces)
Round 2 :
Turn. Ch3 (counts as first dc). Dc in same st as ch3, *ch1, skip next ch-1 sp, 3dc in top of next shell (the top of the center dc of shell); rep across, end with dc in top of turning ch — maintain 40 shells across.
Round 3 :
Repeat Round 2. Maintain 40 shells. This establishes the stable lace body for the center background.
Round 4-8 :
1 dc in each turning ch and shells pattern as established (40 shells). Keep tension consistent. Place stitch marker in first st of Round 4 to mark the central axis for applique positioning later.
Info :
Place a removable marker at the center stitch horizontally on Row 6 to help align the moon and top stars later. The runner is symmetrical along this axis; keep charts handy for applique placement.
Round 9 :
Start subtle texture: ch3, dc in same st, *ch1, 3dc in next shell, rep across. At the start and end add 1 extra dc to keep edges straight (still 40 shells across).
Round 10-12 :
Work 3 rows in even lace to build height beneath the moon area. Keep stitch count stable. If you prefer a denser area under the moon, on Round 11 work shells in BLO to produce a slight ridge that helps applique sit slightly raised.
Round 13 :
Info about moon placement: Count 10 shells down from the top edge to place the moon center on the left-right axis at the marked center stitch. You will pin moon applique centered on row 13 across shells 12-18 approximately (adjust visually).
Round 14-18 :
Continue even shell rows (Round 14-18). Keep marker at center. These rows create the open field of the sky where star appliques will be attached. (40 shells across)
Info :
Work the national motif rows for the cabin placement later. Keep a count of rows from the top to bottom of the pictured cabin area: cabin base will be approximately rows 42-52 on this panel. Use stitch markers to note where trees and cabin will sit.
Round 19-28 :
Continue the lace shell pattern for 10 rows maintaining 40 shells. On Round 22 switch to a slightly denser placement under the cabin area: on Round 22 work each shell as ch1, 3dc in shell then on Round 24 work shells in BLO for a subtle ridge for visual separation. Maintain counts (40 shells).
Round 29 :
Info: Beginning the lower sky rows where smaller stars and the cabin silhouette will be secured. Mark the left and right boundaries of the cabin width: approximately 14 shells wide centered horizontally (count 13 shells from left edge to left cabin boundary, or 13 from right edge to right boundary).
Round 30-38 :
Work 9 rows of shell pattern, keeping the panel flat. These rows will accept the bottom of the trees and cabin. On Round 33 make subtle color carries by bringing in cream and brown for later embroidery if you prefer to pre-place threads behind the panel (optional). Keep 40 shells across.
Info :
When carrying colors, carry them behind the work across no more than 6-8 stitches to avoid excessive bulk. For longer carries, fasten off and re-join yarn at the spot to keep the back tidy.
Round 39-46 :
Continue even shell rows (8 rows) to complete the bottom sky and provide foundation for the inner cream frame. On Round 46 prepare to change color to cream for the frame rows: carry navy loosely behind first two stitches of Round 47.
Round 47 :
Info: Change to cream yarn at beginning of Round 47. Fasten cream with a standing dc in first stitch, ch1 then continue shell pattern in cream for three rows to form the inner frame (work 40 thinner shells across in cream instead of navy). Carry navy inside if you will pick it up again for the outer border.
Round 48-49 :
2 more rows in cream shell pattern, keeping 40 shells across. These three cream rounds form a contrasting inner frame that will visually enclose the navy night sky.
Round 50 :
Info: Return to navy yarn at the end of Round 49. Join navy with standing dc and work one full navy row to recreate the contrast between frame and scallop setup. Count to ensure 40 shells across before starting border formation.
Round 51-60 :
Work ten even navy shell rows (51-60) to provide space for the border to attach. Maintain 40 shells. These rows will be the area where the scalloped shell edging motifs are anchored.
Info :
At this point lay the panel flat and check symmetry. The top and bottom rows of the panel are identical; make small adjustments now if necessary by blocking or by adding/subtracting one row before starting the scalloped border.
Round 61-66 :
Begin slimming down edges slightly by working at each end (short sides) a foundation row of single crochet to stabilize ends: ch1, sc evenly across the two short rows, keeping end counts even—this is for clean corners when adding the scalloped end-point. For long sides continue shells in navy to maintain length. (Panel still holds 40 shell columns)
Round 67 :
Info: Fasten off center panel leaving long tails (approx 12in/30cm) for joining to border. Block flat and pin to desired dimensions: typical finished dimensions for this pattern are approximately 34in x 9in (86cm x 23cm) before scalloped border; final size after border ~36in x 10.5in.
— Moon Applique (Make 1) :
Round 1 :
With gold/mustard, begin in magic ring: 6 sc in MR (6)
Round 3 :
(1 sc, inc) x 6 (18)
Round 4 :
(2 sc, inc) x 6 (24)
Round 5 :
(3 sc, inc) x 6 (30)
Info :
The moon is crescent-shaped; we will shape it by removing stitches on one side to create the crescent curve. Do not stuff; keep applique flat but add slight padding with a tiny bit of fiberfill in the center if desired.
Round 6 :
Work 8 sc, then dec 2 sts, work 6 sc, dec 2 sts, work remaining sc to finish round (this sculpts a crescent curve). Adjust so total remains roughly 26-28 sts depending on shaping.
Round 7 :
Work even sc around entire motif, smoothing edges (approx 26-28 sc). Fasten off leaving long tail for sewing. Block lightly into crescent curve with pins.
Info :
Pin the crescent to the navy panel centered on Row 13 as noted earlier. Secure with large-eye tapestry needle and matching gold yarn using small whip stitches around the inner curve and mattress stitch along the outer curve to maintain flatness.
— Stars (Make 14 small, 6 medium, 4 large) :
Star Small - Round 1 :
With gold, magic ring, ch1: 6 sc in MR (6). Pull tight and sl st to first sc. Fasten off leaving tail for sewing. (Tiny 6-point star)
Star Small - Info :
Attach small stars by sewing through their center into the ch-1 spaces of the lace panel (they sit naturally over the ch spaces). Place 14 small stars scattered across the sky.
Star Medium - Round 1 :
With gold, magic ring: 8 sc in MR (8)
Star Medium - Round 2 :
Slip stitch in next st, ch3, sl st into same st to form a point; *sl st to next st, ch3, sl st in same st; rep around to create 8 ch-3 points. Fasten off leaving tail for sewing. Pin and sew 6 medium stars across the panel as focal stars.
Star Large - Round 1 :
With gold, ch6, join to form a ring, *ch5, sl st into ring, rep 6 times for 6 long rays. Fasten off leaving tail to sew. Add small bullion or surface embroidery stitches at centers in cream to make them pop.
Info :
Variety in star sizes adds charm; place largest star near the crescent and medium ones spread evenly. Sew securely and weave tails neatly to the back of the panel. For added texture, add cream backstitching around a few stars.
— Cabin Applique (Walls, Roof, Windows) :
Cabin Wall - Round 1 :
With brown, ch6, join with sl st to form ring, ch1, 8 sc into ring (8)
Cabin Wall - Round 2 :
(1 sc, inc) x 4 (12)
Cabin Wall - Round 3 :
(2 sc, inc) x 4 (16)
Cabin Wall - Round 4 :
Work 2 rows even sc (16) to build a small rectangular block: sc in BLO on Row 4 and sc both loops on Row 5 to create a tiny textured log look.
Cabin Wall - Info :
Create two identical wall panels and sew them together side-by-side to build width (approx 32 sts wide total) or simply extend Row 3 into an oval if you prefer. The cabin in the photo is very small; these steps make a compact cabin base approximately 1.5in wide depending on yarn.
Cabin Roof - Round 1 :
With cream or dark brown for roof, ch8, sl st to form ring, ch1, 10 sc in ring (10)
Cabin Roof - Round 2 :
(1 sc, inc) x 5 (15)
Cabin Roof - Round 3 :
Make two shallow rows of sc (15) then work angled decreases on one side to create a peaked roof shape: (3 sc, dec) x 3 to create a tapered edge. Fasten off leaving tail for sewing.
Cabin Details - Round 1 :
With ochre, embroider two window squares on the wall piece using woven satin stitch; add small sl st rows of black for window frames or shutters. Add a tiny embroidered door with darker brown.
Info :
Position cabin at approximately rows 42-48 of center panel, centered horizontally. Sew cabin's base to the cream frame area so it appears nestled in the snow. Add tiny cream picot stitches on roof edges for snow build-up.
— Trees (Make 3: left small, center large, right medium) :
Tree Small - Round 1 :
With dark green, ch4, join to ring, 6 sc in ring (6)
Tree Small - Round 2 :
(1 sc, inc) x 3 (9)
Tree Small - Round 3 :
Work a shell row to simulate branch tiers: ch3, 3dc in next st, ch3, sl st to base, rep for 3 tiers. Fasten and leave tail for sewing.
Tree Small - Info :
For snow-topped effect add short white picots or small single crochets in cream at the tips of several branches. Sew tree to panel overlapping lower cream frame so it sits in front of the cabin.
Tree Medium - Round 1 :
With dark green, magic ring, 8 sc in MR (8)
Tree Medium - Round 2 :
(1 sc, inc) x 4 (12)
Tree Medium - Round 3-6 :
Work 4 tiers of shell rows for branches: ch3, 3dc in next st as cluster, sl st to next base — expanding each tier outward by 1-2 dc on successive rows to create triangular silhouette. Fasten off and add cream picots for snow highlights.
Tree Large - Info :
For the tallest tree, follow the medium tree instructions but add an extra tier and increase starting rounds to 10 sc in MR then work 5-6 tiers. Place this tree slightly behind cabin with lower tiers overlapping cabin roof to create depth.
— Snow Embellishments and Surface Embroidery :
Round 1 :
With cream, embroider snow drifts along the base by using layered chain-stitched arcs: bring cream yarn up from the back, make long chain arcs anchored with small single crochets at each end. Repeat two or three staggered arcs to mimic piled snow.
Round 2 :
Add small French knots (use embroidery thread doubled if desired) with cream to simulate snow dots across the trees and roof. Use small stitches only to avoid pulling the lace.
Info :
Surface embroidery should be done with a tapestry needle and the runner laid flat. Stitch from front to back and secure with small knots on the reverse. Keep stitch tension light to avoid pulling shells out of shape.
— Scalloped Border and Corner Motifs :
Round 1 :
With navy (if rejoined) join at any long-edge corner with sl st, ch1, sc evenly along the long edge to create a firm border base. Aim for sc count equal to twice the number of shells (approx 80 sc) along each long side; place 2 sc in each shell top for stability.
Round 2 :
Work long-edge scallops: *(sc, ch2, 5dc in next marker/stitch, ch2, sc) in every second sc across to create shell scallops; rep across. Count should produce 40 scallops along each long side matching the 40 shell columns.
Round 3 :
Info: At short ends you will make pointed scallops: work into end stitches as follows: sc, ch2, 7dc, ch2, sc to create slightly longer scallop points at ends. These create the pointed tips seen in the photo.
Round 4-6 :
Change to cream for an inner scallop row: join cream at each scallop base and work a picot-edge along the scallops: *(sc, picot, sc) across each scallop to make the creamy starburst look. Repeat for two rows as necessary for depth. Keep stitching counts symmetrical for both long edges and short ends.
Round 7 :
Info: For the gold star motifs along the scallop edge, use gold yarn to work small 6-point star clusters in the centers of crest scallops: join gold at crest, ch3, sl st and short stitches to create a star cluster, secure and weave in.
Round 8-10 :
Return to navy and work a final edging row of small shells: *(ch3, 3dc in crest, ch3, sl st) across long sides and short ends to frame the runner. Fasten off and weave in all ends neatly on the back side.
Info :
Ensure scallop counts are equal on both sides; blocking will help even out any unevenness and open up the lacy fabric so stars and moon read clearly from across the table.
— Finishing Applique Placement & Attachment :
Round 1 :
Layout all appliques on the blocked center panel: crescent moon at Row 13 marked area, cluster of three trees and cabin lower center about Rows 42-48, additional stars scattered in Rows 14-40 symmetric about center axis. Pin each applique gently but securely.
Round 2 :
Sew each applique by hand using matching yarn and small whip stitches. For the moon sew the inner curve first then the outer curve; for trees sew only at the base and middle tiers to preserve branch movement.
Round 3 :
Info: Weave in tails from appliques across the back using a tapestry needle, following the lace channels to hide yarn. Use small zigzag whip stitches rather than single long stitches to prevent puckering at the join points.
Round 4 :
Optional: If you want extremely flat appliques, clip a tiny amount of interfacing to applique backs (non-woven fusible) and glue lightly to secure before final sewing. Test on a scrap first.
— Blocking & Care :
Round 1 :
Wet block runner: soak gently, press out excess water without wringing, pin to blocking mat to exact dimensions, shaping scallops and pointed ends. Allow to dry fully for 24 hours. This opens the shell pattern and evens the edges.
Round 2 :
Info: For long-term care, gentle hand wash or delicate machine cycle in mesh bag, reshape and lay flat to dry. Avoid hot water or tumble drying which may distort the lace and appliques.
Round 3 :
Final finishing touches: Steam lightly if needed to remove lingering puckers, clip stray fibers, and check all seams. Add a few extra anchoring stitches under heavy-use areas if needed.
This Navy And Cream Moonlit Cabin Table Runner brings a touch of winter magic to any table — a little hand-stitched landscape that invites a closer look. The layered appliques, lacy shells and scalloped edge make it a beautiful centerpiece for seasonal decorating or a thoughtful handmade gift. Blocking and careful finishing transform the crocheted panel into a polished, cozy accent. Enjoy making this runner and the calm, focused joy that comes with each stitch! 🧶❄️