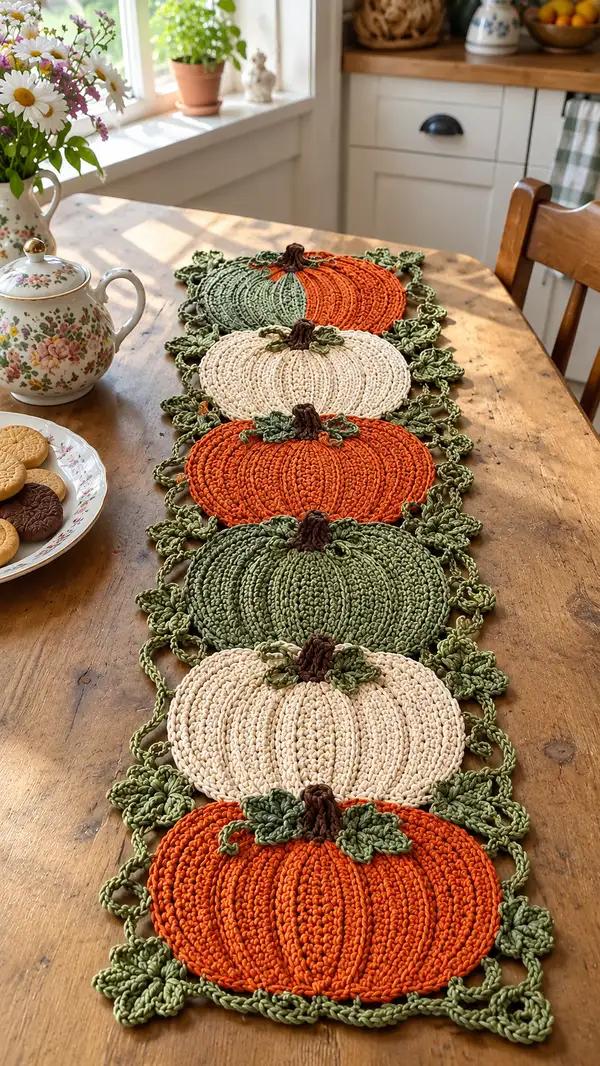
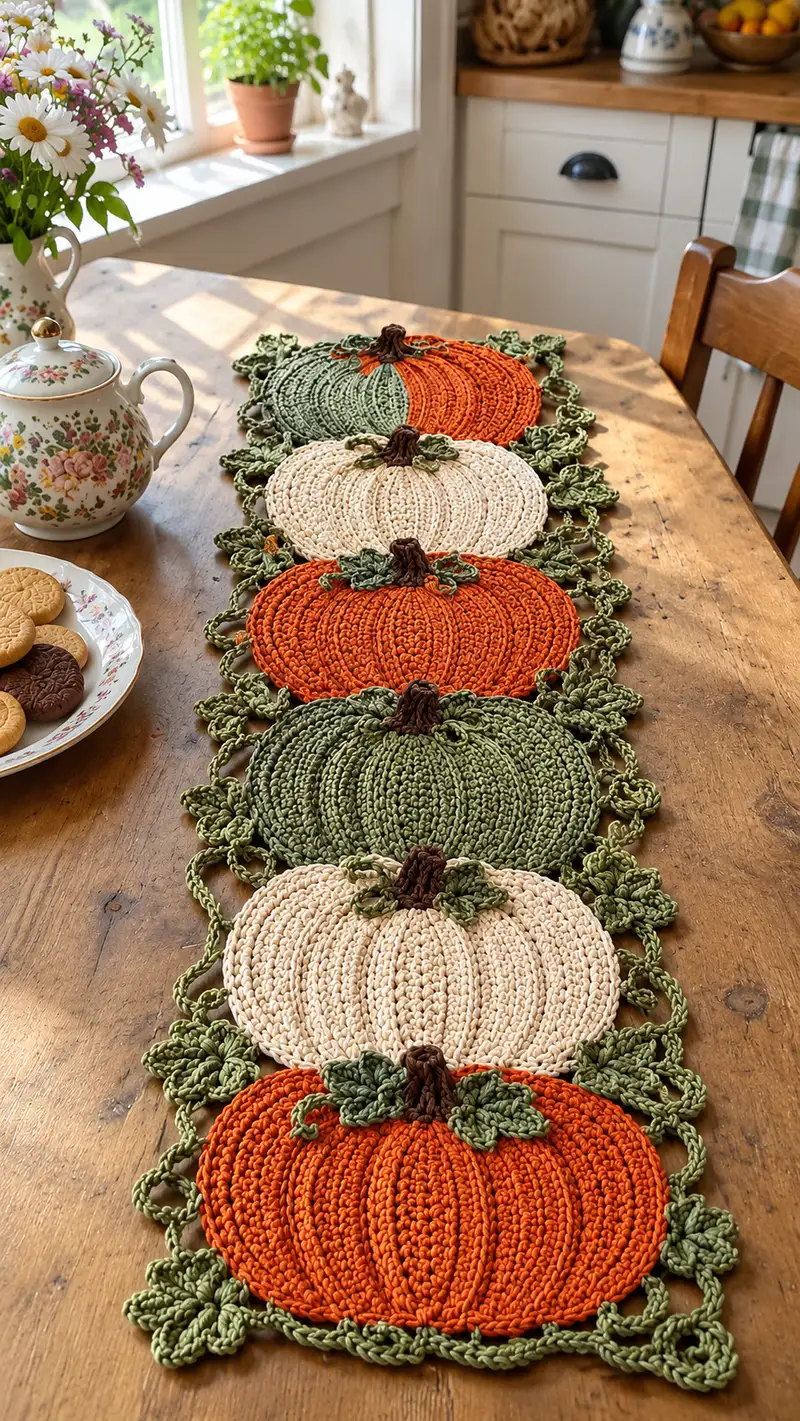
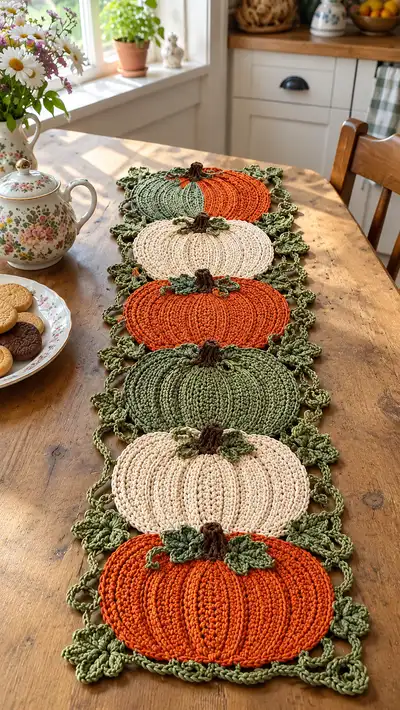
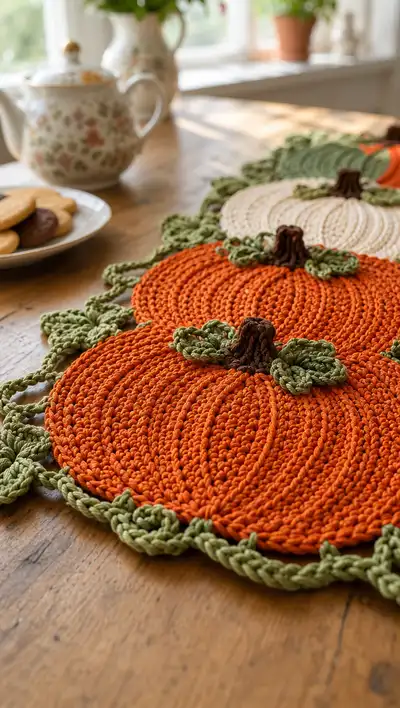
A charming fall table runner featuring a row of flat pumpkin motifs joined by leafy vines and decorative picot edging. Each pumpkin is worked flat with raised ribbing, a textured brown stem and layered green leaves. The runner in the photo uses warm orange, soft cream and muted green tones to create a cozy harvest centerpiece perfect for a rustic kitchen table.
Progress Tracker
0% Complete
— Notes & Preparation :
Info :
This runner is made from individual flat pumpkin motifs joined by chain-vine connectors and enhanced with leaves and stems. Work each motif tightly to keep fabric dense and neat. Gauge is not critical but a consistent hook and tension will ensure even joining. Plan the layout on a flat surface before joining.
Info :
For a similar finished size to the photo (runner approx. 36-40" long and 10-12" wide) make six pumpkin motifs approx. 5.5-6" wide each and join with repeating vine connectors. Adjust number of motifs to fit your table.
— Pumpkin Motif (Make 6; use orange, cream and green colors as desired) :
Round 1 :
6 sc in magic ring (6)
Round 3 :
(1 sc, inc) x 6 (18)
Round 4 :
(2 sc, inc) x 6 (24)
Round 5 :
(3 sc, inc) x 6 (30)
Round 6 :
(4 sc, inc) x 6 (36)
Info :
We begin with a flat, increasing circle and will expand to create a wide pumpkin. Keep your tension consistent; mark the beginning of each round with a stitch marker and move it up as you go.
Round 7 :
(5 sc, inc) x 6 (42)
Round 8 :
(6 sc, inc) x 6 (48)
Round 9 :
(7 sc, inc) x 6 (54)
Round 10 :
(8 sc, inc) x 6 (60)
Round 11 :
(9 sc, inc) x 6 (66)
Round 12 :
(10 sc, inc) x 6 (72)
Info :
At the end of Round 12 you have a circular piece with 72 sts. The pumpkin will take its flattened, slightly oval shape as we work additional even rounds and add texture. If you want a slightly smaller motif, stop increasing earlier and begin even rounds when you reach desired diameter.
Round 13-18 :
1 sc in each st (72)
Info :
Work even to build up the thickness (height) of the pumpkin. I recommend 6 rounds even (Rounds 13-18) to create a sturdy base for ribbing. Keep the surface smooth by smoothing the piece with your hand between rounds.
Round 19 :
1 sc in next 8 sts, inc, 1 sc in next 28 sts, inc, 1 sc in next 8 sts, inc, 1 sc in next 28 sts, inc (76)
Info :
This round creates slight shaping to emphasize two longer sides of the pumpkin (top and bottom) and start a subtle oval. The increases are concentrated in four spaced spots to shape the silhouette; counts equal 76 at round end.
Round 20 :
1 sc in each st (76)
Round 21 :
1 sc in next 9 sts, inc, 1 sc in next 30 sts, inc, 1 sc in next 9 sts, inc, 1 sc in next 30 sts, inc (80)
Round 22 :
1 sc in each st (80)
Info :
You can adjust the number of increase clusters if you prefer a rounder or more elongated pumpkin. The counts above are intended to produce a moderately flattened oval approx. 5.5-6" wide when using worsted cotton and 3.5mm-3.75mm hook.
Round 23 :
1 sc in next 10 sts, inc, 1 sc in next 32 sts, inc, 1 sc in next 10 sts, inc, 1 sc in next 32 sts, inc (84)
Round 24 :
1 sc in each st (84)
Info :
We now have 84 stitches which will give a slightly larger pumpkin motif—use these counts if you want a wider runner. Keep your stitch marker updated.
Round 25 :
Switch to BLO (back loops only) for one round: 1 sc in each st BLO (84)
Info :
Working in the BLO creates a subtle ridge that helps the surface hold the vertical ribbing that we will create with front-post work. If you prefer a totally flat finish, you can skip this BLO round but ribs will be softer.
Round 26 :
1 sc in each st (84)
Round 27 :
Mark 8 evenly spaced 'rib anchor' stitches around the surface. To calculate spacing, divide your total stitch count by 8 (e.g., 84/8 = 10.5). Place markers after working 10 sts, 11 sts, 10 sts, 11 sts, and repeat to distribute 8 markers evenly.
Info :
These 8 markers mark where vertical ribs will be made. Keep a record of these markers; you'll work front post double crochet (fpdc) around the indicated stitches to build raised ribbing.
Round 28 :
Working in continuous rounds, *fpdc around marked st, 1 sc in each of next 9 sts*; rep from * to * around (84) — move markers as you pass them to keep track
Round 29 :
*fpdc around next marked st, 1 sc in each of next 9 sts*; rep around (84)
Round 30-33 :
Repeat Rounds 28-29 for 4 rounds total of fpdc to develop raised ribs. (84)
Info :
After 4 rounds of fpdc at the rib anchors, the ribs should be pronounced. If you prefer deeper ribs, add additional fpdc rounds (but be mindful of adding height to the motif). Keep tension even on fpdc so ribs sit flush and neat.
Round 34 :
Switch back to sc: 1 sc in each st (84)
Round 35 :
Work a decorative surface line to emphasize ribs: with a contrasting (or same) yarn, sl st along the top of each rib from one side to the other by working 8 evenly spaced surface slip stitch arcs, ending at the center top area. (Use a yarn needle or hook to surface crochet following the rib markers)
Info :
Surface slip stitching is optional but gives a defined rib line like the example photo. If you use the same color it will be subtle; using a slightly darker or lighter shade creates contrast.
Round 36 :
Finish with one round of sc around the edge to tidy: 1 sc in each st (84)
Round 37 :
Fasten off leaving a long tail for sewing joins (or carry yarn if making continuous connection). Weave in tail or leave for assembly. Block motif lightly if needed to flatten.
Info :
Repeat the Pumpkin Motif instructions to make a total of six motifs, alternating colors as desired. For the runner shown, the motif order (from near to far) is: bright orange, cream, green, orange, green, cream. Pin them on a table to set the exact spacing before joining.
— Stem (Make 6) :
Round 1 :
Using brown, ch 6; join with sl st to form a small loop (6)
Round 2 :
Work 6 sc into the loop (6)
Round 3 :
(1 sc, inc) x 3 (9)
Round 4 :
1 sc in each st (9)
Round 5 :
1 sc in each st (9)
Info :
This creates a short cylindrical stem. Keep stitches tight so the stem holds its upright shape when sewn to the pumpkin.
Round 6 :
(1 sc, dec) x 3 (6)
Round 7 :
1 sc in each st (6)
Round 8 :
Leave a long tail for sewing, do not fasten off. Using the tail, fold the cylinder slightly and sew the base to secure a tapered stem shape. Add a few surface sl st ridges with the brown yarn to mimic stem grooves if desired.
Info :
Alternative method: work stem in continuous rounds using fpdc to build vertical grooves in the stem itself. If you want a sturdier stem, insert a short piece of rolled cardboard or a pipe cleaner before sewing closed, folding ends inward and securing with yarn.
— Leaves (Make 12+; 2 per pumpkin and extras for border clusters) :
Round 1 :
With green yarn, ch 6, sl st into 3rd ch from hook to make a picot ring (or ch 6 and sl st to join) (6)
Round 2 :
Ch 2 (counts as hdc), 2 hdc in same sp, ch 2, sl st in next sp, ch 2, 2 hdc in same sp, ch 2, sl st to join (creates a splayed leaf base)
Round 3 :
Working around the base: *ch 3, 3 dc in next ch-space, ch 3, sl st into base*; rep 3 times to form 3 lobes (3 lobed leaf)
Round 4 :
Turn leaf face outward and surface crochet 1 sc along edges for a finished look. Fasten off leaving a long tail for sewing.
Info :
This pattern makes small stylized leaves similar to the photo. For a layered look, make 2 leaves per pumpkin and stagger them when sewing near the stem. For larger, more sculpted leaves, repeat round 3 to add additional rows of dc lobes.
Round 5 :
Optional: Use a smaller hook to add center veins with sl st or a few back-loop-only sc stitches to create texture.
— Vine Connector & Border (Chain-Vine with Picot Leaves) :
Info :
The runner is assembled by connecting pumpkins with long chain-vine runs embellished with leaf clusters and small picot loops to echo the photographed decorative border. Work a continuous vine after all pumpkins are made or create vine segments and sew them in place—this pattern instructs making connecting vines per section and joining to adjacent motifs with sl st and whip stitch for a flat seam.
Vine Round 1 :
Attach green yarn at the right-most stitch of a pumpkin (near stem) with sl st. Ch 20 (or length to desired spacing), sk 2, sl st into edge of next pumpkin at the matching stitch to anchor the vine. Repeat to link subsequent pumpkins. Make sure chains are of equal length for consistent spacing.
Info :
To achieve the decorative twisted chain seen in the photo, use a chain made of twisted crochet cord: ch 40, sl st in 2nd ch from hook to create a sturdy chain, then twist lightly and press flat when joining. Alternatively, work a braided cord and sew it down for texture.
Vine Round 2 :
Along each chain connector, add leaf clusters: *sl st to the midpoint of chain, ch 4, (sc, hdc, dc, hdc, sc) in same ch, picot (ch3, sl st in 3rd ch), sl st back to chain*; repeat every 8 ch along connector. Fasten off and weave tails.
Info :
Space leaf clusters evenly and mirror placement on both sides of the runner for balance. Pin clusters in place before final sewing to fine-tune spacing.
Vine Round 3 :
To create the outer lace border, with green yarn work a continuous loop around the entire runner edge: join yarn to any chain space, *ch 6, sl st in next edge st; rep around*, adjusting chain length to maintain even spacing. At corners or between pumpkins add a leaf cluster as in Vine Round 2 to fill gaps.
Info :
For a more solid border, replace ch 6 loops with ch 8 and sc into outer points to create a raised scalloped border. Blocking after finishing will help the loops lay evenly.
— Decorative Leaf Clusters (Make many for border) :
Round 1 :
Attach green to vine or edge, ch 4, 5 dc into next st, ch 4, sl st to base (creates a large leaf cluster)
Round 2 :
Move 4 sts along edge, repeat cluster pattern; repeat to create clusters every 4-6 sts as desired
Info :
Each cluster is anchored with a sl st and forms the leafy border effect visible in the image. Make extras and lay them along the runner edge before sewing so you can get spacing that feels organic and balanced.
— Assembly & Joining (Detailed steps) :
Info :
Block all pumpkin motifs, leaves and vine elements lightly to flatten and set shape. Lay motifs in final layout on a large flat surface and photograph or mark positions for reference. Join motifs with the vine chains using sl st or whip stitch for a flat seam.
Round 1 :
Place two pumpkins side by side with stems alternating left/right and align edges so that the inner curve of each pumpkin meets the next. Use pins to hold position.
Round 2 :
With the long tail left from each motif, whip stitch through the corresponding back loops only of each motif's edge for an invisible seam. Make stitches every 4-6 sts and pull gently to draw edges close without puckering.
Info :
For a seamless look, try using a matching yarn and yarn needle to sew hidden mattress stitch-style. Alternatively, use sl st joining from the top to have a visible joining ridge that matches the ribbing texture.
Round 3 :
Sew stems to the center top of each pumpkin using long brown tails. Position stems upright and use 6-8 secure stitches at the base to anchor them. Add a couple of sl st ridges in brown along the stem to mimic the photo's textural grooves.
Round 4 :
Sew leaf pairs to the base of each stem, one on each side, using the long tails. Tuck leaf points slightly under stem edge and tack securely with 6-8 stitches per leaf. Add small picot curls (ch6, sl st at base) to mimic tendrils if desired.
Info :
Optional: For more dimension, lightly stuff the base of each leaf with a small dab of fiberfill before sewing and shape with a few holding stitches to make leaves pucker slightly like in the photo.
Round 5 :
Attach vine chains between pumpkins using sl st to the edge stitches you left when making motifs, or sew vine chains with a yarn needle for extra strength. Make sure vine tension is even so runner lays flat.
Round 6 :
Finish by adding the outer chain-loop border. Sew leaf clusters into border loops to create the leafy scalloped edge. Fasten off and weave all tails to the wrong side of the runner.
Info :
Once all pieces are assembled, lightly steam-block the full runner (do not press directly if cotton blends) to help loops and vines settle. Use pins to hold border loops in place while drying for a crisp finish.
— Alternative finishing options :
Info :
If you prefer a sturdier runner for heavy use, back the entire runner with a strip of cotton fabric cut to match shape and hand-sew it in place. This adds durability and helps washability.
Info :
To make a placemat version, make a single pumpkin motif and add a tighter border; to make a table runner for a long dining table increase the number of motifs and lengthen vine connectors to taste.
This pumpkin patch table runner brings fall warmth to your home with textured pumpkins, leafy vines, and a handcrafted charm that's impossible to resist. Each motif is a small project of its own, and assembling them into the runner is extremely satisfying. I hope this pattern inspires cozy gatherings, seasonal decorations, and many cups of tea while you crochet. Happy stitching and enjoy your beautiful harvest centerpiece! 🍂🧶