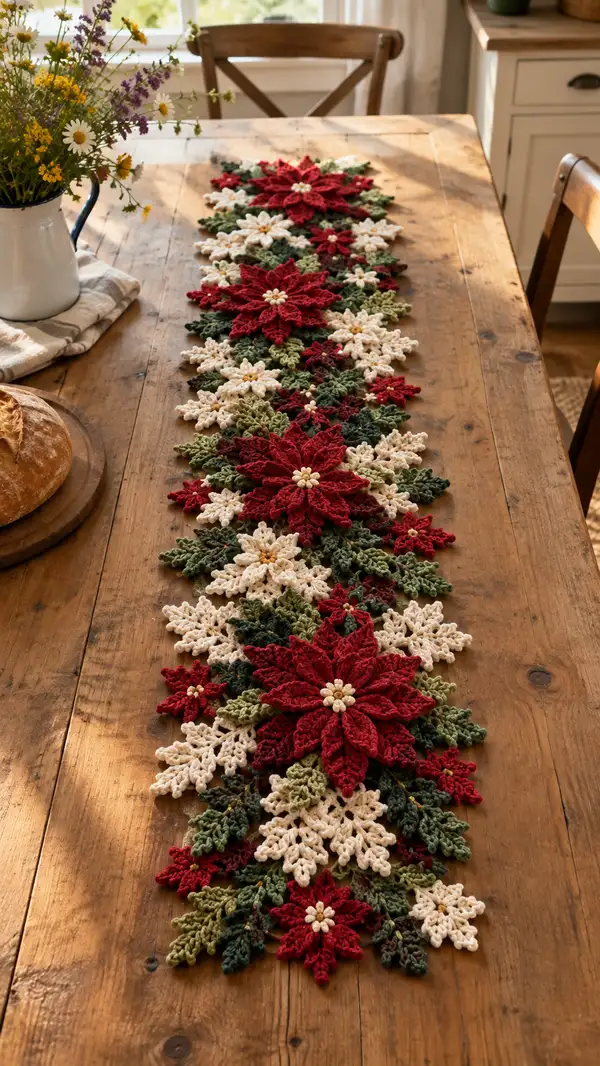
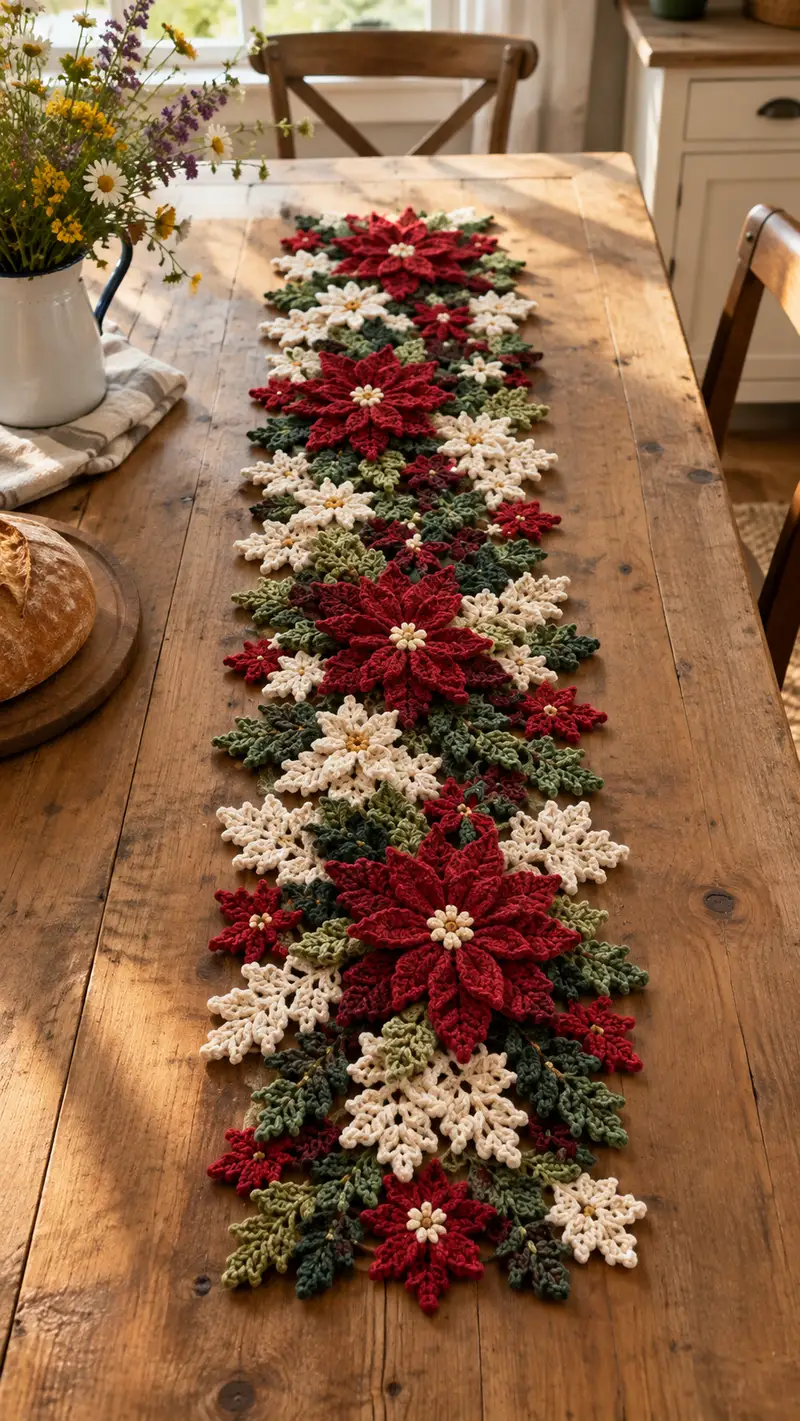
A festive, floral table runner made from layered poinsettia and snowflake motifs in rich red, cream and mixed greens. This pattern teaches layered petals, lacy leaves, and motif-joining techniques to create a long, elegant runner perfect for holiday tables. Finished runner is richly textured with raised petals and clustered bead centers for a handcrafted heirloom look.
Progress Tracker
0% Complete
— Large Poinsettia (Make 4–5 large flowers) :
Round 1 :
6 sc in magic ring (6)
Round 3 :
(1 sc, 1 inc) x 6 (18)
Round 4 :
(2 sc, 1 inc) x 6 (24)
Round 5 :
(3 sc, 1 inc) x 6 (30)
Round 6 :
(4 sc, 1 inc) x 6 (36)
Round 7 :
(5 sc, 1 inc) x 6 (42)
Round 8 :
(6 sc, 1 inc) x 6 (48)
Round 9-10 :
1 sc in each st (48)
Info :
Place a stitch marker at the beginning of Round 11 and keep it there while forming petal anchors. These anchors will be placed evenly around the 48-st center to create 12 petal bases (every 4th stitch).
Round 11 :
*Sc in next st, ch7, sk next 3 sts* repeat 12 times, join with sl st to first sc. You will create 12 ch-7 loops around the center (12 anchors).
Info :
Work petals into each ch-7 loop. Keep petals uniform by counting stitches as you make them. Use the same yarn color (red) for the whole large flower's petals.
Round 12 — Petal 1 :
Working in first ch-7 loop: sl st into first ch, ch1, (sc, hdc) into ch space, dc 3 into center of chain, tr 2 (the high point), dc 3, hdc, sc, sl st into base to close petal. Finish petal and repeat for next ch-7 loop. Repeat this petal sequence 12 times to create 12 full outer petals.
Round 13 :
After completing all 12 outer petals, join with sl st to base, ch1, sc around the bases of each petal working 6 sc across each petal base (approx 72 sc depending on how you stitched each petal). Adjust to keep the round even by placing slightly more or fewer sc across bulky petals to avoid puckering (aim for ~72 sts).
Info :
Check that all outer petals are evenly shaped and that the petal bases sit flat. If needed, block petals gently by pinning them to shape on a blocking mat and spritzing lightly.
Round 14 :
Begin inner layered petals: *sc in next 5 sts, ch5, sk 5* repeat around to create 12 inner loop anchors (this anchors smaller petals between the outer petals).
Round 15 — Inner Petal :
In each ch-5 loop make: sl st into ch, ch1, sc, hdc, dc 2, tr 1 (peak), dc 2, hdc, sc, sl st back to base. Repeat for all 12 inner loops to create a second layer of smaller petals sitting inside and between outer petals.
Round 16 :
Join with sl st and work 1 round of sc around the base of inner petals to tidy join (approx 72 sc). Fasten off if you wish to change yarn color for center beads.
Info :
For the central bead cluster: using a contrasting cream yarn or actual beads, attach bead(s) or create a small beaded disc. If using yarn: mr, 6 sc, sl st and thread small beads onto yarn to stitch into center later. If using beads, sew 6–8 beads in a clustered circle.
Round 17 — Center Finish (optional) :
With cream yarn, work a small 6-sc circle: mr, 6 sc (6), tighten and fasten off leaving 10–12 inch tail to sew through center. Sew through center of flower and secure beads or the cream disc over the knot. Weave tail and sink into petal underside.
Info :
Lightly steam or mist-block layered petals to set shape. The two layers should alternate so inner petals sit between outer ones, increasing visual depth.
— Small Poinsettia / Accent Star (Make 8–10 small flowers) :
Round 1 :
mr, 6 sc in magic ring (6)
Round 3 :
1 sc in each st (12)
Round 4 :
*Sc in next st, ch5, sk next st* repeat around 6 times to create 6 ch-5 loops for petals. Join with sl st to first sc (6 loops)
Round 5 — Petal :
Work the small petal in each ch-5: sl st into ch, ch1, sc, hdc, dc 2, hdc, sc, sl st. Repeat in all loops to form 6 distinct small petals.
Round 6 :
Join with sl st, fasten off, weave ends. Sew a 3–5 bead cluster in center using cream/gold beads or stitch a tiny cream round using mr, 6 sc and attach tightly.
Info :
These little accent poinsettias are ideal for filling gaps between larger motifs and adding visual rhythm. Make them in both red and cream to alternate colors down the runner.
— Cream Snowflake / Star Motif (Make 12–16) :
Round 1 :
mr, ch3 (counts as first dc), 11 dc into ring, join with sl st to top of ch3 (12 dc) (12)
Round 2 :
Ch1, sc in same st, *ch4, sk next dc, sc in next dc* repeat around to form 6 ch-4 loops (6), join with sl st to first sc
Round 3 — Arm :
Into each ch-4 loop: sl st, ch1, sc, hdc, dc2, picot (ch3, sl st into top of last dc), dc2, hdc, sc, sl st to base. Repeat into all 6 loops to make 6 snowflake arms. Fasten off, weave ends neatly.
Info :
Use cream yarn for these snowflakes. Work tightly to ensure the arms are crisp. Blocking on a mat with pins will open the arms nicely and help it sit flat in the runner.
— Leaf (Make ~30–40 assorted leaves in moss and forest green) :
Round 1 :
Ch8, in 2nd ch from hook: sc, hdc, dc, hdc, sc (working down the chain) then 3 sc along opposite side of chain to form a symmetric leaf (total stitches vary; this creates a small leaf). Fasten off. (approx 8–10 sts)
Round 2 :
To create a fuller leaf, join to center chain at base and work: ch1, sc across base, then *(ch2, sl st) across top to make ridges* — this is optional decorative edging for texture.
Round 3 :
For longer leaves: ch12, sc in 2nd ch from hook, hdc, dc 2, tr 2, dc 2, hdc, sc, then 5 sc back along opposite side of chain. Fasten off. Leaves will be 9–12 cm depending on yarn/gauge.
Info :
Make leaves in varying lengths and two greens to mimic the natural scatter. Use BLO on the final rounds on some leaves to create a subtle ridge and visual interest.
Round 4 — Vein Detail (optional) :
With contrasting green or slightly darker shade, embroider a center vein down the leaf using stem stitch or surface slip stitch, starting at base and finishing near tip. Secure ends and weave in.
— Tiny Filler Berry Flowers (Make many) :
Round 2 :
Push center slightly to flatten, fasten off leaving long tail for sewing. Alternatively, sew on three small beads for a berry cluster.
Info :
Tiny berries in red and cream are used to tuck into gaps and to echo the central bead clusters of the large poinsettias. Make 20–30 of these small rounds.
— Joining & Connector Motifs (Make connecting mini motifs and anchors) :
Round 1 :
Small joiner motif: ch6, join into ring with sl st, ch3 (counts as dc), 11 dc in ring (12 dc), sl st. This small disc acts as a stable anchor to sew petals and leaves onto.
Round 2 :
Ch1, sc in each st around, sl st to join (12 sc). Fasten off with tails for sewing.
Info :
Create a handful (10–15) of these small discs to stitch between motifs for stability when assembling the runner. They help maintain spacing and secure layers of petals and leaves.
— Decorative Edging (Optional) :
Round 1 :
After assembly, work a lace chain border along the runner edges by picking up the outer-most stitches with matching green or cream: attach yarn, ch4, sk 2 sts, sl st into next; repeat to create picot-lace edging. This is worked after motifs are sewn together.
Round 2 :
For a scalloped edge: attach yarn at edge, *(5 dc in same edge space, sl st in next)* repeat around runner perimeter. Fasten off and weave ends.
Info :
Edging is optional because the motifs have naturally irregular edges. The lace border neatens the outer silhouette and can be matched to table decor or left undone for a raw organic look.
— Assembly Instructions (joining motifs into a runner) :
Info :
Lay out all your motifs on a flat surface and experiment with placement. The runner in the photo alternates large red poinsettias with clusters of cream snowflakes and small red accents with leaves filling the gaps in a repeating pattern. Aim for a visually balanced composition, staggering motif centers about 8–12 cm apart depending on motif size.
Round 1 :
Use long yarn tails and a yarn needle to sew motifs together with small whip stitches through the outer loops or the base joiner discs. Sew only a few stitches at each contact point so joints remain flexible. Aim for 3–5 secure stitches at every overlap between two motifs.
Round 2 :
Sew leaves underneath petals and snowflakes at overlapping junctions so leaf tips peek out naturally. Use ladder stitch for invisible joins where the leaf meets petal base; for stronger joins use a round of top-stitch across overlapping edges.
Round 3 :
When joining large poinsettias, overlap the inner petal edges slightly so the beads remain visible and the seam is hidden. Use several connector discs under heavy overlap points and stitch through both discs and motif bases to stabilize the runner.
Info :
Keep stitches small and even, and turn the piece periodically to check the runner lies flat. Add or remove filler motifs (small stars, leaves, berries) to correct any gaps or to lengthen the runner.
Round 4 :
Once sewn, add bead clusters at centers. Use strong thread to sew beads and secure with a knot hidden beneath a petal. If desired, dab a tiny bit of fabric glue on bead knots for extra security (allow to dry before handling).
Round 5 :
Weave all tails to the underside and trim. Block entire runner: pin to a flat surface, shaping petals and leaves, then lightly steam or mist and allow to dry completely for a crisp finished look.
Info :
Assemble in stages: first attach all large flowers in a rough center line, then add medium and small motifs outward, tucking leaves and snowflakes into gaps for a natural clustered look similar to the image.
— Optional Extra Texturing Rounds (Add depth to petals and leaves) :
Round 1 :
On selected petals, work one round of BLO crab stitch (reverse sc) around petal edges to create a raised ridge and more texture. Work slowly to maintain even tension.
Round 2 :
To give petals a cupped look, work a short row of increases near the petal base on the WS (e.g., sc in base, (sc inc) across first 3 sts) then block petal so outer edges curl slightly up.
Info :
Texturing can make a flat runner look handcrafted and rich. Don't overdo increases or petals may be distorted; small controlled increases will add gentle cupping.
— Finishing Touches :
Round 1 :
Sew on additional bead highlights sparsely along runner for subtle sparkle. Use a small gold or cream bead to echo the flower centers.
Round 2 :
Final inspection: check for loose stitches, trim stray fibers, and rehearse placement by draping runner and ensuring it lays flat on table.
Info :
Store runner flat or rolled to avoid flattening petals. For washing: hand wash gently and re-shape while damp; heat may distort beads or fibers so avoid hot water and machine drying.
This poinsettia runner brings handcrafted holiday charm to your table — the layered petals, cream snowflakes and textured leaves make each stitch worth it. The modular motifs let you customize size and color, creating a piece you'll cherish season after season. Celebrate slow craft and give your table the warm, festive look it deserves. 🧶🌿✨