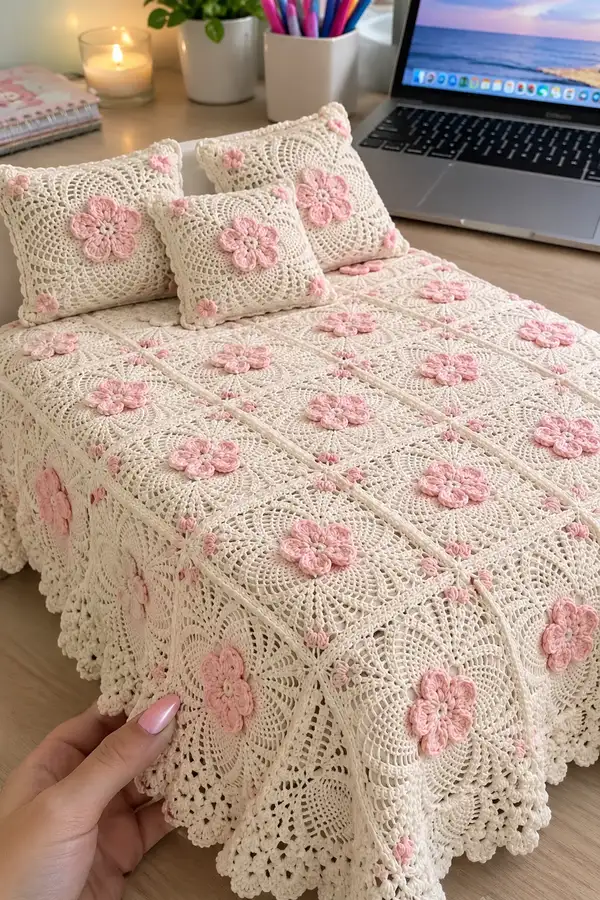
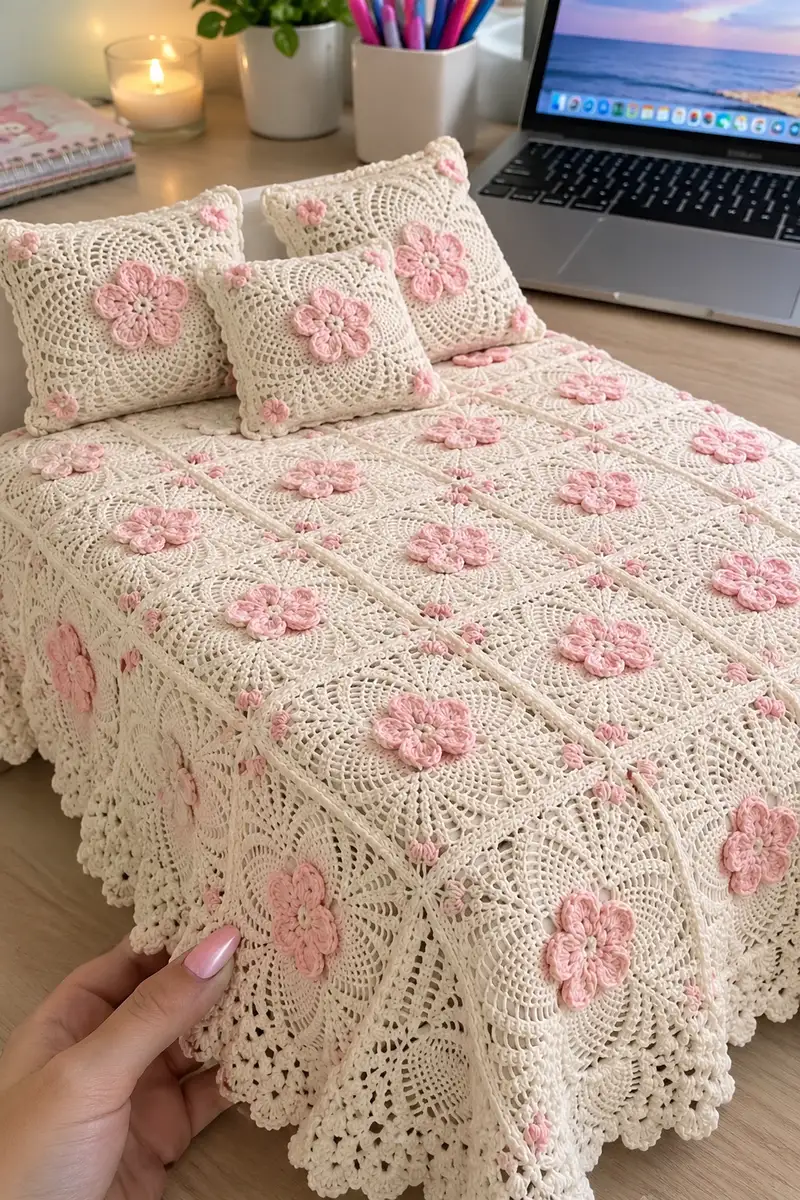
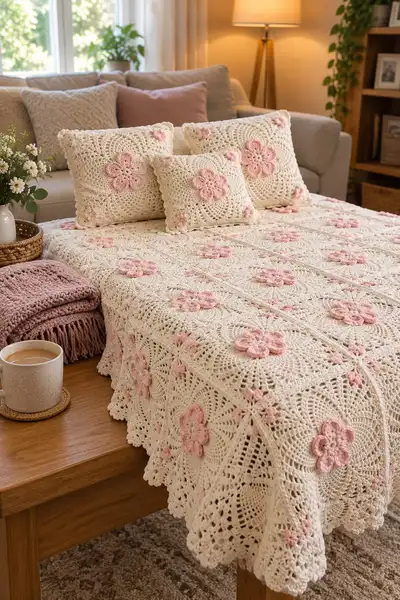
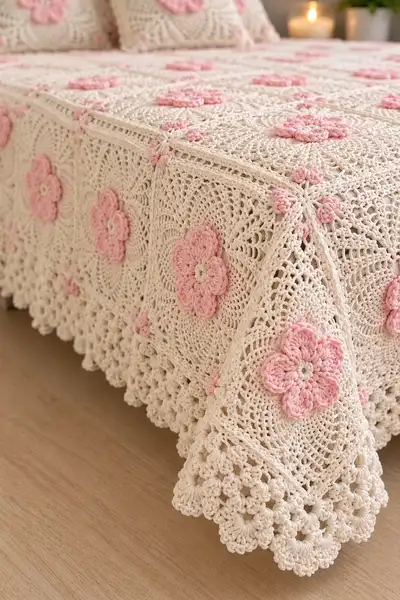
A dreamy cream lace bedspread adorned with soft pink 3D flowers and scalloped edges. This pattern breaks the bedspread into elegant floral square motifs joined with tiny rosebud connectors and finished with a deep lacy scallop. Perfect for adding a vintage, romantic touch to a bedroom or for gifting to someone who loves delicate crochet lace.
Progress Tracker
0% Complete
— Notes & Gauge :
Info :
This bedspread is constructed from repeating square motifs joined together, with a deep scalloped border added at the end. Use cotton DK weight yarn and a 3.5mm hook to achieve a crisp lace look. Gauge is not critical but for consistency aim for each finished motif (before blocking) to measure approximately 18cm (7") square after blocking. Work tension slightly tighter than you would for garments to keep the lace defined.
Info :
Abbreviations used in the round-by-round instructions: mr, ch, sc, hdc, dc, tr, dtr, sl st, inc, dec, BLO, FLO, sp, sk. Block each motif square to size for consistent joining. Place stitch markers at the beginning of rounds and at the four 'corner' points when working rounds that form corners.
— 3D Flower Center (Make one per motif) :
Round 1 :
Start with soft pink yarn. Make a magic ring, ch1, 8 sc in ring. Tighten ring and join with sl st to first sc (8)
Round 2 :
Ch1, *sc in next st, ch3; rep from * around to create 8 ch-3 loops, join with sl st to first sc (8 ch-3 loops)
Round 3 :
Into each ch-3 loop: (sc, ch1, 5 dc cluster worked as 5 dc around same loop forming a tall petal, ch1, sc) — do this around for 8 petals. Fasten off pink, leaving tail for sewing the flower center to motif (work counts: 8 petals)
Info :
Make sure the 5-dc petal clusters are worked tightly so petals sit up as 3D. You can work petals as 5 hdc if you prefer smaller petals. Block petal section gently with pins to shape the petals before sewing in place.
Round 4 :
Using a tiny amount of cream or pale accent yarn, join in the center back with sl st and work 6 sc around the very center hole to create a small central disk (6). Fasten off and weave in ends. This center will be sewn onto the motif ring in the next section.
— Motif Square (Make many) :
Round 1 :
With cream yarn, make a magic ring, ch3 (counts as first dc), work 11 dc into ring, join with sl st to top of ch3 (12)
Round 2 :
Ch3 (counts as dc), dc in same st, *2 dc in next st; rep from * around, join (24)
Round 3 :
Ch4 (counts as tr), tr in next st, *ch2, sk next st, (tr, tr) in next 2 sts; rep from * around, join (12 tr-pairs + ch2 spaces)
Info :
Round 3 sets up the radial fan spokes. Keep tension even; place a marker at the first ch2 space so you can identify the 8 cardinal points later. These points will be used to form square corners in later rounds.
Round 4 :
Ch3, dc in each tr and dc across, placing 2 dc in each ch2 space from previous round (48)
Round 5 :
Ch1, sc into each st across to smooth the round, placing sc evenly (48)
Round 6 :
Ch4 (counts as tr), *sk 2 sts, (3 tr cluster) in next st, ch2; rep around placing cluster at the top of several fan sections, join (16 clusters and ch2 loops)
Info :
Round 6 creates small fan clusters that add texture behind the flower. If you prefer a more open look, replace 3 tr cluster with 3 dc cluster worked into the same base stitch. Maintain cardinal markers for corner shaping ahead.
Round 7 :
Ch1, sc in each st and in each ch2 loop, working 2 sc into top of each 3-tr cluster to broaden the ring (64)
Info :
Change to a slightly smaller hook (3.25mm) for the lacy rounds if desired to keep stitch definition. Begin positioning where the 3D flower will sit: mark the central point at the top of the motif (center of round 1) and place 4 tiny markers at cardinal points around the ring — these will become the corners when shaping to square.
Round 8 :
Ch3, *dc in next 3 sts, ch1, sk 1 st; rep from * around, ensuring ch1 spaces are evenly placed to create 16 ch-1 loops (64)
Round 9 :
Ch1, sc around, working sc into each dc and into each ch-1 loop (64)
Round 10 :
Ch5 (counts as tr+ch2), *sk 3 sts, (2 tr, ch2, 2 tr) in next st (corner cluster), sk 3 sts, tr in next 3 sts; rep from * around and join (creates 4 prominent corner clusters; keep stitch count variable because corners add extra chains)
Info :
Round 10 is the transition round that begins to create 4 corner clusters that will shape the motif into a square. Carefully place the corner clusters opposite each other. This round will slightly increase the total stitch/space count compared to previous even rounds; do not panic — subsequent rounds will normalize the count by working into chain spaces.
Round 11 :
Ch1, sc in each tr and in each ch-2 space, working (sc, ch2, sc) into each corner ch-2 space to form defined corners (counts will vary due to corner ch2 groups; approximate total 88 points)
Round 12 :
Ch3, dc in each st and in each sc across, working (dc, ch2, dc) in each corner ch-2 space (96)
Info :
At this stage the motif is moving from round to square shape; block if needed to get corners right. Use pins at the four corner ch-2 spaces and stretch slightly while blocking so the square becomes even. Make one motif and test join size with a second motif before making the entire bedspread.
Round 13 :
Ch1, sc around in each st and each chain space to tidy the round (96)
Round 14 :
Ch3, *(2 dc, ch2, 2 dc) in corner ch-2 space, dc in next 10 sts; rep from * around (104)
Round 15 :
Ch1, sc around, placing 2 sc over the 2-dc groups where necessary to keep edges even (104)
Round 16 :
Ch4 (counts as tr), *dc cluster pattern: (tr in next 2 sts, ch1, sk 1 st), (3 tr cluster in next st), ch1; rep across sides and in corners work (tr, ch2, tr) to maintain corners (112)
Info :
Rounds 14-16 create more defined side panels that will form the fans visible in the photos. The motif begins to show long lacy spokes between corners. Keep stitch markers at each corner to preserve the square geometry.
Round 17 :
Ch1, sc into each st and ch-space; work 3 sc into corner ch-2 spaces to create stable corners (112)
Round 18 :
Change to an open mesh round: ch5 (counts as tr + ch2), *sk 3 sts, tr in next st, ch2, sk 3 sts, (3 tr cluster) in next st; rep around and join (mesh pattern across each side)
Round 19 :
Ch1, sc in each tr and each ch-2 space to tidy mesh (112)
Info :
At this point the motif resembles the airy circular lace inside a square frame. You can choose to add one or two additional openwork rounds for extra lacy look — these will lengthen the motif and should be balanced across all squares for consistent joining size.
Round 20 :
Ch3, dc in next 5 sts, (dc, ch2, dc) in corner, dc in next 14 sts; rep around (128)
Round 21 :
Ch1, sc around in each st and ch-space (128)
Round 22 :
Begin decorative fan rounds: *in each side space make (ch2, 5 dc, ch2) as a fan, work sc between fans; in corners continue to make (dc, ch2, dc) to maintain square corners. Repeat around creating 8-10 fans per side depending on size (approx 136)
Info :
These fan clusters create the radiating fan-lace seen in the photos. Count and space fans evenly across each side; using a stitch marker to divide sides makes this easier. The approximate stitch counts increase when you add fans; exact counts vary based on how many fans you place per side — the key is symmetry.
Round 23 :
Ch1, sc around to secure fans; place 3 sc in each corner cluster to keep corners square (136)
Round 24 :
Ch3, dc in each st across, working 2 dc into fan middle where needed and (dc, ch2, dc) in corners (144)
Round 25 :
Ch1, sc across to tidy the square and create a defined edge (144)
Info :
At the end of Round 25 the motif should measure about 18cm (7") across after blocking if using DK cotton and the given hooks. Adjust stitch count or add one open round if your motif is smaller. Make a set of motifs (for example, 5x7 grid for a small bedspread or as many as needed for your bed) and block each motif square flat and square using pins.
Round 26 :
Prepare to attach the 3D flower: centered on the motif, use a blunt yarn needle to sew the completed pink 3D flower center to the very middle of the motif. Use small whip stitches through the center disk and through a few stitches of the motif center to secure firmly. Weave ends to the back.
Info :
Ensure the flower is centered by folding the motif in half twice to locate the exact center, or by identifying the round 1 center stitches. Pin the flower on before sewing to check placement. The raised petals should sit flat but pronounced; avoid pulling too tight and flattening them when sewing.
— Small Rosebud Connector (Make many) :
Round 1 :
With pink yarn, ch4, join with sl st to form ring, ch1, work 6 sc into ring, join (6)
Round 2 :
Ch2, (dc, ch1) into same st, *dc in next st, ch1; rep around, ending with sl st to top of ch2 (6 small petals)
Round 3 :
Ch1, sc around working sc into the base of each dc and into ch-1 spaces to tidy (12). Fasten off and leave tail for sewing into joins.
Info :
These small rosebuds are used at each motif join intersection (corners where 4 motifs meet) and at mid-join points as seen on the bedspread. Sew them where joins intersect to hide seams and add decorative interest. Make many — estimate about one small rosebud for each joined intersection and four per motif grid square (depending on layout).
— Joining Motifs (Continuous or Sewn Join) :
Info :
There are two recommended joining methods: join-as-you-go (JAYG) using slip-stitch joins on the last round, or sew motifs together after blocking using whip stitch or mattress stitch. The instructions below describe a slip-stitch join-on-last-round method and a sewn join alternative.
Method A - Join-As-You-Go (preferred for invisible joins) :
Work motifs up to the final round but do not fasten off. Lay the new motif on top of the previously placed motif in the layout where it will join. On the last round, when you reach the corner chain-space that aligns with a finished motif, sl st into the corresponding space on the finished motif then continue working the last round. Where motifs meet at sides, join in each corresponding ch-space by sl st through both motifs. Continue around to join two or three sides as needed, then finish the last side with regular stitches. Fasten off and weave in ends.
Method B - Sewn Join (for very secure seams) :
Block all motifs. Arrange motif grid on a flat surface. Using a blunt yarn needle and matching cream yarn, whip stitch through both motif edge stitches along the side edge stitch-by-stitch, keeping tension even. For corners where four motifs meet, leave a small central hole to place a small rosebud connector, then sew the rosebud over the hole to disguise the join and to secure the corner point.
Info :
When joining, ensure motifs are oriented the same way (flower petals pointing the same direction) for consistent visual flow. Use pins to secure motifs together before sewing to prevent shifting. For JAYG, keep the joining tension slightly looser than body of motif to avoid puckering.
— Border & Scalloped Edge :
Round 1 :
With the full spread assembled and blocked, join cream yarn at any corner. Ch1, sc evenly around the entire outer edge of the assembled spread, working 3 sc into each motif corner to stabilize (counts vary because of total motifs — work to fit, approximate 8-10 sc per motif side depending on motif size)
Round 2 :
Ch3, dc in each sc across, working (dc, ch2, dc) in each corner to maintain square/rectangle corners (counts will depend on spread size; keep corners consistent)
Round 3 :
Ch1, sc around to tidy edge
Round 4 :
Ch3, *sk 2 sts, (5 dc cluster) in next st, sk 2 sts, dc in next st; rep around forming deep shells along entire edge (shell placement should be consistent and evenly spaced)
Info :
Shells form the scalloped look. Space shells evenly so scallops fall at the motif edges and between motif corners. If you have very large spread edges, you may add an extra row of shells for a deeper scallop.
Round 5 :
Ch1, sc in each st and in each dc of shells to secure shells and to create a small picot or single sc in the shell tops if you desire tiny decorative points
Round 6 :
For a rounded scalloped edge: *in shell top work (sl st, picot: ch3 sl st into 3rd ch), then sl st into center of next shell; rep around. Fasten off and weave in ends.
Round 7 :
Optional heavier scallop: join a second row of shell clusters: ch3, (2 dc, ch2, 2 dc) in each shell top from previous round, sl st between shells to anchor. Fasten off and block thoroughly to set the scalloped edge.
Info :
Blocking is critical for the final scalloped edge to lay beautifully. Use pins to round each scallop and spray lightly with water or steam-block following yarn care instructions (cotton tolerates gentle steam). Allow to dry fully before removing pins.
— Optional Deep Lace Flounce (Extra Draping Edge) :
Round 1 :
Join cream yarn at base of scallop, ch5 (counts as tr+ch2), *work 4 tr in next shell space, ch2; rep across entire edge creating a fuller flounce (counts vary with spread size)
Round 2 :
Ch1, sc in each tr and each ch-2 space, working (sc, ch3, sc) at intervals to add picot lace points across the flounce
Round 3 :
Ch3, work (2 tr, ch3, 2 tr) clusters into designated spaces for shell peaks along the flounce to build a layered scallop. Fasten off and weave ends. Block with extra pins to deepen the flounce.
Info :
Extra flounce rounds create the deep, ruffled look seen along the bed edge in the images. These are optional but add a luxurious drape. Using slightly heavier yarn or a larger hook for flounce rounds will exaggerate the ruffle effect — but keep overall balance in mind.
— Cushion Covers (Set of 3 - 2 Large, 1 Small) :
Round 1 :
Make square motif same as Motif Square rounds 1-25 but stop at Round 20 to make a slightly smaller motif for cushion front, or follow full motif for larger cushion fronts. Make two matching motifs for each cushion (front and back) or one motif for front and make a simple plain back.
Info :
For the cushion backs, you can crochet a solid lace panel by working Repeat: ch3, dc in each st for 8-10 rounds, then finish with a neat sc border. Alternatively, use fabric for the back and insert a zipper or envelope closure. Sew the front motif to the back fabric carefully, pinning and sewing near the edge to keep seams invisible.
Round 3 :
Sew a small 3D flower to the center of each cushion front as on the bedspread. If using a removable cushion insert, ensure you leave a small overlap for insert clearance when sewing the sides together.
Info :
Use a pillow insert a bit smaller than the cover dimensions for a plumped look. Block cushion fronts flat before attaching to the back panel to make sure all petals and edges sit consistently.
— Finishing Touches & Embellishments :
Info :
Sew small pink rosebud connectors at each point where motifs meet (especially where four corners align) to mimic the image. Add a tiny central bead or pale green french knot using embroidery thread at the very center of each pink flower if desired. Weave in all ends behind motifs and trim short. Re-block the entire spread after joining and finishing to set the lace and scallops.
Info :
For a very professional finish, weave in ends on the wrong side and press lightly using steam (if using cotton yarn). Store the bedspread folded with acid-free tissue to preserve the shape of the petals and prevent crushing.
Final Tips :
Work in a well-lit space for lace detail. Keep a gauge square of 3-4 motifs to test your joining method before committing to the full number of motifs. Keep notes of how many rounds you used for each motif and for the border so you can reproduce the same result if making another bedspread or cushion set.
This romantic pink flower lace bedspread is a labor of love that combines delicate lace rounds with charming 3D petals and a deep scalloped edge. Every square motif is a little victory — and together they create a timeless piece that will dress your bed with vintage-inspired elegance. Block, join, and add tiny rosebud accents for that final boutique finish. 🧶💗🌸 Enjoy the slow, meditative joy of crocheting and the beautiful result you get to display and treasure!