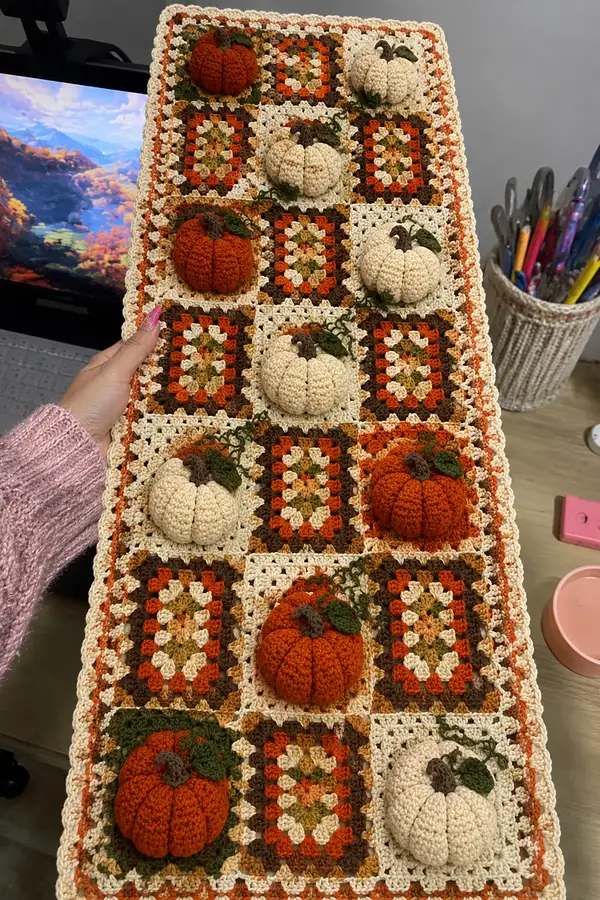
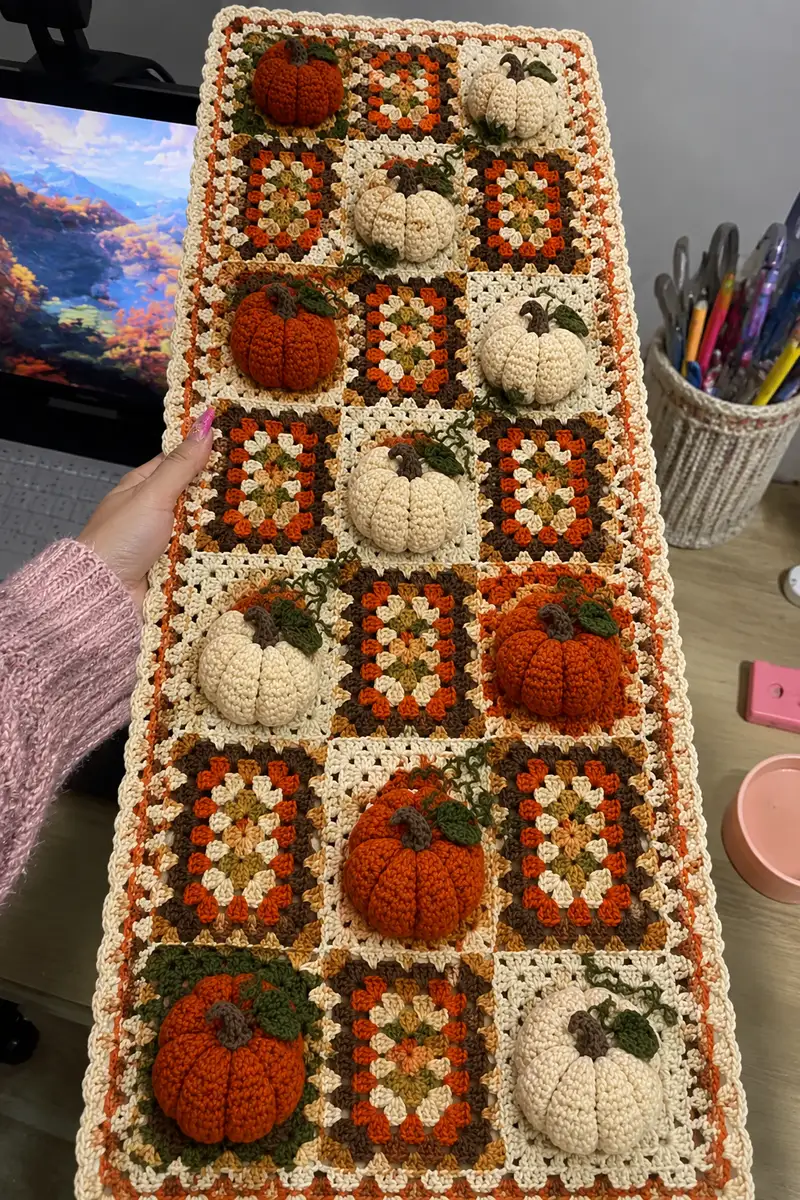
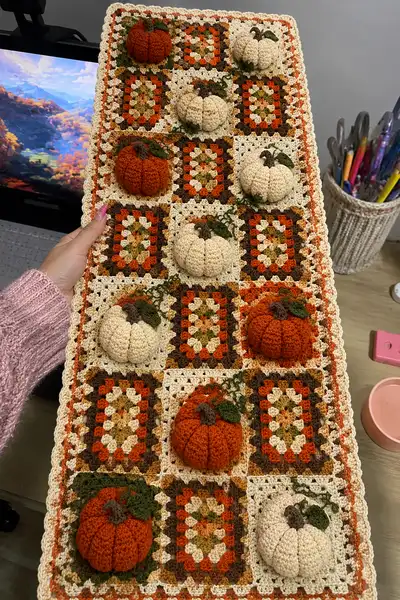
A warm, rustic table runner made from classic granny squares and topped with plump 3D crocheted pumpkins. This pattern features autumnal shades—cream, burnt orange, olive green and chocolate brown—and a padded, layered construction for a cozy, tactile centerpiece. Includes full granny square instructions, detailed pumpkin amigurumi rounds, stems, leaves, assembly and a scalloped border for a finished heirloom look.
Progress Tracker
0% Complete
— Finished Size & Gauge :
Info :
Finished runner in photo measures approximately 12 x 36 inches (30 x 91 cm) using 3 columns x 7 rows of 4.5" (11.5 cm) granny squares. Gauge: one granny square measures approximately 11.5 cm/4.5" square after blocking when using a 4.0mm hook with worsted weight yarn. Adjust number of squares to fit your table.
— Notes Before You Begin :
Info :
Make 21 granny squares in total (3 wide x 7 long). You will make two identical panels of 21 squares each if you want the padded sandwich effect as shown, then join the panels together leaving a cavity for light stuffing between panels. Alternatively, make a single panel and add a fabric-backed batting for padding. Pumpkins: make 9 plump pumpkins in two sizes (standard and small) to top selected cream squares. Use 3.25mm hook for pumpkins for tight fabric. Block all squares before joining for neat assembly.
— Multi-Color Granny Square (Make 11) :
Round 1 :
Using green or center color, form a magic ring, ch3 (counts as dc), 2 dc in ring, ch2, [3 dc, ch2] three times, join with sl st to top of beginning ch3 to form 4 corner clusters. (4 clusters, ch2 corners)
Round 2 :
Change to tan/mustard accent color. Sl st into next ch2 space, ch3, 2 dc, ch2, 3 dc in same ch2 space (first corner made). *In next corner ch2 space work 3 dc, ch2, 3 dc; rep from * around for four corners. Join with sl st to top of beginning ch3. (4 corners)
Round 3 :
Change to brown. Sl st to next ch2 corner space, ch3, 2 dc, ch2, 3 dc. *Ch1, in side space (between clusters) work 3 dc, ch1 (to create side cluster), in next corner work 3 dc, ch2, 3 dc; rep from * around. Join. (4 corners, side clusters created)
Round 4 :
Change to burnt orange. Sl st to closest corner space, ch3, 2 dc, ch2, 3 dc. *Ch1, 3 dc in each side space, ch1 between side clusters, in next corner 3 dc, ch2, 3 dc; rep from * around. Join. (square forming)
Round 5 :
Change to cream/ivory. Repeat the same corner and side cluster pattern: corners=3 dc,ch2,3 dc; sides=3 dc in each side space separated by ch1. Join. (square grows; counts by cluster not st)
Round 6 :
Change to brown (or alternate). Work one more round of clusters, remembering to ch1 between side clusters and ch2 at corners. Join and fasten off. Block square to 11.5 cm (4.5").
Info :
Each cluster round increases the visual size. For consistent size, use the same yarn order and tension for all 11 multi-color squares. Use stitch markers in corners if needed to maintain even expansion.
— Neutral/Cream Granny Square for Pumpkin Base (Make 10) :
Round 1 :
Using cream, ch4, join with sl st to make a ring. Ch3 (counts as dc), work 2 dc, ch2, [3 dc, ch2] three times, join with sl st to top of ch3. (4 corners)
Round 2 :
Sl st to next ch2 space, ch3, 2 dc, ch2, 3 dc in same corner. *Ch1, 3 dc in each side space, ch1 between, 3 dc,ch2,3 dc in next corner; rep around. Join. (square formed)
Round 3 :
Change to cream again if desired, repeat round 2 to build a slightly larger neutral square. Join, fasten off and weave ends. Block square to same size as multicolor squares (11.5 cm/4.5").
Info :
These cream squares are designated pumpkin placement squares. You can add a little 2-3 round circle of green or tan in the center before attaching the pumpkin for extra visual depth. Keep a tidy center to make seam sewing invisible.
— Pumpkin Body (Make 9 total: 5 standard, 4 small) :
Info :
Use 3.25mm hook and worsted weight yarn for pumpkins. Make 5 standard pumpkins using burnt orange and 4 small pumpkins using cream (or vice versa to match photo). Standard pumpkins: finished approx 2.25-2.75" (6-7 cm) diameter; small pumpkins slightly smaller. The pumpkin is worked in continuous rounds; use a stitch marker to mark round starts.
Round 1 :
MR, 6 sc in ring (6)
Round 3 :
(1 sc, inc) x 6 (18)
Round 4 :
(2 sc, inc) x 6 (24)
Round 5 :
(3 sc, inc) x 6 (30)
Round 6 :
(4 sc, inc) x 6 (36)
Round 7 :
(5 sc, inc) x 6 (42)
Round 8 :
(6 sc, inc) x 6 (48)
Round 9-16 :
1 sc in each st around (48). Work even for eight rounds to build pumpkin height. (48)
Info :
Start stuffing when you reach round 12-13 with a small amount and continue adding stuffing as you add more even rounds. Stuff lightly at first, as you will add more later before the final decrease. Maintain a tight stuffing to keep shape without visible lumps.
Round 17 :
(6 sc, dec) x 6 (42)
Round 18 :
(5 sc, dec) x 6 (36)
Round 19 :
(4 sc, dec) x 6 (30)
Round 20 :
(3 sc, dec) x 6 (24)
Info :
At round 20, continue stuffing to make the pumpkin plump. Add stuffing gradually, firm enough to hold shape but not so tight as to cause stitch distortion. The decrease rounds begin to shape the top; ensure even distribution by pushing stuffing toward the top as you close.
Round 21 :
(2 sc, dec) x 6 (18)
Round 22 :
(1 sc, dec) x 6 (12)
Info :
Fasten off leaving a long tail for closing. Use a yarn needle to draw the 6 remaining sts closed and secure. Leave an additional long tail for sewing the pumpkin to the square and for creating ribs and segments as described below.
Round 24 :
Using the long tail, thread onto a yarn needle and create 8 segments (standard) or 6 segments (small) by pulling the tail from the top center to the bottom center across the pumpkin, then back up repeatedly to form ribs. For a standard pumpkin make 8 equally spaced passes. Tie securely and hide the tail inside the pumpkin. (Info for ribbing)
Info :
To create pronounced ribs: after closing the hole, push the needle from the center bottom through to the top and wrap the long tail around the pumpkin between passes, pulling gently to indent the yarn at equal intervals. Repeat around the circumference until you have 8 (or 6) defined segments. Secure the final knot inside the pumpkin and weave in the end.
Round 25 :
Optional: Surface crochet a spiral of sc around the pumpkin to accent ribs. Insert hook near the top and sl st in each stitch along a line, repeat for each rib if desired. Fasten off and weave ends invisibly. (Optional decorative detail.)
— Pumpkin Stem (Make 9) :
Round 1 :
With brown yarn and 3.25mm hook, ch4, sl st in 2nd ch from hook, sc in next ch, hdc in last ch, turn to work along opposite side of chain: sc, sl st to form a small tube. Fasten off leaving long tail. (6 stitches in tube)
Round 2 :
Alternatively, MR 5 sc, work 5 rounds even (5 sc around each round) for a taller stem: Round 1 MR 5 (5); Round 2-6: 1 sc in each st (5). Fasten off leaving long tail for sewing. (Use MR method for firmer stem)
Info :
Choose stem height based on pumpkin size. For the standard pumpkin the MR 5 tube worked for 4 rounds yields a slightly stubby stem similar to pictured. Stuff the stem lightly with a pinch of fiberfill or a short yarn scrap before closing and sewing onto pumpkin. Curve the stem slightly when sewing using a few strategically placed stitches.
— Leaf & Tendril (Make 9 leaves + tendrils) :
Round 1 :
With green yarn and 3.25mm hook, ch6. Row 1: sc in 2nd ch from hook, hdc, dc, hdc, sc in last ch. Turn to work along opposite side: sc, sl st to join at base. Fasten off leaving tail for sewing. (Small leaf)
Round 2 :
For a larger leaf: MR, ch2 (counts as hdc), 2 hdc, dc, 2 hdc, ch2, sl st to MR. Pull ring closed, leave tail. (Petite round leaf)
Round 3 :
Tendril: with green, ch20, sl st back along chain to create a curled tendril. Alternatively, tightly work sc in each ch and then wind the chain around your finger to create natural spiral and tack in position when sewing. Fasten off leaving long tail for sewing. (Tendril)
Info :
Sew one or two leaves and a tendril next to each stem when attaching pumpkins. Use a few small stitches to anchor tendril in a spiral. Trim and weave in ends. Leaves and tendril add charm and hide the join between pumpkin and square.
— Pumpkin Finishing & Rib Stitching Details :
Info :
After ribs and stems are attached, use a sewing needle and a short length of contrasting green yarn to couch a small leafy vine across the cream square for a vintage look. You can also add a short loop of brown at the center of the pumpkin and tack the stem over it for a more natural junction.
— Panel Construction (Make 2 identical panels for padded runner) :
Round 1 :
Arrange 21 squares in a 3 x 7 grid, alternating multi-color and cream squares to match photo. Place the cream squares where pumpkins will be sewn (approx nine cream squares spaced evenly). Pin squares together edge-to-edge.
Round 2 :
Joining method A - whip stitch seam: With matched squares right sides up and yarn in cream, use whip stitch to sew squares together through back loops only of adjacent edges for a flatter join. Sew each row of three squares together, then join rows to make the full panel. Fasten off and weave in ends. (Info on joining)
Round 3 :
Joining method B - join-as-you-go (JAYG): Work last round of each square with cream and when making last round of a square, join into edge stitches of an adjacent completed square by replacing corner sl st with sl st to next square. This creates a seamless look on the right side. If you use JAYG you can skip extra seaming later.
Info :
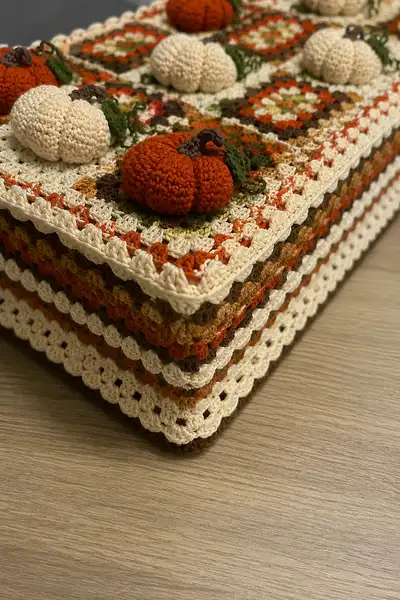
Make two identical panels following the same layout if you want the padded sandwich effect pictured. Keep the right sides matching so that the seams align when stacked. Lightly block each panel after joining to square up edges.
— Side Walls & Padding (Create thickness between panels) :
Round 1 :
With cream yarn and 4.0mm hook, attach yarn to any corner of the front panel. Ch1, sc evenly around the outer edge of the panel to work a neat border. Count stitches along the long and short sides to ensure consistency. Work 1 sc per chain space or per stitch around. Join with sl st to first sc. (one round of sc)
Round 2 :
Ch3 (counts as dc). *Skip 1 st, 3 dc in next space (shell), skip 1 st, dc in next stitch; rep around creating a scalloped shell edge. Join with sl st and fasten off. (Scallop prelim)
Round 3 :
To build the side wall height to create a padded box: Join yarn at the outermost sc of the front panel and work sc around the perimeter without joining at corners—work continuous rounds to create a tube. For each round: 1 sc in each st around front panel edge and then sc into the corresponding back panel edge once panels are aligned and pinned. Continue working rounds until desired thickness is reached (approx 10-14 rounds to match photo thickness). (side wall height)
Round 4 :
Info: After working 6-8 rounds the height will be visible—stop and test fit before continuing. When panels are sc-joined halfway, insert a strip of polyfill batting or thin foam to create a flat cushioned sandwich if desired. Continue sc rounds to enclose the back panel edge and finish off when front and back are joined fully. Fasten off and weave in ends.
Round 5 :
If you prefer a stitched box look like the photo: join the two panels together by placing them RS together and sc through both loops around the perimeter for a tidy seam. Leave a small opening, stuff the cavity with light polyfill, then finish sc and close. This creates the quilted, padded feel shown.
Info :
When stuffing between panels, distribute polyfill evenly and avoid overstuffing which can warp the squares; the panels should lay flat but with a gentle cushion. Pin panels tightly and keep seams even to avoid puckering.
— Outer Border & Final Scallop Edge :
Round 1 :
With cream, join at any outer corner, ch3 (counts as dc), 2 dc, ch2, 3 dc in corner. *Ch1, 3 dc in each side space (in previous sc rounds), ch1 between shell groups, in corner 3 dc, ch2, 3 dc; rep around. Join and fasten off. (create an even outer round)
Round 2 :
Change to burnt orange for accent scallops. Sl st to next space, ch1, sc in same st, sc along the side working two sc in each side ch1 space to create a defined band around the runner. Join. (narrow band)
Round 3 :
Change to cream, work scalloped shell edging: *Skip 1 st, 5 dc in next st, skip 1 st, sl st in next st; rep around to form large scallop shell. Finish with sl st and weave ends. (final scallop)
Info :
Work the border slowly and check for consistent stitch counts on long sides to avoid curling. Blocking the runner lightly after the final border helps the scallops lie flat and look finished.
— Pumpkin Placement & Sewing (Assembly) :
Round 1 :
Place pumpkins on the cream squares as per your layout: equally spaced in 9 cream squares. Pin each pumpkin lightly through the square (use T-pins) to assess spacing and aesthetic balance before committing to sew.
Round 2 :
Sewing pumpkins: Thread a yarn needle with the long tail from the pumpkin closure. From the underside of the cream square, push needle up into the center of the pumpkin base. Use short running stitches around the pumpkin base attaching to the square through the back loops of the last round of the cream square to keep the top neat. Sew through the mattress-stuffed pumpkin base and square a minimum of 12-16 stitches to secure firmly. Knot inside and weave in tail. Repeat for all pumpkins.
Round 3 :
Attach stem: sew the stem into the top center of pumpkin by running the tail down the inside of the stem into the top center and taking multiple small stitches to secure at an angle. Add leaves and tendrils by sewing them with tiny whip stitches to hide the tail under the stem base.
Info :
When sewing pumpkins to a padded runner, ensure the stitches also capture both top panel and the thin side wall beneath so the pumpkins feel secure and won't twist when the runner is moved. Go through both layers if needed for extra security.
— Final Finishing Touches :
Round 1 :
Weave in any remaining ends. Use a small amount of fabric glue under the stem base if you need extra hold (optional). Trim stray fibers and gently steam-block to set shape if using acrylic/wool blends but avoid high heat for cotton blends.
Round 2 :
Optional embellishments: add a tiny embroidered vine across a few cream squares, sew a wooden button into the center of a pumpkin for a rustic accent, or lightly dust cheeks of pumpkins with a pastel for a soft antique finish.
Info :
Spot-clean the runner with a damp cloth; avoid machine washing if stuffed or padded. If a washable version is desired, make a single panel and back it with fabric and removable batting for easier laundering.
— Extra Info Section (Troubleshooting & Tips) :
Info :
If your pumpkins are too floppy, switch to a 3.0mm hook and rework the body to get firmer stitches. For a squashier look, use a slightly larger hook or add more stuffing. Always make one pumpkin as a tester to dial in your hook and tension before making the full set.
Info :
If your panels pucker while joining, check that your squares are the same size after blocking. Adjust by adding a small round of sc along the edges of the smaller squares to even them up before final joining.
Info :
For a thinner runner, omit the second panel and side wall rounds; simply join squares edge-to-edge and add the final border. You can also add a non-slip fabric strip to the underside if used on smooth tables.
Putting the final stitches on this rustic runner felt like wrapping the season in yarn—warm, satisfying, and full of cozy texture. The plump pumpkins pop against the classic granny squares and the padded construction gives a quilted, heirloom quality. Display it proudly on a harvest table or give as a handmade autumn gift—either way, it tells a story made stitch by stitch. 🧶🍂