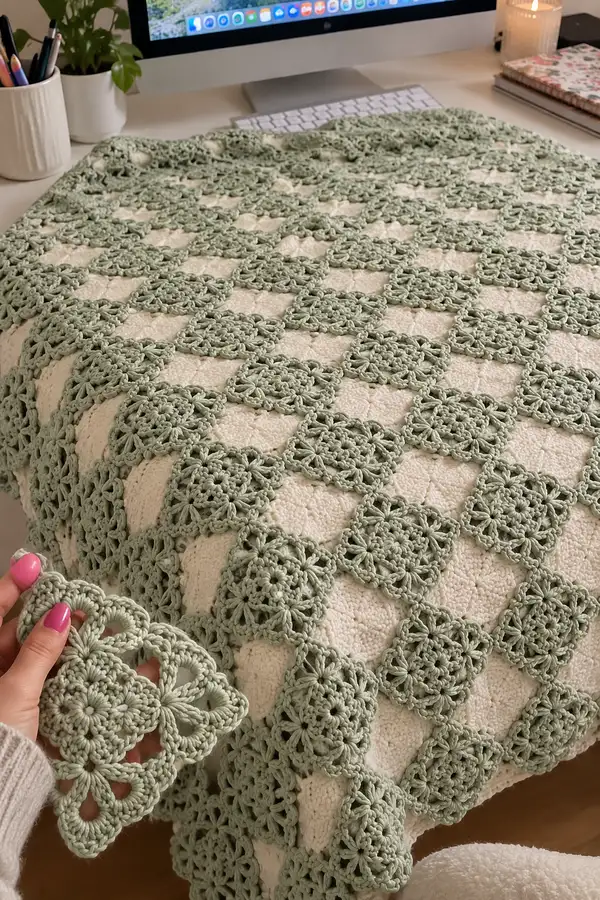
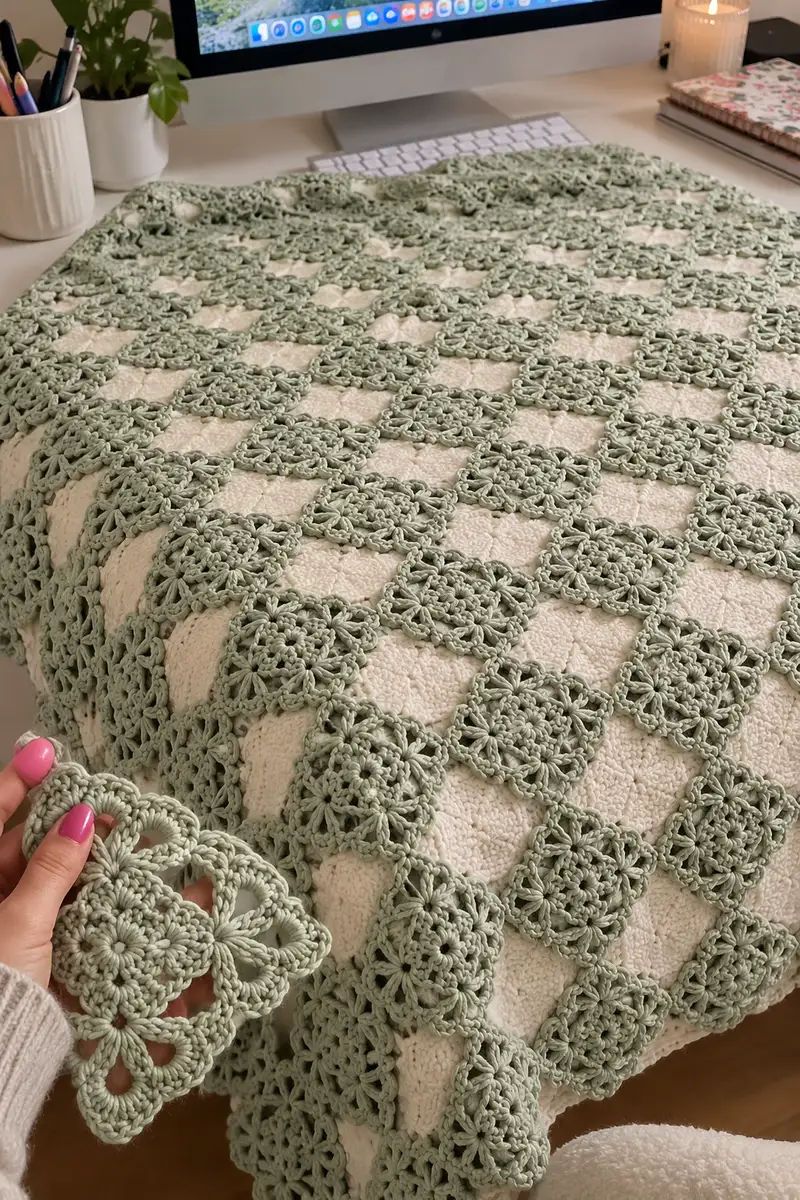
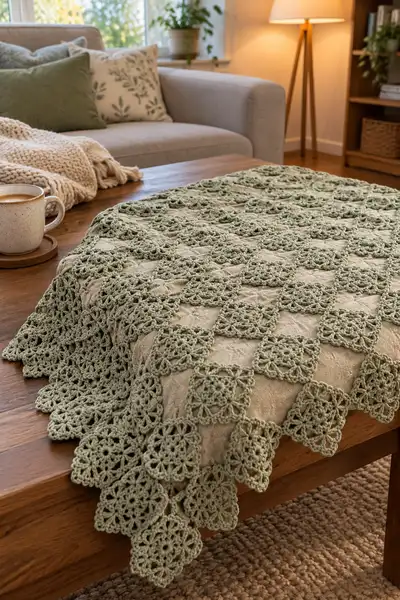
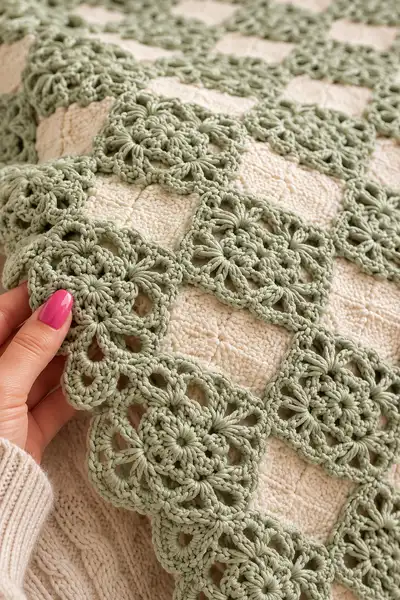
A beautifully airy bedspread made from delicate sage-green floral square motifs joined in a lattice layout. This pattern creates a lightweight, decorative coverlet with openwork squares and a scalloped leafy edge — perfect for layering over a duvet or sofa throw. The repeating floral-squares are worked in a soft sage worsted cotton for a modern cottage look. Detailed join-as-you-go instructions and a border finish make this a satisfying project for crocheters who love modular designs.
Progress Tracker
0% Complete
— Notes & Gauge :
Info :
Gauge is measured over one completed motif from centre to outer tip. With worsted cotton and a 4.0mm hook, one finished motif measures approximately 10.5 cm (4.1") square after blocking. Adjust hook size if your motif is larger or smaller. Make a 3x3 swatch to test gauge and make adjustments before starting the full project.
Info :
All motifs are worked in the round. Join-as-you-go (JAYG) instructions are included so you can attach motifs as you go to build rows and blocks. If you prefer, motifs can be made separately and sewn together using mattress stitch or whip stitch.
— Special Stitches :
Info :
Puff stitch (large puff used here): Yarn over, insert hook into indicated space, yarn over and pull up a loop (repeat 4 more times so you have 11 loops on hook), yarn over and pull through all loops, ch1 to close the puff. Counts as 1 puff. Adjust number of loops (4 or 5) based on desired puff height.
Info :
3-dc cluster: Yarn over, insert hook, draw up loop, yarn over and pull through two loops (two times) until only one loop remains on hook — or work 3 dc together and finish the cluster with a ch1 if preferred. For this pattern, we use a tall cluster that gives a petal effect.
— Motif (Make as many motifs as required for your project) :
Round 1 :
mr, ch1, 8 sc into magic ring. Pull tight and sl st to first sc. (8)
Round 2 :
Ch3 (counts as a dc), *ch2, dc in next sc; rep from * around to create 8 dc separated by ch2 sps. Sl st to top of ch3. (8 dc, 8 ch-2 sps)
Info :
This round sets up 8 petal spaces; count carefully. If you prefer more petals, increase the initial sc in round 1 to 12 and modify round 2 accordingly.
Round 3 :
Work in each ch-2 space: *(sc, ch3, puff (5 loops) closed with ch1, ch3, sc) in next ch-2 sp; rep from * around. Sl st to first sc. You will have 8 petal clusters. (Each petal section = sc + ch3 + puff + ch3 + sc)
Round 4 :
Ch1, sc in same st, *ch4, skip to the top of next puff, sc between petals (the small sc worked previously); rep from * around to create chain arches between petals. Sl st to first sc. (8 sc between petals, 8 ch-4 arches)
Info :
At this stage, the motif looks floral. Maintain consistent puff size for even petals. If puff stitches are too loose, tighten the loop pulls and close with an extra ch1 to secure.
Round 5 :
Into each ch-4 arch: *(sc, ch5, sc) in ch-4 arch; rep from * around to form taller loops for the next round of clusters. Sl st to first sc. (8 sc, 8 ch-5 sps)
Round 6 :
Working in each ch-5 sp: *(sc, 3-dc cluster, ch2, 3-dc cluster, sc) in ch-5 sp; rep from * around. Sl st to first sc. This creates a double-petal / leaf shape on each side. (8 big petals)
Info :
3-dc clusters here are worked as follows: yarn over, insert hook, draw up loop, yarn over and draw through two loops twice (finish cluster across 3 partial dcs) then ch1 between clusters. This gives a petal that stands up slightly.
Round 7 :
Ch1, sc in same st, *ch6, sc between the clusters (work sc into the ch2 between the two clusters from previous round); rep from * around to make elongated chain loops. Sl st to first sc. (8 ch-6 loops)
Round 8 :
In each ch-6 loop work: *(sc, puff (5 loops) closed with ch1, sc); rep around. Sl st to first sc. This adds a secondary row of puff leaves that help enlarge the motif to square shape. (8 puff units)
Info :
Keep puffs tall but controlled so the motif stays flat. Gently press puffs into position as you complete the round to ensure an even face.
Round 9 :
Ch1, sc in same st, *ch3, skip next sc, (5 dc cluster) into the top of the puff from previous round, ch3, sc in next sc; rep around to begin forming corner arches. Sl st to first sc. (8 corner arches)
Round 10 :
Working into each corner arch area: *(sc, ch4, sc) in the ch3 arches at each side of the cluster; rep four times around each corner so each side begins to look squared off. Sl st to first sc. You should now observe 8 small side arches which will become sides of the square.
Round 11 :
Ch1, sc in same st, *[ (2 sc, ch3, 2 sc) in corner ch-4 arch ] for the 4 corner corners around the motif; between corners work: (sc, ch5, sc) in each side arch; rep around to create a rounded-square outline. Sl st to first sc. (4 corner shells, side ch-5 sps)
Info :
If your motif is not square-like yet, gently block it into a square on a blocking mat. Square alignment will make joining much easier and neater.
Round 12 :
Ch1, sc in same st, *sc across side chain spaces (work 6 sc across each side evenly spaced), then in corner shell work (sc, ch3, sc); rep around. Sl st to first sc. Count across each side to ensure even stitch numbers. Aim for 24 sc total around after this round when distributed evenly. (Approx 24 sc)
Round 13 :
Work in BLO for cleaner join edge: 1 sc in each st BLO around to create a neat join ridge. Sl st to first sc. (24 sc)
Info :
This BLO round creates a subtle raised ridge that reads as the outer frame of each motif and makes join-as-you-go easier and more consistent. If you prefer a seamless look, skip BLO and join in the back loops on the join round instead.
Round 14 :
Fasten off leaving a long tail for weaving if making motifs separately. If using Join-As-You-Go, do not fasten; proceed directly to your join round instructions. Finish by weaving tail through wrong side and trimming. (Motif complete)
Info :
Each motif should measure approximately 10-11 cm square when blocked. Keep motif counts in a notebook: number of motifs across and down will determine final blanket size. For reference, a queen-size bedspread in the photos was assembled from approximately 14 x 16 motifs depending on motif size and overlap.
— Join-as-You-Go Main Joining Method (JAYG) :
Info :
We recommend joining motifs in rows, working left to right, then joining rows to each other. Join using a slip-stitch or single crochet join into the BLO ridge created in Round 13 of each motif. For a flat join, use sl st; for a decorative raised join use sc.
Round 1 (Join Step) :
Work the motif as per Rounds 1-13 and keep last round live. When at a position where the motif touches an already-made motif edge, connect as follows: sc in next st on current motif, ch1, insert hook into BLO of corresponding st on adjacent finished motif and sl st to join, ch1, sc in next st of current motif — continue to join every other stitch across the side.
Info :
When joining to two adjacent motifs (corner intersections), join to both by placing a sl st into corresponding BLO of both neighbouring motifs at the corner point, then continue around. This creates a stable corner link.
Round 2 (JAYG detail) :
For side joins: work 'sc, ch1, sl st into neighbour, ch1' pattern into every second stitch across the side. Each side has approximately 6-7 potential join points depending on your motif size. Maintain count so joins remain even.
Round 3 (Corner joins) :
At corners where up to four motifs meet, anchor the corner by inserting the hook through the corner ch-3 space of the neighbour, pull up a loop, then through the corner space of the next neighbour and sl st to secure so that the corner is a 4-way point. Make sure the corner ch-3 remains visibly rounded and not puckered.
Info :
If you find sl st joins too loose, use sc joins (1 sc into BLO of neighbour) for a firmer seam. For an invisible join, use a mattress stitch after blocking and whip stitch on the wrong sides.
Round 4 (Join repeat guidance) :
Repeat the JAYG for each motif across the row: start the first motif of a row separate, then join subsequent motifs to the first and to the motif above as you place them. When joining the first motif of a row to motifs above, join along the underside of the last row's BLO ridge so the front remains neat.
Round 5 (Row building) :
To build a full row, make motif 1 and place it on your worktable. Make motif 2 and join its left side to motif 1 as you complete Round 13-14. Continue until the row contains the desired number of motifs for width. Count motifs carefully. Work the next row and join every motif to its neighbour in the same fashion, and to the motifs above at each corresponding join point.
Info :
When joining successive rows, be mindful of placement so that motifs align in a diamond/offset layout as in the photos: the motifs are placed on point creating a lattice effect, so plan your grid to alternate motif orientation every other row if you prefer the diagonal checker effect.
Round 6 (Joining repeat for 1)
Join pattern example: For a side with 24 sc around, join every 3rd sc for 8 even joins: (sc in current, ch1, sl st into neighbour BLO) x 8. This ensures there are not too many join points that distort the motif. Adjust per motif circumference if you have more or fewer stitches around.
Round 7 (Joining repeat for 2)
If using sc join: (sc in current st, sc into neighbour BLO) repeated evenly around the side for a sturdier seam. For corner intersections, work (sc, ch2, sc) into the corner space to preserve corner geometry.
Round 8 (Info) :
Work one row fully across before moving to the next. If you need to carry yarn, carry the unused colour along the back and catch it with sl st every 6-8 stitches to hide it and prevent tangles. Weave in carried tails later under BLO ridge.
Round 9 (Progressive join notes) :
When joining motifs to two or three neighbours at the same time (such as mid-blanket), always anchor the motif at two opposite corners first, then proceed to join remaining sides — this prevents twisting and helps maintain flatness.
Round 10 (Edge planning)
If you plan to add a wide scalloped outer border, leave approximately 1 motif extra on each edge to act as a border buffer, or plan an edging addition that flares slightly beyond motif edges to create a soft drape.
Info :
For the diamond-off-set layout in the photos, align motifs on point and join so that the openwork spaces create a soft lattice over a solid background (if using a blanket or mattress beneath the bedspread). If making a standalone bedspread, consider adding a lightweight backing or lining for warmth and opacity.
— Progressive Join Sequence (Detailed step-by-step for a 14 x 16 layout) :
Round 1 :
Make 14 motifs for Row A. Join them left to right using JAYG method: for each join, use 'sc in motif, ch1, sl st into neighbor's BLO, ch1' repeated evenly across the matching side. Test join spacing on first two motifs and adjust pattern to maintain even tension across the row.
Round 2 :
Make Row B motifs. As you complete each motif of Row B, join each to the motif left (if not first) and to the corresponding motif above in Row A. For diagonal/tile offset, align motif centers so that Row B motifs sit between Row A motifs creating a checkerboard diamond pattern, then join at appropriate side points and corner spaces.
Round 3 :
Repeat this process across all rows. When you reach the last motif in a row and it requires joining to two motifs above (corner and side), first secure the corner with a sl st into the corner ch-3 space of both neighbours; then continue the side join along the side BLO ridge.
Round 4 :
At midway stages, periodically lay the joined area flat and check drape and flatness. If edges ripple or pucker, unpick 1-2 joins and rejoin with slightly different tension, or block the contained section and retighten joins.
Round 5 :
For very large spreads, join in modular panels — make panels of 4x4 or 6x6 motifs, block and straighten panels, then seam panels together using a mattress stitch on the backs for a neat finish. This reduces handling bulk.
Info :
Seaming panels after blocking often yields the neatest overall edges and allows easier handling. If you prefer a continuous JAYG assembly, be prepared to manage many stitches in hand as your blanket grows.
Round 6 :
Count motif joins often — for a 14 x 16 layout you will have 224 motifs and approximately 560 join actions at side points and corners combined. Keep an assembly tally to track progress and avoid mis-placing motifs or orientation errors.
Round 7 :
If any motifs edge-slope out at joins, block the motif in place and add a small invisible tack stitch at the BACK to relieve tension and keep the front neat. Avoid visible front-side tack stitches.
Round 8 :
When you complete the main field of motifs, check perimeter alignment before adding the outer edging. If edges look uneven, add or remove a half-motif border or adjust motif spacing to make a balanced border width.
Round 9 :
Work slowly around corners — keep counts consistent so corner spacing does not pull. Corners often require an extra ch or slight spacing to keep flat; test and adjust while joining last row of motifs.
Round 10 :
After completing the motif assembly, weave in ends from joins into the BLO ridges and wrong side of the blanket. Use a yarn needle and weave each long tail through 6-8 stitches before trimming to secure.
Info :
We recommend leaving enough tail length to secure joins with a mattress stitch if you decide to replace a join later — 20-25 cm helps with re-seaming without adding new yarn joins later.
— Outer Scalloped Leaf Border (worked after field is fully assembled and blocked) :
Info :
The border shown in the photos is a soft scalloped leaf edging that follows the diamond-grid outline and creates a leafy scallop all around. The following rounds create a 6-8cm wide scallop using puff stitches and chain arches.
Round 1 :
Join sage yarn to any outer BLO ridge at a mid-side point with a sl st. Ch1 and working into each BLO around the entire perimeter, work 1 sc in each BLO to create a neat walkway for the border. Keep counts even; the number of sc will be equal to the number of BLO stitches you created around the blanket (approx 24 x number of motifs along edge). Sl st to join. (One even sc round around perimeter)
Round 2 :
Ch3 (counts as dc), *skip one st, (5 dc cluster) in next st, ch3, sc in next st; rep around. This creates alternating clusters and small spacers around the perimeter. Sl st to top of ch3. (Alternating clusters and sc)
Info :
Place clusters centered on motif corners and side midpoints to echo the motif shapes. If a cluster falls between two motif joins, center it visually over the join for symmetry.
Round 3 :
Ch1, sc in same st, *ch6, sc into the top of the next cluster; rep around to create tall arches for the scallops. Sl st to first sc. (Arches formed)
Round 4 :
In each ch-6 arch work: *(sc, puff (5 loops), sc) in arch; rep around. Sl st to first sc. This will form big leaf-shaped scallops all around. (Scallop units)
Info :
Make sure to shape each puff so that scallops sit flat and don't twist; pin while wet-blocking if necessary to shape evenly.
Round 5 :
Ch1, sc in same st, *ch3, (3 dc cluster, ch3, 3 dc cluster) in center of scallop, ch3, sc in next st; rep around. Sl st to first sc. This adds decorative ribs inside each scallop to emphasize leaf veins.
Round 6 :
Work 1 sc in each st around the scallop outer edge to tidy raw edges, then sl st to join. Fasten off and weave in ends securely. If desired, add a final picot round for texture: *ch3, sl st in top of last sc to create small points along outer edge.
Info :
For a deeper, heavier drape, repeat rounds 3-5 to create a double scallop (two rows of scallops). This will add weight and create a fuller border similar to deep drapery in the photos.
Round 7 :
Optional finishing round: With a 3.5mm hook and same color, work a final round of 1 sc in each st around the very outer edge to even out stitch count and hide joins. Sl st and fasten off. Weave in ends on the wrong side of the border so they are not visible.
— Alternative Join Option: Seamless Slip-Join Ladder (if not using JAYG) :
Round 1 :
Make all motifs separately and block to size. Prepare to seam using a slip-stitch ladder join: With right sides facing up, hold two motifs with edges touching, insert hook through front loop only on each motif's BLO ridge, yarn over and sl st through both loops; repeat evenly along side. This creates a narrow sl st seam visible as a lace line on the front.
Round 2 :
For a sturdier seam, use mattress stitch on the wrong sides: whip stitch across corresponding BLO ridges, pulling gently to draw motifs together invisibly. Match petals and loops as you work to keep joins inconspicuous.
Info :
Seaming motifs after blocking gives a very neat finish but is slower. It is a good option when producing a heirloom piece that will be handled often or laundered frequently.
— Blocking & Finishing :
Round 1 :
Block the assembled blanket by pinning it to a flat blocking surface and spritzing with water or using a steam iron at low setting (do not touch directly if cotton yarn will scorch). Shape each motif gently into a square and pin scallops to even spacing. Allow to dry fully before removing pins.
Round 2 :
Weave in all ends: For a clean finish, weave tails into the BLO ridges or wrong side of motifs, then trim flush. For extra security, run a small dab of fabric glue on hidden tails and press into place, but allow to dry thoroughly and do not overuse glue which can stiffen the blanket.
Round 3 :
Care instructions: Hand wash gently or machine wash on delicate in a mesh bag with cool water. Reshape and dry flat. Avoid tumble drying to preserve puffed stitches and scallops.
Info :
Consider adding a lightweight muslin or cotton backing, sewn or tied at joins in the wrong side, to make the bedspread more opaque and warmer while preserving the openwork surface texture.
— Size Planning & Motif Counts (Reference examples) :
Round 1 :
Lapghan (approx 50x60cm): 4 x 6 motifs = 24 motifs. Throw (approx 50x60" depending on motif size): 6 x 8 motifs = 48 motifs. Twin/Single coverlet: 10 x 12 motifs = 120 motifs. Queen bedspread (as shown): 14 x 16 motifs = 224 motifs (approx). Adjust counts by measuring your motif after blocking and calculating desired bedspread dimensions accordingly.
Round 2 :
Edge allowances: remember that joining reduces the visible width of motifs slightly. Measure a small sample joined block (3x3 motifs) to determine the horizontal and vertical motif space once joined, then multiply to calculate final motif count.
Info :
Make a small joined sample (3x3) and lay it over your bed or target surface to ensure you like the drape, openness, and scale before committing to a very large number of motifs. This saves time and yarn if you wish to adapt motif size or border width.
— Optional Decorative Variations :
Round 1 :
Add a contrasting colour in Round 8 or 11 of each motif to make the petals pop. Example: use ecru in Round 8 and sage elsewhere for a two-toned motif. When changing colour, carry the yarn on the wrong side and catch every 6-8 stitches.
Round 2 :
Use an alternate block pattern for a denser texture by replacing puff rounds with 3-dc clusters throughout and adding extra sc rounds to square off each motif for a more solid look.
Round 3 :
To create a central medallion or focal band, change the border colour for the outer 3 rounds of the blanket to a slightly darker sage or neutral tone for contrast, then continue with the scalloped edge in the main colour.
Info :
Customizing colour or size is the most effective way to make this bedspread match your decor. Keep motif repeats to even numbers when planning symmetrical panels for bed sizes to ensure a centered look.
— Troubleshooting & Tips :
Round 1 :
If motifs cup (edges curl upward), block firmly and use a slightly smaller hook for the outermost rounds to tighten the edge. This will flatten motifs without changing the internal structure.
Round 2 :
If the blanket grows unevenly in width, count joins per row and compare to desired motif count; unpick and rejoin a problem row rather than trying to compensate later which often creates larger misalignment.
Round 3 :
Keep a small pile of finished motifs separated by rows on a table so you can lay out pattern repeats and check orientation — motifs will look slightly different rotated by 90 degrees, and the diamond pattern depends on consistent motif orientation.
Round 4 :
When working the puff stitches, always close each puff with a ch1 to prevent the next puff from pulling into it and changing the rhythm of the motif. Count puff groups often; mismatched puff counts distort the motif symmetry.
Info :
Patience and consistent tension are key. This bedspread is modular and repetitive by nature — it becomes meditative once you establish a rhythm. Enjoy the process and block frequently for best results.
This sage leaf bedspread pattern brings calm, texture, and handcrafted charm to any bedroom or living space. Work motif by motif and watch the airy floral squares grow into a beautiful, cozy layer. The join-as-you-go method keeps assembly neat and satisfying, while the scalloped leaf edge adds a delicate finishing touch. 🧶 Make it in your favourite shade and enjoy the slow, relaxing rhythm of creating something that will be used and loved for years. 🌿✨