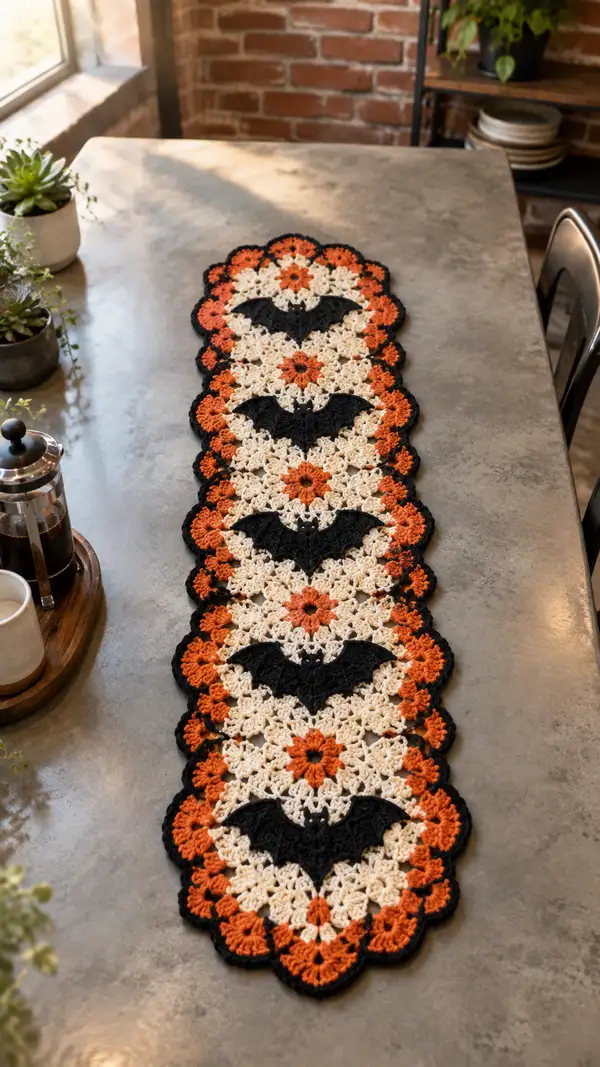
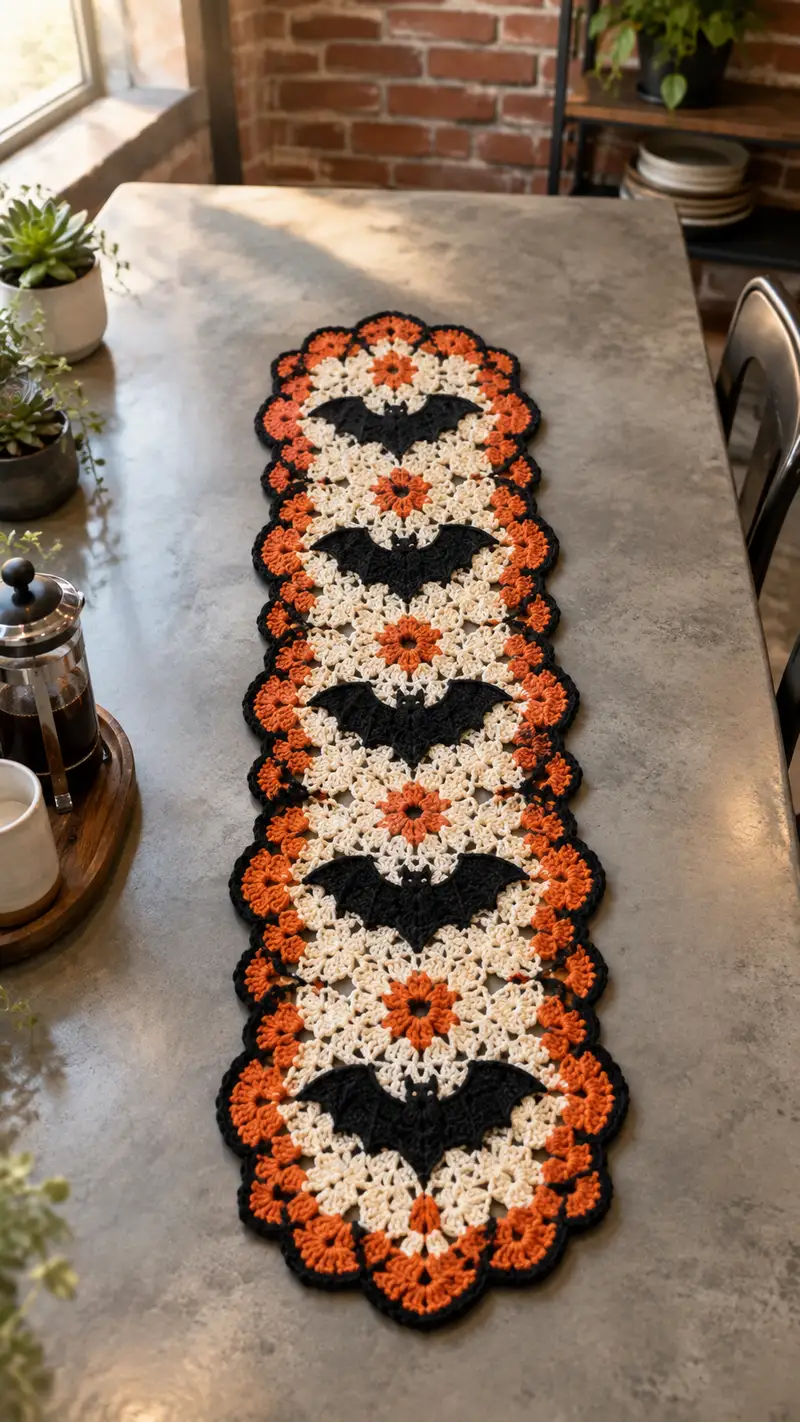
A festive Halloween table runner featuring connected floral medallions in warm orange and cream, highlighted by striking black bat appliques and a scalloped black border. This polished, homey runner is worked from individual motifs joined in a long strip and edged for a professional finish. Perfect for seasonal décor, it sits beautifully down the center of a dining table or on a console for instant spooky charm.
Progress Tracker
0% Complete
— Overview :
Info :
This runner is built from repeated floral medallion motifs (worked round), flat bat appliques (worked flat and finished in rounds), motif connectors, and a continuous scalloped border in black. One motif block measures approximately 5.5-6 inches across after blocking when worked with worsted weight yarn and a 4.0mm hook. The sample runner in the photo uses eight medallions connected in a row with bats between every second medallion; you can add or remove medalions to fit your table length. Work motifs first, make all bats, block motifs flat, then join and add border.
Gauge / Sizing :
One finished medallion after blocking: about 5.5-6" diameter. Bat applique width: about 5" across wingspan. Adjust gauge by using a slightly smaller/larger hook. Gauge is not critical but keep consistent tension across motifs to avoid mismatched joins.
— Floral Medallion Motif (Make X - adjust for desired length) :
Round 1 :
6 sc in magic ring (6)
Round 3 :
(1 sc, inc) x 6 (18)
Round 4 :
(2 sc, inc) x 6 (24)
Round 5 :
(3 sc, inc) x 6 (30)
Round 6 :
(4 sc, inc) x 6 (36)
Info :
Change to pumpkin orange yarn for a bright petal round. If you prefer reversible color placement, carry cream across the FLO to avoid many ends, but for crisp color blocks break yarn and weave in tails.
Round 7 :
In orange: (5 sc, inc) x 6 (42)
Round 8 :
In orange: (6 sc, inc) x 6 (48)
Round 9 :
Change to cream. Ch3 (counts as dc), *sk 1 st, (3 dc in next st) forming small puff petal, ch1, sc in next st; rep from * around, sl st to top of ch3 (48 clusters; working sequence creates 16 petal groups visually)
Info :
Round 9 uses cluster groups that visually form petals. Keep tension consistent so motifs remain flat. If your clusters pull in too tightly, work clusters into a chain-1 space instead of a single stitch to spread the fabric.
Round 10 :
Ch1, sc in same sp, *ch5, sc in top of next petal cluster (ch1 sp between clusters), rep around (creates looped spaces for next decorative round). Join with sl st (48 sc equivalents in layout)
Round 11 :
Change to cream for a lacy shell body: Into each ch5 loop work (sc, hdc, 3 dc, hdc, sc). This forms scalloped petals around (6 large scallops per motif). Count: 6 shell groups around; stitch count measured as shell groups, overall appearance consistent (visual repeat of 6 shells).
Info :
After Round 11 the medallion should lie mostly flat and show six large petals. Block now if needed to emphasize shape before continuing to outer rounds.
Round 12 :
In cream: sl st to center of first shell, ch3, (2 dc, ch2, 3 dc) in same shell center to form picot arch over each shell, *sl st to next shell center, (3 dc, ch2, 3 dc) in that shell; rep around (creates 6 arches). Join to top of ch3. (Visual: 6 arches)
Info :
Switch back to pumpkin orange for an outer contrast round that defines the sitter of the bat when overlaid. Carry cream if you intend to avoid many ends; otherwise break cream and join orange at any shell apex to create strong orange outline.
Round 14 :
In orange: Into each arch from Round 12 work (sc, ch3, sc) to form small picot loops across the arches, total 6 small picot loops. This adds a bright ring around the motif (visual count: 6 picots).
Round 15 :
Change to black. Sl st to a point between two orange picots. Ch1, 1 sc in same sp, *ch7, sk arch, 1 sc between next two orange picots; rep around to create long loop spaces for joining and to add a dark outline (approx 6 long loops). Join with sl st.
Info :
Round 15 sets the black frame used by the border later. Count long loops and ensure spacing is even so the scalloped black border will sit evenly later. If a tighter runner is desired, work ch5 loops instead of ch7.
Round 16 :
In black: In each ch7 loop work (sc, hdc, 5 dc, hdc, sc) to create bold scallops that form the outer rim. There will be 6 large scallops; sizes will approximate the motif radius. (visual scallops: 6)
Round 17 :
Ch1, sc evenly around scallops working 2 sc in apex sts where needed to keep edge flat; count and adjust so you have a consistent number of sc per scallop. Target overall circumference equivalent to previous rounds (visual consistency rather than strict numeric change).
Info :
Fasten off leaving a 6-8" tail for joining. If you plan to join motifs using slip-stitch join, leave shorter tails and join motifs while working last round instead of sewing later. Block each motif gently pinned to a round template to maintain scallop shape before final joining.
— Bat Applique (Make one between each second medallion) :
Overview :
Bat appliques are worked flat in black yarn. The bat motif is assembled in rounds that read in the round but produce a flat silhouette. When completed, bats are sewn to the medallions centrally; two small beads or tiny cream embroidery dots form the eyes.
Round 1 :
With black, ch12, starting in 2nd ch from hook: sc 10 across (10) - this forms the base foundation for the body center (worked as a small base row but treated as a 'round' for consistency of numbering).
Round 2 :
Ch1, turn. Sc in each st across (10). Then around the last sc work 3 sc into the same st and continue working along the opposite side of chain: sc 10 back, sl st to first sc, making a small oval (26) - counts include the 3 extra sc in the turn.
Round 3 :
Ch2 (counts as hdc), hdc in next 2 sts, *(2 hdc, ch2, 2 hdc) in next st to form a small wing notch, 3 hdc along next three sts; rep star sequence to form both wing lobes. End with hdc to close to body. Total hdc groups approx 20-22 depending on shaping. This round builds wing foundation.
Info :
Bat shaping is visual—work increases on wing tips and decrease slightly at wing sockets to achieve a silhouette. Place stitch markers at wing tips to mirror left and right sides for symmetrical shaping.
Round 4 :
Work alternating clusters to define three scalloped wing points on each side: *In next small wing valley work (sc, ch3, sc) as a point; skip 1, 3 sc along body edge; rep across both wings. Join and fasten off leaving long tail for sewing (approx 8-10" required).
Info :
Sew two small pale cream French knots or seed stitches for the eyes at the central body row. If using beads, sew them securely and knot ends into the body fabric. Use a small amount of glue for extra hold if desired.
Round 6 :
To firm the bat silhouette, work one last finishing round around the entire applique: join yarn at any point and sc evenly around maintaining smooth curves. Work 2 sc in each pronounced corner to avoid puckering. Fasten off and leave long tail for sewing. Final bat width should measure about 5" wingspan when blocked flat.
Info :
Blocking the bat flat on a small template will help keep wing points crisp and make alignment consistent across appliques. If you plan to add small wire in the bat for tiny wing shaping, stitch wire channels under the sc round and insert very thin craft wire, folding ends and securing into the body with yarn hidden loops.
— Joining Motifs (Connector Rounds and Layout) :
Info :
Decide on runner length and lay out motifs in desired order (sample used 8 medallions with bats between every second medallion). For a runner composed of N motifs, plan N-1 joins between motifs. Use blocked motifs for more even joins. Two common joining options: join-as-you-go (JAYG) during the last round or sew motifs together with a whip stitch using tails. The instructions below describe a join-as-you-go using ch loops from Round 15 of motifs.
Round 1 :
Place two motifs face up. With right sides facing up, pick one motif to be the joining pivot. Join black yarn at a ch7 loop on motif A's last round, ch1, sc in loop, ch7 loop from motif A corresponds to loop on motif B—sl st through paired loop on motif B to join; continue working (sc in loop on A, sl st in corresponding loop on B) across three adjacent loops to create a strong seam between the two motifs. Work this seam in one continuous pass across the matched loops. Repeat for remaining seams between motif pairs. This creates a seam that remains flexible yet secure.
Info :
When joining successive medallions, align scallop apices so the black scalloped rounds sit uniformly down the runner. Use pins to anchor motifs and check overall straightness before finalizing any joins. If you notice gaps, consider using a slip-stitch join instead of single crochet to reduce bulk.
Round 3 :
For corners where the scallops meet at a slight offset, overlap one motif's outer scallop by working an additional sc into the motif receiving loop, then sl st to the joining motif, pulling threads gently to close small gaps. Fasten off and weave ends through the join to secure.
Info :
After every second motif pair attach a bat applique centered over the seam between the two motifs. Pin the bat and check symmetry across the entire runner; position bats approximately centered on the medallion row by measuring from ends of motifs and marking center with a pin. Sew the bat using the long tail left from Round 6, using small neat whip or ladder stitches around the perimeter and two small stitches through the central body for a secure hold.
— Seam Reinforcement and Row Consistency :
Info :
Once all motifs are joined and bats attached, examine both faces of the runner for any visible holes or loose joins. Reinforce joins by working a thin slip-stitch seam along the join on the runner face in black to harmonize with the border color. This helps prevent sagging during use and gives a clean, continuous outline.
Round 1 :
With black yarn and a 4.0mm hook, work a round of slip stitches around the entire assembled runner edge, working 2 sl st in tight concave spots to maintain flatness and 1 sl st per sc along flatter sections. This prepares the edge for the scalloped final border and tidies joining points.
Info :
Keep the runner flat as you work the edging pass; use blocking pins beneath outer scallops if any sections want to curl. Use gentle tension to avoid pulling the runner in at joins.
— Scalloped Final Border (Continuous Edge, worked after joining) :
Round 1 :
With black yarn, join at any outer sl st from the previous pass. Ch1, sc in same st, *skip 2 sts, (sc, hdc, 5 dc, hdc, sc) in next st (this works over the previously formed outer loop creating a defined scallop), skip 2 sts, sl st in next st; rep around to create a continuous scalloped rim. Where scallops meet seams, add an extra sc in the seam space to keep the edge flat and scallops even. Join with sl st and do not fasten off (this is Round 1 of the border).
Round 2 :
Ch1, sc in same st, *ch3, sl st in space 3 sts over to shorten bridge between scallops, sc in center top of scallop; rep around. This creates a decorative bridge that tightens the scallops and gives the finished look shown in the photo. Join with sl st.
Info :
Optional second border layer: For a chunkier scallop, repeat Round 1 with slightly larger shell (sc, hdc, 7 dc, hdc, sc) worked into the center of the previous scallops to give deeper curves. This will add definition but uses extra yarn and will slightly enlarge runner width.
Round 4 :
To finish, fasten off and weave all ends to the back of the runner using a tapestry needle. Trim tails neatly once secured. Block the entire runner: pin each scallop to a flat surface to maintain scallop symmetry, spray lightly with water and allow to dry fully before using to set shape.
— Optional Decorative Enhancements :
Info :
1) Add small surface crochet flowers or mini pompoms at the centers of alternating medallions for extra texture. 2) Use a contrasting thread to blanket stitch around bat bodies for a subtle outline. 3) Add a tiny loop to one end to hang the runner for display when not in use.
— Care and Finishing :
Info :
Hand wash gently in cool water with mild soap. Reshape and block while damp; avoid hot water and tumble drying to preserve shape. Store flat or rolled to avoid scallop crushing. Reblock as needed between seasons.
Final Notes :
The above motif and bat instructions are intentionally modular: you can scale the runner by adding or subtracting medallions. For a shorter table runner use 5 medallions, for a longer one use more; the joining and border instructions apply unchanged. If you want a more solid surface, work an extra inner rounds in cream to fill the lacy void in the center of each medallion before proceeding to the colored rounds.
This Spooky Bat Floral Table Runner combines vintage medallion crochet with playful Halloween motifs for a standout seasonal centerpiece. Each medallion and bat applique comes together to create a long, scalloped runner that’s both elegant and whimsical. The pattern is modular and satisfying to make—perfect for gifting or to elevate your own holiday table. 🧶🎃🦇