🧶 Beautiful ✨ Detailed 💝 Adorable

Sunburst Floral Table Runner Pattern

Sunburst Floral Table Runner Pattern
4.0★ Rating
10-12 Hours Time Needed
3.6K Made This
✂️

Intermediate Level

Ideal for those with basic crochet experience, featuring slightly more advanced stitches and techniques to expand your skills.

⏱️

Slow & Steady

A 10+ hour project—great for savoring the process over several sessions.

🏡

Cozy Accent

A warm touch for your space that transforms ordinary corners into inviting nooks filled with handmade charm.

🧶 Jump to Pattern ↓

About This Sunburst Floral Table Runner Pattern

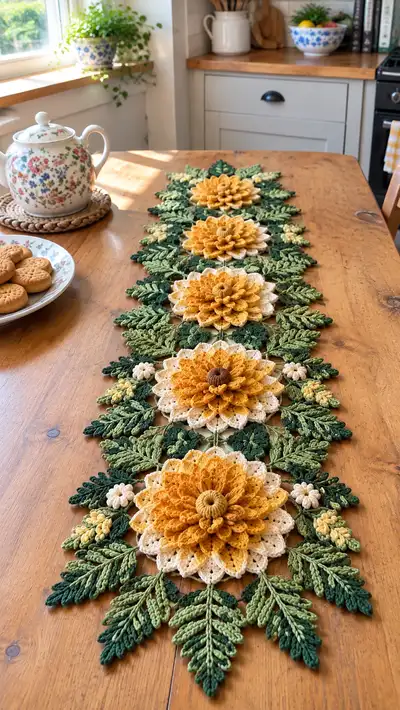
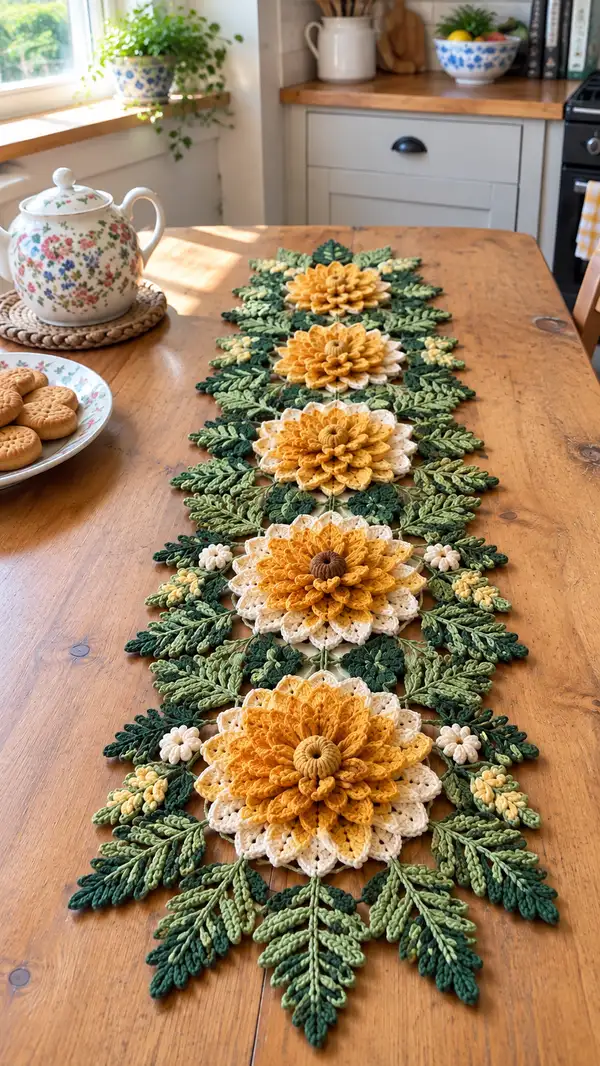
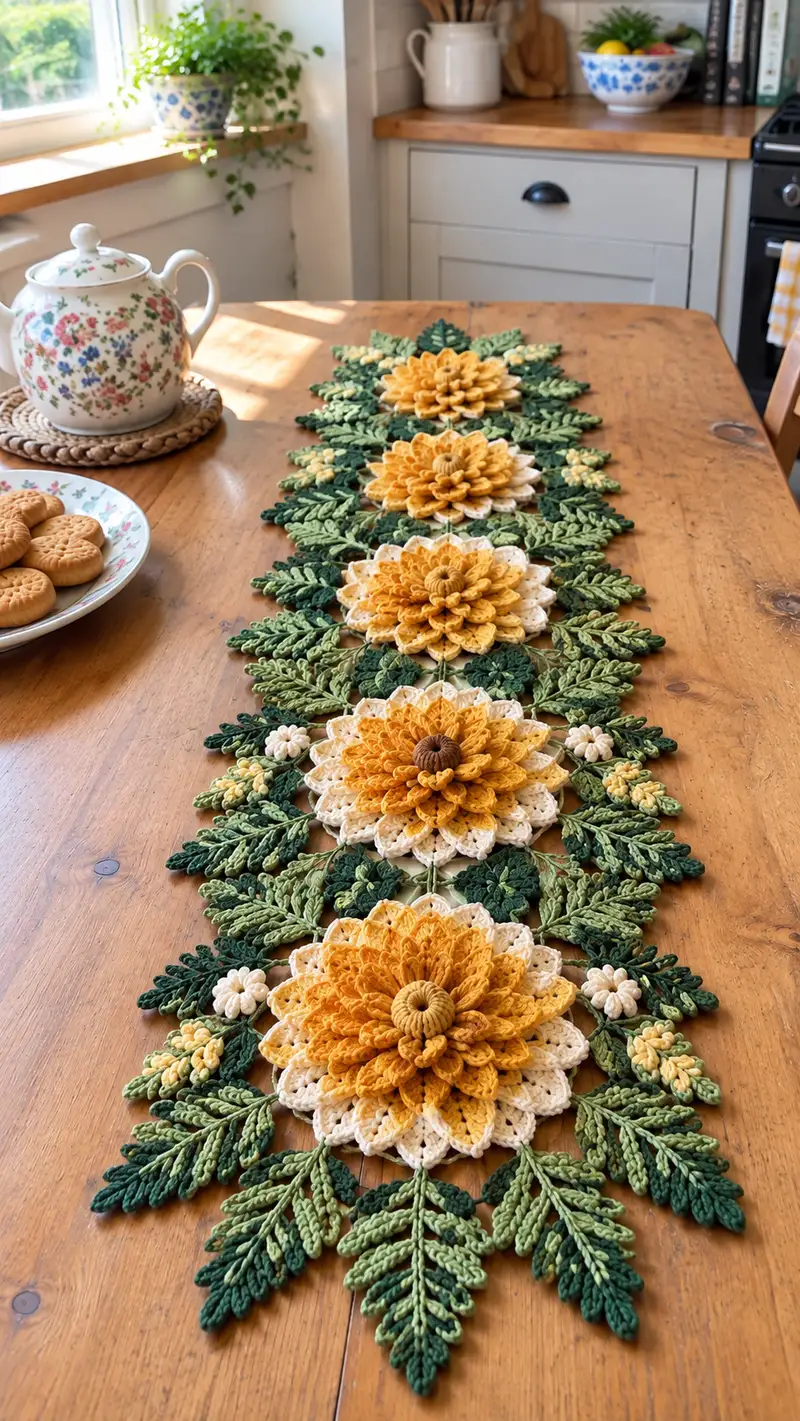
This pattern creates an elegant, long table runner made of repeating sunburst floral motifs and layered foliage. Each large flower is constructed with three layered petal rounds (cream base, pale yellow middle, deep mustard top) and a ribbed, coiled central bud. Surrounding each bloom are several sizes of textured leaves and tiny filler flowers to produce a natural, garden-like cascade. The runner is worked motif-by-motif and joined as you go for a flat, stable finish.

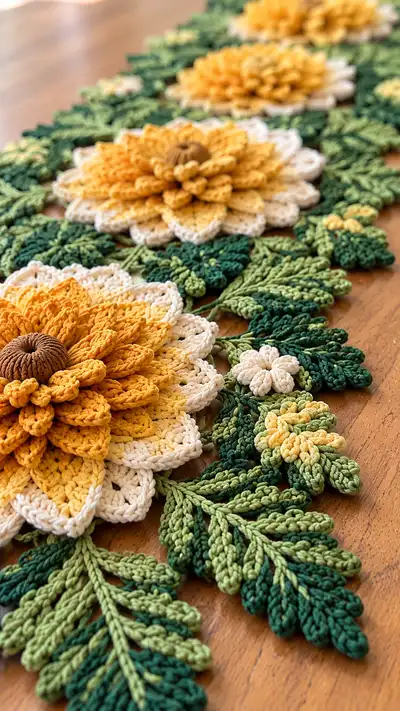
Sunburst Floral Table Runner Pattern crochet pattern - detailed view of completed project

The design emphasizes 3D layered petals and sculpted leaves made with front/back loop techniques and raised stitches. The pattern is written for cotton-worsted yarn and includes color-change tips, blocking suggestions and assembly notes to achieve the crisp shapes shown.

Why You'll Love This Sunburst Floral Table Runner Pattern

I love this pattern because the layered petals create a dramatic 3D effect that looks impossibly intricate but is very satisfying to make. The palette of mustard, cream and multiple greens gives a warm, natural feel that brightens a wooden table. I also appreciate the join-as-you-go options — you can decide where each leaf sits and customize spacing to fit your table perfectly.

Sunburst Floral Table Runner Pattern step 1 - construction progress Sunburst Floral Table Runner Pattern step 2 - assembly progress Sunburst Floral Table Runner Pattern step 3 - details and accessories Sunburst Floral Table Runner Pattern step 4 - final assembly and finishing

Switch Things Up

I absolutely love how customizable this runner is — you can change the focal flower colors, make each flower unique, or use the same motif in a circular placemat instead of a long runner. Try swapping the mustard top petals for coral pinks for a summery feel.

I also recommend experimenting with different leaf sizes and quantities: fewer large leaves gives a bold, graphic look while many small leaves create a delicate trailing vine effect. You can change spacing between motifs to scale the runner to any table length.

If you want a more compact decoration, make a single motif as a trivet or centerpiece mat. If you want to stretch the design, add more vine chain and intersperse small filler motifs to bridge extra gaps — I often make a sample layout with pins before committing to sewing.

Common Mistakes & How to Fix Them

✗ Skipping stitch markers when working rounds on the base circle leads to miscounts and uneven petal spacing; mark the first stitch each round. ✗ Changing colors without finishing the final loop of a stitch can leave a weak join; always complete the last yarn over with the new color. ✗ Working petals too loosely results in floppy, undefined petals; use slightly tighter tension for petal rounds to help them stand up. ✗ Not blocking leaves and petals will make it hard to achieve the flat, even look; steam-block or wet-block pieces gently before assembly. ✗ Joining motifs without pinning first often causes twisted or lopsided joins; pin motifs in place before sewing or slip-stitch joining. ✗ Using yarn with a very different gauge than recommended without adjusting hook will change petal size and number; swatch and adjust hook size to match proportions.

Sunburst Floral Table Runner Pattern

A gorgeous long table runner featuring layered, 3D sunburst flowers and trailing fern-like leaves in warm yellow, cream and deep greens. Each large floral motif has stacked petals, a textured center, and is surrounded by clusters of leaves and tiny buds. The pattern uses medium-weight cotton yarn to give crisp stitch definition and sculptural petals that hold shape beautifully. Perfect for a rustic or farmhouse table, this runner makes a stunning seasonal centerpiece or gift.

Intermediate 10-12 Hours

Materials Needed for Sunburst Floral Table Runner Pattern

— Main Fabric

  • 01
    Worsted weight cotton yarn (#4) approximately: 220-260g in mustard yellow (main flower petals)
  • 02
    140-180g in cream/off-white (outer petal layer and small flowers)
  • 03
    120-150g in dark brown or cinnamon (flower center bud)
  • 04
    150-200g in dark green (deep foliage)
  • 05
    100-150g in medium green (mid foliage)
  • 06
    80-120g in light green (accent leaves and stems)
  • 07
    Small amounts (10-20g) in pale yellow for tiny buds and details

— Tools Required

  • 01
    3.5mm (E) crochet hook for main work (adjust if your tension differs)
  • 02
    3.0mm (D) hook for tighter petal rounds and leaves (optional)
  • 03
    Yarn needle for sewing and weaving ends
  • 04
    Scissors
  • 05
    Blocking mat and pins
  • 06
    Stitch markers (at least 6)
  • 07
    Measuring tape or ruler
  • 08
    Optional: fabric glue or clear-drying craft glue for securing very small petals
  • 09
    Optional: light fusible interfacing for very flat table areas (not necessary in most cases)

Progress Tracker

0% Complete

— Supplies & Gauge :

Info :

Gauge is not critical for this decorative runner but for petals to stack proportionally work a 10cm/4" swatch of dc rounds: ~16 sts x 10 rows with 3.5mm hook in worsted cotton. Use slightly smaller hook for petal rounds if you prefer crisper petals.

— Flower Motif (make 5-7 depending on runner length) :

Round 1 :

6 sc in magic ring (6)

Round 2 :

6 inc (12)

Round 3 :

(1 sc, 1 inc) x 6 (18)

Round 4 :

(2 sc, 1 inc) x 6 (24)

Round 5 :

(3 sc, 1 inc) x 6 (30)

Round 6 :

(4 sc, 1 inc) x 6 (36)

Round 7 :

(5 sc, 1 inc) x 6 (42)

Round 8 :

(6 sc, 1 inc) x 6 (48)

Round 9-11 :

1 sc in each st (48)

Info :

These rounds form a stable disc that will anchor the outer petal layer. Keep tension consistent so the disc lies flat. If your disc cups, use a slightly larger hook for the next rounds; if it ruffles, try a slightly smaller hook.

Round 12 :

Change to cream color. 1 sc in each st (48)

Round 13 :

1 sc in each st BLO (48)

Info :

Working in BLO creates a subtle ridge where the outer petal layer will sit. Fasten off cream only if you prefer to make the cream layer separately; otherwise leave tail for joining.

Round 14 :

Switch to cream if not already. Prepare to make 24 outer petal loops. (Work into base disc: *(sc, ch4, sk 1 st) x 24* — base uses 48 sts, creating 24 loops)

Round 15 :

Into each ch4 loop: sl st, ch1, (sc, hdc, 2 dc, hdc, sc), sl st — repeat x24 (creates 24 scalloped outer petals)

Info :

Outer petals are lightly textured and act as the foundation. Ensure consistent stitch height in each petal; use the same tension to make all petals equal size. If petals are too small, re-make with ch5 loops.

Round 16 :

Change to pale yellow. Working behind outer petals (insert hook from back to front between petals), join yarn with sl st and *ch2, (3 dc cluster into same space), ch2, sl st between petals* x24 (24 clusters)

Round 17 :

Into each pale yellow cluster: ch1, (sc, (hdc, dc, tr, dc, hdc) worked in cluster base, sc) — make 24 medium petals (24)

Round 18 :

Info :

Info :

These are your second layer petals (pale yellow). Work them so they slightly overlap the cream base. If using two-tone petals (as in photos), leave short tail to join inner petal base later.

Round 19 :

Change to mustard/yellow. Work between pale-yellow petals to create inner layer: *sl st to base, ch3, (2 tr, dc, 2 tr) in same base, ch3, sl st* x24 (24 inner petals)

Round 20 :

Into each inner ch3: ch1, (sc, (dc3cluster, picot) , sc) x24 (24 pronounced top petals)

Round 21 :

Info :

Round 21 :

Attach smaller decorative rounded petals between each larger petal: join yarn behind inner petals and *sl st, ch2, (2 hdc, sc) in front loop of petal base, sl st* x24 (24 small petals)

Round 22 :

Info :

Round 22 :

Turn the motif over and check petal symmetry. Slightly steam-block petals by holding iron a few cms above pieces to allow the cotton to relax—do not touch iron to yarn directly.

Round 23 :

Make the central bud (see separate section 'Center Bud') and sew or slip-stitch it into the middle of the flower, then secure with yarn needle.

Info :

At this stage the large flower motif is complete: outer cream layer, mid pale-yellow, and top mustard petals plus central bud. Make as many motifs as you need (photo shows five motifs linked in a row). Leave long tail from the last round for joining into runner layout.

— Center Bud :

Round 1 :

mr, 6 sc (6)

Round 2 :

6 inc (12)

Round 3 :

(1 sc, 1 inc) x 6 (18)

Round 4 :

1 sc BLO in each st (18)

Round 5 :

(2 sc, 1 dec) x 6 (12)

Round 6 :

(1 sc, 1 dec) x 4, sc x4 (8)

Round 7 :

Work rows of ribbing: ch1, turn, 8 sc in back loop only for 6 rows to create a short tube (8)

Round 8 :

Stuff lightly, fold the tube into a small coil and sew the bottom closed; secure the top by running yarn through center to make a slightly indented 'seed' look. Fasten off leaving tail for sewing (bud finished).

Info :

Make the bud slightly stuffed to maintain rounded center. Use darker brown/cinnamon yarn to mimic seed pod color. Adjust stuffing level to keep bud compact and avoid flattening petals when sewn in place.

— Large Leaf Unit (Make multiple sizes) :

Round 1 :

ch 14, sl st to 2nd ch from hook to form small ring, ch1 work back along chain: sc in each st across (13)

Round 2 :

Turn work, ch2 (counts as hdc), hdc in next 4, (2 hdc in next) at tip, hdc back along opposite side to join to first st, sl st (approx 24)—you should now have an oblong leaf shape

Round 3 :

Info :

Round 3 :

Work into each side to build lobes: *(sc, ch3, sc) in next st on one side, continue along to tip and mirror on other side*—this creates small lobes for a fern-like look (approx 30 lobes total counting both sides)

Round 4 :

Change to medium green for central rib. From base, ch1, sc along center spine on top of leaf (approx 13 sc). This will be used to attach leaf to runner.

Round 5 :

Work FLO around edges to create raised veins: 1 sc in each st FLO around edge (approx 46)

Info :

Working FLO/BLO gives lifted vein texture. Make two sizes: Standard leaf ch14 base, large leaf ch18 base (increase by 4 chains) and small filler leaf ch10. Keep counts consistent when joining to runner so spacing lines up.

Round 6 :

Optional: Add raised braided veins by couching a contrasting green strand along center spine with long running stitches using yarn needle for extra texture.

Round 7-12 :

Repeat shaping for additional leaf sizes, increasing chain foundation and keeping lobes in pairs; final leaves typically measure 10-15cm depending on yarn and hook.

Info :

In the pictured runner each flower is framed by several long fern-like leaves made from repeating small lobed leaves sewn end-to-end. Make at least 6 long leaves per motif, using 3 sizes to add depth.

— Small Filler Flower (Make many) :

Round 1 :

mr, 6 sc (6)

Round 2 :

ch2, *(hdc, picot, hdc) in next st, sl st in next* x3 to create 3 tiny flowers or make 6 tiny bobbles (6)

Round 3 :

Fasten off leaving tail for sewing. Use cream and pale yellow yarns to make clusters that nestle between leaves and petals.

Info :

Tiny buds are made with 3-6 rounds of very small loops and 2-3 padding stitches. They add realism and help fill gaps between larger elements.

— Connecting Vine & Join-As-You-Go Mesh :

Round 1 :

With medium green, ch 60 (adjust length to desired spacing), join ends to form a long chain strip that will be used to connect flower motifs with slip stitch anchors every 5-6 ch.

Round 2 :

Along chain create decorative picot loop spaces: *sc in next 3 ch, ch4, sk 1 ch* until end. This provides points to sew leaves and small flowers (approx 10-12 loops per 60 ch).

Round 3 :

Info :

Round 3 :

Join motifs to the vine using sl st at predetermined points: mark center of each flower motif and align with vine to join. Use a sturdy backstitch or sl st joining through the base disc stitches (the original 48-st rounds) to anchor motifs flat.

Round 4 :

For a tighter, flatter runner use join-as-you-go: while making the last round of a motif, instead of finishing the round, sl st into the vine chain space and continue around motif, securing as you go. This reduces sewing later.

Round 5 :

Info :

Round 5 :

Arrange the vine so motifs sit equidistant (photo spacing ~13-15 cm center-to-center). Pin the arrangement on blocking mat before final sewing to ensure alignment and symmetry.

— Assembly & Finishing (Detailed) :

Round 1 :

Lay out all motifs on flat surface in desired order. Pin each motif and leaf cluster to the vine. Start with center motif and work outward to keep symmetry.

Round 2 :

Sew leaves into place using mattress stitch or whip stitch through the central spine of each leaf and into the vine chain or base disc edge. Use matching green yarn and invisible sewing method for neatness.

Round 3 :

Attach filler flowers and buds by sewing through their center with small stitching and knotting securely at the back of the runner. Trim threads and weave ends into stems and leaves to hide.

Round 4 :

Info :

Round 4 :

Block the entire runner gently: dampen pieces or use a spray bottle, shape on mat, pin petals and leaves flat to the desired shape. Allow to dry completely to set the 3D petal shape and leaf positions.

Round 5 :

Optional: Add an invisible running stitch along the underside of junctions between motifs for durability, especially if the runner will be moved frequently.

Round 6 :

Final trimming: weave all tails in the wrong side, clip any stray fibers, and check for loose joins. Lightly steam once more if needed to settle petals.

Info :

Test the runner on your table and adjust any petals/leaf positions by resewing small areas if needed to keep a balanced silhouette. If you expect heavy use, reinforce joins with tighter stitches or occasional glue dots under leaves.

— Variations & Colorwork :

Round 1 :

Info :

Round 1 :

For autumn tones, substitute mustard for burnt orange and cream for a pale beige. For a spring look, use soft pinks and greens and make the central bud pale yellow.

Round 2 :

To add depth, lightly brush a small amount of diluted fabric paint or tea-staining solution onto petal edges before blocking. Test first on scrap yarn.

Info :

Because petals are layered, minor color shifts look natural. Keep leaf shades in at least two tones to emphasize the fern-like texture.

Assembly Instructions

  • Pin motifs to layout on blocking mat to check spacing and alignment before sewing permanently. Use the vine chain as the central anchor, spacing motif centers about 13-15 cm apart for balance.
  • Attach head of each motif to vine: line up the motif base (round 9-12 disc) under the vine, then sew through base disc rounds using the long tail left at the end of the disc to secure. Make sure the motif lies flat.
  • Sew leaves along the vine at the marked picot points: align central spine (Round 4 of leaf) with vine chain and sew with tight invisible stitches, attaching leaves in pairs on either side of the vine.
  • Nest filler flowers and tiny buds between leaves and petals: stitch through their centers, anchoring to either the vine or the motif base so they sit naturally among the foliage.
  • For a stronger join-as-you-go, slip-stitch the vine into the motif's last round by replacing some sl sts of the final round with sl sts into vine spaces; reinforce with sewing stitches afterwards.
  • Weave all loose tails inside the runner, especially behind large motifs and leaf undersides. Trim ends closely but leave a little extra in case of future repairs.
  • Block the completed runner by pinning petals and leaves into final shape on a flat mat. Spray lightly with water and let dry completely to set the shape.
  • If the runner will receive heavy tabletop traffic, add an invisible stitching line along underside junctions or small fabric patches to protect joins.

Important Notes

  • 💡Use stitch markers at the start of rounds on the base disc to avoid losing your place and to align petals evenly.
  • 💡Stuff the center bud just enough to create a rounded seed pod — too much stuffing will flatten the petals when sewn in place.
  • 💡Work petals slightly tighter than the base disc so they stand forward and retain 3D shape.
  • 💡Leave long tails when finishing foundation disc rounds to aid in join-as-you-go or later sewing to the vine.
  • 💡Always pin motifs and leaves before sewing to check final appearance and spacing — it's much easier to move a pin than to unpick sewn stitches.
  • 💡Block every motif and leaf individually before final assembly to ensure even shape and size across repeats.
  • 💡For neat joins, use a yarn color that matches the underside of the motif or vine; darker yarn hides behind dark leaves, lighter yarn hides behind cream petals.
  • 💡Keep a small scrap yarn and swatch to test color changes and hook sizes before working on the motif you plan to keep.

This Sunburst Floral Table Runner brings a beautiful, hand-crafted centerpiece to any table with layered petals and cascading foliage. Each carefully made motif stacks into a living, tactile bouquet that’s as delightful to stitch as it is to display. The pattern encourages small creative choices—color swaps, alternate leaves, or extra buds—so every runner feels personal and unique. 🌼🧶 I hope it inspires you to make a stunning table display you’ll love showing off.
You ask,

we answer.

FAQs

What is the finished size of this table runner?

Finished size depends on number of motifs and spacing. With five large floral motifs spaced about 13–15 cm center-to-center, expect approximately 140–160 cm length and about 28–32 cm width including foliage. Add or remove motifs to fit your table.

Can I use a different yarn weight for this project?

Yes. You can use thinner or thicker yarn, but adjust hook sizes accordingly (generally 1–2 sizes smaller than manufacturer recommendation for crisp petals). Different weights will change motif and runner size; make a swatch and adjust counts if needed.

Do I need to block each piece?

Blocking is highly recommended — it sets the layered petals and leaf shapes, giving the runner a polished, flat appearance. Steam-block or wet-block on a mat and pin pieces to shape before assembly.

Can this runner be machine washed?

Most cotton yarns can be washed on a gentle cycle, but delicate 3D petals and joins may be best hand washed and laid flat to dry. Always follow yarn manufacturer care instructions and test a scrap if unsure.

How many motifs do I need for a standard dining table?

A typical 6-seater table looks balanced with 5–7 motifs depending on spacing. Measure your table and plan spacing (photo uses ~13–15 cm centers). You can also make a shorter or longer runner by adding/removing motifs.

Are the flowers sewn on after making them, or joined-as-you-go?

Both methods are described. Join-as-you-go can save sewing time and make the runner flatter, while sewing individual motifs allows more flexible placement. Pin your layout to decide before fixing.

How much yarn will I need?

Approximately 800–1000g total cotton worsted yarn across all colors for a 5-motif runner with abundant foliage (see yarn breakdown in 'mainfabric' for color-specific estimates). Exact amounts depend on leaf coverage and motif count.

Can I make the runner with acrylic yarn instead of cotton?

Yes, acrylic gives softer, less crisp petals but is lighter and often more affordable. Blocking and shaping will behave differently—cotton holds shape best for structured petals shown in the photos.