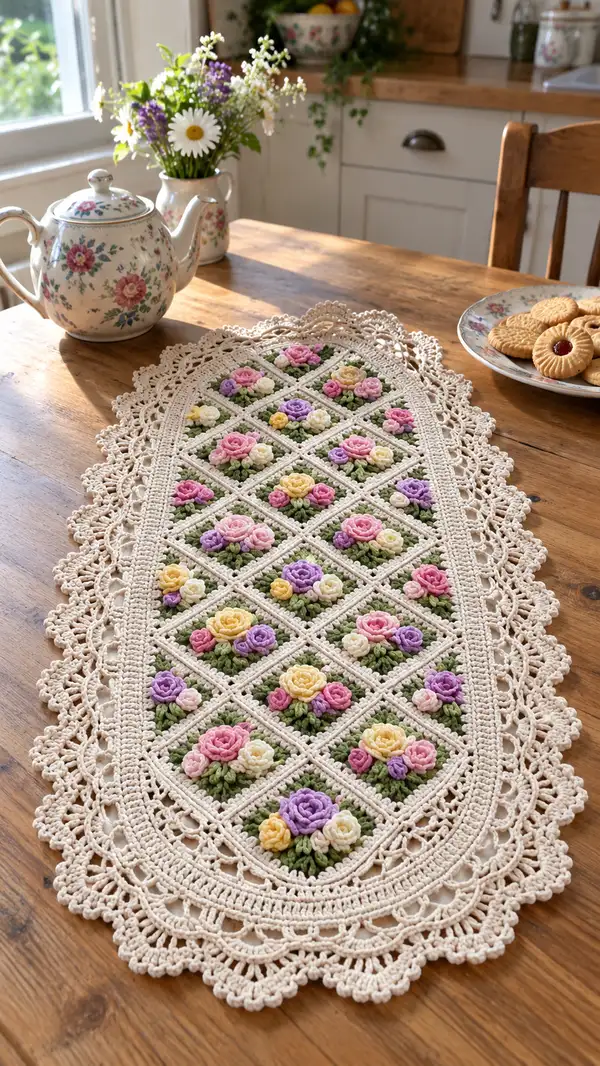
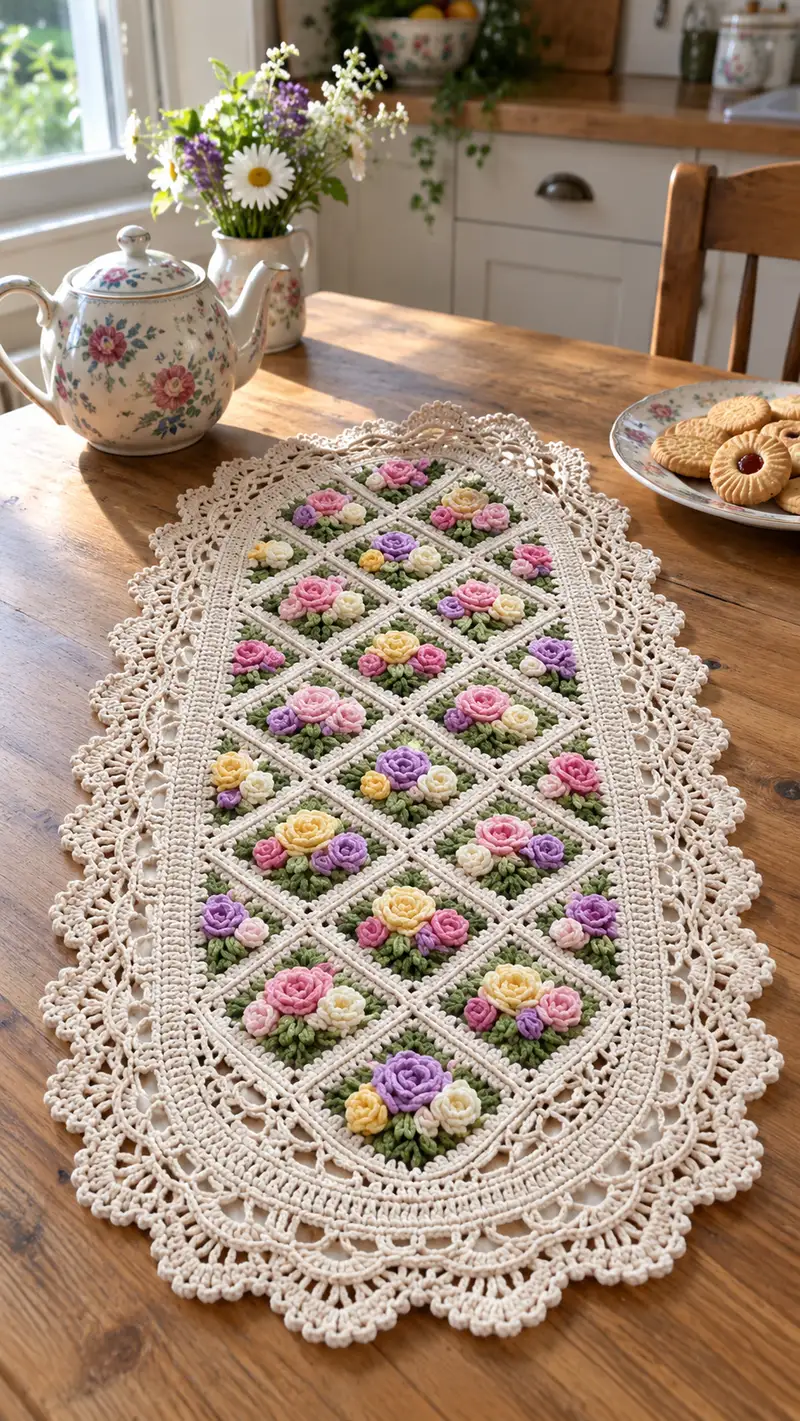
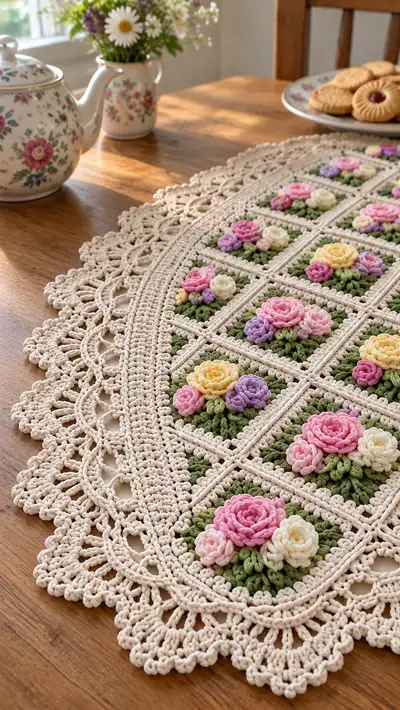
Create a timeless, vintage-inspired floral table runner featuring raised 3D roses set in a lattice of cream squares and finished with an elegant scalloped lace border. This detailed pattern breaks each motif and border into clear rounds with tips for assembly and blocking. Perfect for a dining table, dresser or as a special handmade gift to brighten any room.
Progress Tracker
0% Complete
— 3D Rose (Make x number to fill each square cluster; large rose)
Round 1 :
6 sc in magic ring (6)
Round 3 :
(1 sc, inc) x 6 (18)
Round 4 :
(2 sc, inc) x 6 (24)
Round 5 :
1 sc in each st (24)
Info :
We begin a compact base for the rose—these first five rounds create a circular disk that will underlie the spiral of petals. Keep tension slightly tight so petals sit up. Finish round 5 and do not fasten off.
Round 6 :
Ch1, *dc3tog cluster over next 3 sts, ch1, sl st in next st* repeat around to create base petals (24 clusters equivalent, 24 ch-1 spaces)
Round 7 :
Into each ch-1 space: (ch2, 5 dc in space, ch2, sl st into base between clusters) — this forms first petal row; repeat around (24 petal clusters)
Info :
For a nice rounded petal, pull the working yarn loops gently outward while forming the 5-dc clusters; do not over-tighten or petals will pucker.
Round 8 :
Working behind first petal row, sl st to back of next cluster and work (ch2, 6 dc in back of cluster, ch2, sl st) around to begin second petal row (24 petals)
Round 9 :
Slip to next petal base, *ch2, 7 dc in space behind petals, ch2, sl st* around forming a larger second spiral (24 petals)
Round 10 :
Work a spiral wrap: join each successive petal to previous with sl st and continue adding petals slightly offset to create a rose spiral (work 24 sl st joins; rose now has 3 layers)
Info :
When making the spiral, think of sewing the petals forward slightly so each new row covers the seam of the previous. The sl st joins are mostly hidden behind petals—use them to secure layers.
Round 11 :
Ch1, in back loops only of base st, *sc, ch1* around to create a small ridge for attachment (24)
Round 12 :
Using the same color, wrap additional micro-petals: in each ch1 space: (hdc, dc, hdc) to give fuller center (24 clusters)
Round 13 :
Take small hook (3.0mm) and work single spiraling coil: in gaps between petals work (sl st, ch1) x 36 to finish shaping. Fasten off leaving 20cm tail for sewing (no count)
Info :
Fasten off with long tail to tack rose to square later. Lightly shape petals with fingers and, if desired, add a very small tuft of polyester stuffing under heavier roses to keep them domed.
— Small Rose Bud (Make several per square)
Round 1 :
6 sc in magic ring (6)
Round 3 :
(1 sc, inc) x 6 (18)
Round 4 :
Fold disk and work slip stitches around edge to form a closed bud shape, letting it cup slightly (18 sl st around)
Info :
Buds are intentionally small and slightly flattened; fasten off with 10-15cm tail for sewing.
— Leaf Cluster (Make clusters to surround roses)
Round 1 :
Ch5, sc in 2nd ch from hook, hdc in next ch, dc in next ch, sl st in last ch; turn to work second leaf on same foundation ch: sc, hdc, dc, sl st. Fasten off (two leaves made)
Round 2 :
Create a 3-leaf cluster by working foundation ch6 and making three leaves onto same base: (sc, hdc, dc) x3, sl st to join (6 leaf sides)
Round 3 :
Make smaller filler leaves: ch4, sc, hdc, sl st back into base. Make 6 small leaves for one cluster. Fasten off leaving tail for sewing.
Info :
Use slightly smaller hook for leaves (3.0-3.25mm) to produce crisp shaping. Arrange leaves in pairs and clusters under and around roses when sewing to square base.
— Floral Square Base (Make x squares to form runner length and width)
Round 1 :
Ch4, join to make ring, ch3 (counts as dc), work 11 dc into ring, join with sl st to top of ch3 (12 dc) (12)
Round 2 :
Ch3, dc in same st, 2 dc in each st around, join (24)
Round 3 :
Ch3, *dc in next st, 2 dc in next* repeat around (36)
Round 4 :
Ch3, dc in next 2 sts, 2 dc in next st, rep around (48)
Round 5 :
Turn square into diamond grid: ch1, sc in each st around for 48 sc (48)
Info :
This early work builds a circular foundation that will be squared into a diamond frame—maintain an even stitch count and keep stitches firm to contain the weight of flowers sewn on top.
Round 6 :
Using cream, work in BLO: ch2, hdc in each st BLO around to start forming a textured background (48)
Round 7 :
Continue in BLO: 1 hdc in each st around for tension, join (48)
Round 8 :
Create corner shaping: *(hdc, ch2, hdc) in next st (corner), 1 hdc in next 9 sts* repeat 4 times to form approximate square; join (48+4 ch-2 sps)
Round 9 :
Work around corners: in each ch2 sp work (sc, ch2, sc) to box corners; sc in each side st between corners. Square now has 4 corners and sides shaped (count variable depending on ch-sps)
Info :
At this stage you'll turn the round foundation into a framed diamond area for the floral placement. Square should measure roughly 6.5-7 cm across diagonally depending on your yarn and hook.
Round 10 :
Working outward from center, create internal lattice bars: ch1, sc in first 3 sts, *ch4, skip 2 sts, sc in next 3* repeat to form open bars on each side (maintain symmetry)
Round 11 :
Reinforce lattice: join with sc around each ch4 space working (2 sc, ch2, 2 sc) into each ch4 to make small framed spaces for flowers (count depends on spacing)
Round 12 :
Surface crochet a raised inner frame: attach cream yarn to one corner and sc along edge working 3 sc in each corner (approx counts: 12 sc per side, 48 + corner increases)
Info :
These rounds form the diamond cell where the flowers and leaf clusters will be affixed. Make sure the inner framed cell edges are even and square—use pins and block lightly if needed.
Round 13 :
Decorative beaded ridge: in FLO work sc around to create a subtle ridge that visually frames the inner cell (48)
Round 14 :
Ch3, dc in each st to build a slightly raised frame (48)
Round 15 :
Work a tighter inner trim: 1 sc in each st around the little diamond cell, sl st to join (48)
Info :
Fasten off here after blocking if you prefer; otherwise leave long tails for joining squares. Repeat to make all squares needed (count in pattern plan). Each square will later receive one large rose, one medium rose and two buds with leaf clusters arranged symmetrically.
— Flower Placement & Sewing into Square
Info :
Layout the square so diamond points are top/bottom and left/right. Place the large rose slightly above the center of the diamond, the medium rose below and two small buds along the side diagonals; position leaf clusters beneath each flower grouping.
Round 1 :
Using long tail from rose, tack large rose to square by taking 6 evenly spaced stitches through the back loops of the rose base into the square center; knot and weave tail through back (no count)
Round 2 :
Sew medium rose 4-5 rounds below large rose using 6-8 stitches spread around base; ensure petals face outward and fill any gaps with small filler buds
Round 3 :
Sew buds into the diagonal corners of the inner cell to create triangular compositions with roses; use small whip stitches and weave ends neatly
Info :
Use pins to temporarily fix placement, then tack with long tails. Sew leaves under and around each floral cluster: place leaf clusters so that their tips appear from beneath the petals; make sure stitches are small and hidden behind petals.
— Repeat Units and Runner Layout
Info :
Decide final runner size: the photographed runner appears to have 5 squares across the width visually reduced by diamond orientation and approximately 6-8 diamonds in length. For a typical runner 40-50cm wide and 100-130cm long, plan for 20-28 squares depending on your desired spacing. This pattern will describe joining for an 3x10 layout example (3 columns x 10 rows) — adjust as needed.
Round 1 :
Make all floral squares (count determined by layout). Block each square flat to square measurements using pins so diamonds align perfectly.
Round 2 :
Arrange squares on table with diamonds touching at corners. Using cream yarn, join squares row by row with join-as-you-go method: working into edge sc of square A, sl st into edge sc of square B pairing stitches, then sc across seam to lock (approx 48 stitches per side seam)
Round 3 :
When joining corners (where four squares meet), use an X-tack method: insert needle through all four layers at the intersection and sew with 6-8 secure stitches to prevent open points.
Info :
Keep joins flat and avoid pulling too tight. Pin squares well to maintain an even plane. If you prefer, join squares with whip stitch for an invisible seam; join-as-you-go gives a more finished look from the start.
— Center Panel Finishing (Working continuous rounds to build inner frame)
Round 1 :
With all squares joined in the desired layout and seams secured, attach cream yarn to any corner point of the overall piece and work 1 sc evenly around the outermost edges of the joined panel; count will vary (example layout 3x10 ~ perimeter 2x length + 2x width, approximate 480 sc)
Round 2 :
Work 2 rounds of hdc evenly around to build a strong inner frame: 1 hdc in each st around, join (same count as round 1)
Round 4 :
Work a decorative ladder row in BLO: *sc in next 5 sts, ch3, skip 2 sts* repeat round to create even openwork channels for lace placement. Adjust ch-sps evenly on edges and corners.
Info :
This frame will transition into the ornate lace border. Keep counts even on corners; use 3 sc in corner spaces if needed to maintain curvature.
— Inner Border Rounds (Build up height for lace)
Round 1 :
Attach cream yarn and work 2 rounds of 1 sc in each st to even the edge (sc perim count same)
Round 2 :
Round of raised ridges: *(ch1, sc in next st) x 5, sc in next 3 sts* repeat around to give subtle texture
Round 3 :
Work picot decor: sc in next st, *ch3, sl st in first ch to form picot, sc in next 7 sts* repeat (creates blocky picots aligned for lace)
Info :
These inner border rounds function to add weight and a base for the outer lace. Be consistent with tension—if the border starts pulling in, loosen a hook size for these rounds, then return to original hook for lace.
Round 4 :
Work 1 round of dc in each st to build depth for the outer scallops (dc perim count matches previous)
Round 5 :
Work (2 dc, ch3, 2 dc) in every 7th stitch to start scallop spacing. Adjust counts so scallops are evenly spaced across long edges and around curved end points.
Info :
On the curved runner ends, add extra scallops by spacing more closely to maintain smooth curve. Mark positions with stitch markers before crocheting scallops to ensure symmetry.
— Outer Lace Scallop (Detailed multi-round lace; 20 rounds)
Round 1 :
Attach cream yarn to top of a previously made scallop and work: ch4 (counts as tr), 3 tr in same sp, *ch2, skip 1 st, 4 tr in next* repeat to form tall arches (count varies)
Round 2 :
In each arch work: sl st to center of arch, ch1, (sc, ch3, sc) to make a small fan inside arch—this gives the lace interior (fan count matches arches)
Round 3 :
Work mesh row: ch5, sl st in arch base to create long loops between scallops; repeat to create visible open channels for vintage effect
Info :
Use a slightly larger hook (3.75-4.0mm) for the tall lace rounds only if you prefer more open lace. However to match the pictured runner's firm lace, remain on 3.5mm but relax tension slightly for arches.
Round 4 :
Form second-tier fans: in each arch work (ch2, 5 dc, ch2), sl st to anchor—fans face outward (fan count = arch count)
Round 5 :
Between fans work small picot clusters for texture: *sl st to side, ch4, picot, sl st back, sc in next space* across perimeter
Round 6 :
Work a chain-loop row: ch6 loops anchored by sl st across bases of fans to create lacy webbing (loop count matches fans)
Info :
Check symmetry: place runner on table before each lace round and count loops to ensure equal spacing on both long sides and around ends. Adjust with extra sl st if needed.
Round 7 :
Form outer shell: *in each fan work (5 dc, ch3, 5 dc), sl st to next fan base* — this makes bold scallops (shells count matches fans)
Round 8 :
Embellish shells with small clusters: sl st to center of shell, (ch2, picot, ch2), sl st to edge to give tiny points
Round 9 :
Work a decorative chain-lace overlay: ch8, sl st in outer shell center to make tall loops; repeat to form a secondary row of loops
Info :
When making tall outer loops, support them with pins while blocking to maintain arch shape. The pictured runner shows delicate looped arches that are lightly stretched when blocked.
Round 10 :
Add picot edging: *sc around shell edge, add picot every 3 sc* repeat to create dotted scallop edge
Round 11 :
Deepen scallops with dtr clusters: in each shell work (dtr, ch2, dtr) to give a high-lace ridge (count matches shells)
Round 12 :
Work a small bead row: sl st in each shell edge creating subtle beads (sl st per shell edge)
Round 13 :
Create final decorative loops: ch5 anchored at tip of shell then sc back across outer edge to neaten (loop count = shells)
Round 14 :
Work a tight sc round along outermost tips to finish shell points neat (sc perim count as necessary)
Info :
Try a practice scallop on scrap yarn to get comfortable with arch shaping and spacing before committing to full outer edge. Adjust hook if scallops look too narrow or too wide.
Round 15 :
Work a final decorative fan: in between shell tips work small fans (3 dc, ch2, 3 dc) to fill gaps and provide the layered lace look (fan count = number of gaps)
Round 16 :
Finish with a popcorn dotted rim: *sc in next 2 sts, (5 dc in next st and join to same st to make popcorn), sc in next 2 sts* repeat around; fasten off and weave in ends
Round 17 :
Blocking Info :
Info :
Soak the entire runner in lukewarm water and mild soap, gently squeeze excess water, pin to blocking mat stretching scallops into shape. Allow to dry overnight. Use heavy pins at outer tips to preserve curved runner ends.
— Optional Decorative Topstitching & Finishing Rounds (Attach theme beads or embroidery)
Round 1 :
Optional: embroider tiny French knots in center of some buds using matching yarn and yarn needle for extra texture (no count)
Round 2 :
Optional: add tiny pearl beads with a needle and thread to shell tips or rose centers. Secure with small knot and a drop of fabric glue to stabilize beads if runner is to be washed occasionally.
Info :
When adding beads, plan placement before sewing to avoid piercing petals. Test one bead first to ensure it visually enhances the lace without weighing it down.
Completing this vintage floral runner is such a rewarding journey—each square becomes a miniature garden and the lace border frames them like heirloom trim. The soft cream background and pastel roses add a gentle, romantic touch to any table. Pin, block and stitch with care and you'll have a beautiful centerpiece to treasure or gift. 🧶🌸 Happy stitching and enjoy the calming rhythm of petals and lace! ✨