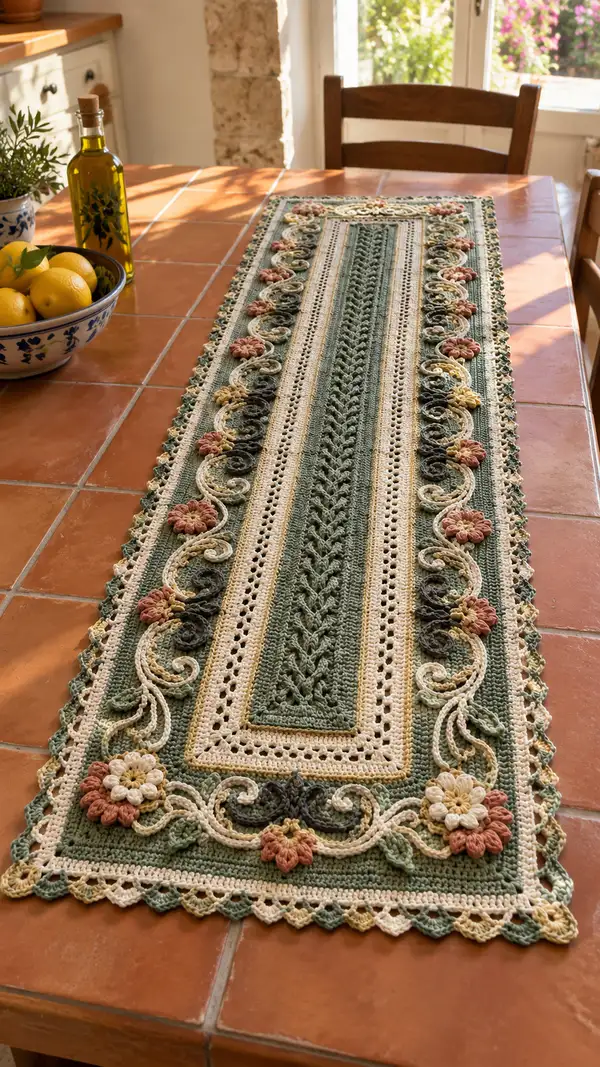
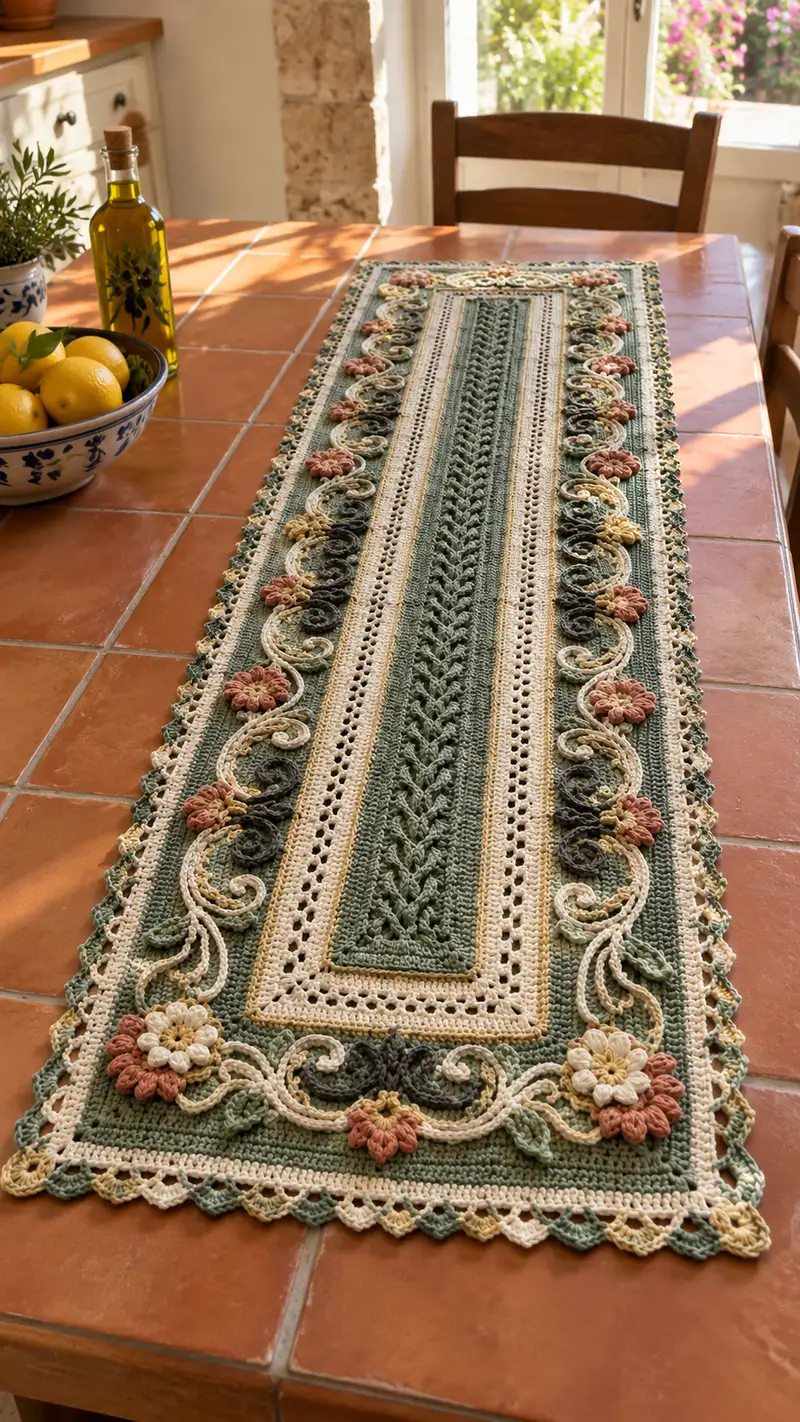
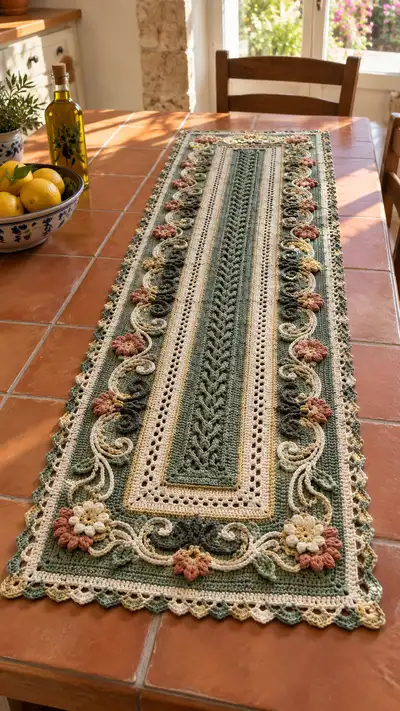
A vintage-inspired rectangular table runner featuring a central braided lattice, delicate eyelet rows, and raised floral applique9s with scrolling vines. Soft sage greens, warm creams and muted rose accents create a timeless look perfect for a kitchen table or buffet. The runner is worked flat for the base with separate floral and scroll motifs added on top for depth and texture. Finished look is elegant, with a scalloped outer edge and layered border.
Progress Tracker
0% Complete
— Base: Foundation & Center Panel :
Info :
Work the runner flat in rows on a foundation chain. Measurements for this pattern assume a foundation chain of 201 chains for a finished width of approximately 13.5-14 inches (34-36 cm) before blocking. Adjust chain to a multiple of the center motif repeat (see layout info below) to increase or decrease overall width.
Materials for Base :
Use worsted weight yarn in sage (MC) for the majority of the base. Use cream (CC1) for eyelet rows and edging stripes, and a narrow stripe of pale tan (CC2) if you want the layered border seen in the photo.
Layout :
Central braided panel (worked with FPDC/BPDC) = 40 sts centered. Flanked by narrow ribbing panels (10 sts each), then openwork eyelet rows (6-8 sts each side), then remaining stitches as plain sc grounding. For an overall chain of 201: 201 = 2 edge sts + 80 left ground + 10 left rib + 40 cable + 10 right rib + 80 right ground + 2 edge sts (adjust accordingly).
Row 1 :
Foundation chain 201. Ch1, sc in 2nd ch from hook and in each chain across. Turn. (200 sc)
Row 2 :
Ch1, sc in BLO across to end. Turn. (200 sc)
Row 3 :
Ch3 (counts as first dc), dc in next 2 sts, *dc2tog over next 2 sts, dc in next 6 sts; rep from * across, end with dc in last 3 sts. Turn. (200 dc)
Info :
The first three rows establish a firm base; keep tension even. Mark the center 40-stitch panel with stitch markers at the start and end so you can place the braided stitches accurately.
Row 4 :
Ch1, sc across in each st. Turn. (200 sc)
Row 5 :
Ch2, hdc in each st across. Turn. (200 hdc)
Row 6 :
Change to CC1 (cream). Ch3, dc in each st across. Turn. (200 dc)
Info :
Eyelet rows will be worked in CC1 for the lighter stripe effect. Carry MC behind work if you prefer to avoid cutting ends, or fasten off and rejoin for crisp color changes.
Row 7 :
Ch1, *sk 1, sc in next st (creates a tiny eyelet), ch1; rep from * across ending with sc in final st. Turn. (100 sc, 100 ch-1 sps)
Row 8 :
Ch1, sc in each sc and ch-1 sp across. Turn. (200 sc)
Row 9 :
Change to MC. Ch1, sc in each st across while maintaining marker positions for the center 40-st cable panel (do not work cable stitches yet). Turn. (200 sc)
Row 10 :
Ch3, dc across row in each st but in the 40-st center panel prepare to start cable pattern: work dc for the first and last 2 sts of the center panel, then proceed to Row 11 cable instructions. Turn. (200 dc)
Info :
From Row 11 onward we will work the central 40-st cable motif using Front Post and Back Post double crochets to create the braided/rope effect. Keep the rest of the row as simple dcs or scs as indicated, maintaining the same stitch count.
Row 11 :
Ch2, hdc in first 80 sts (left ground), then for center 40 sts work the cable foundation: *fpdc around next 4 sts, bpdc around next 4 sts; rep from * for center 40 sts, then hdc in final 80 sts. Turn. (200 sts counted as hdc/fpdc/bpdc)
Row 12 :
Ch2, hdc in each of the first 80 sts. For center 40 sts: *bpdc around next 4 sts, fpdc around next 4 sts; rep across. Hdc in final 80 sts. Turn. (200)
Row 13 :
Repeat Row 11 to continue the alternating fpdc/bpdc bands that create the braid. Turn. (200)
Row 14-22 :
Repeat Rows 11-12 alternating to continue cable for 12 rows total (this gives a tall braided texture). Keep overall stitch count consistent at 200. Turn after each row.
Info :
Check the center panel visually as you go. The fpdc and bpdc create raised ridges; if stitches look too loose, switch to a slightly smaller hook for the cable region or tighten tension slightly just when working posts.
Row 23 :
Ch1, sc across entire row (200 sc). Turn. This evens the texture after a tall cable section.
Row 24 :
Ch1, sc in BLO across the row to create a subtle ridge below the cable. Turn. (200 sc)
Row 25 :
Ch3, dc across in MC. At the start and end of cable zone, add 2 dc in the first and last st of the 40-st area to visually pad the braid; maintain 200 sts by removing 2 dc in adjacent grounding areas as required (see note). Turn. (200)
Info :
When adding extra dc near the cable, compensate evenly across both sides to keep the runner straight. Always make additions symmetrically left and right.
Row 26-30 :
Work even rows in sc and hdc alternating to create a banded effect across the center. Example: Row 26 ch1 sc across, Row 27 ch2 hdc across, Row 28 ch1 sc across, Row 29 ch2 hdc across, Row 30 ch1 sc across. Maintain 200 sts each row. Turn after each.
Info :
At the conclusion of Row 30 you have established the central textured strip and the surrounding background. Measure your width; if you want a wider runner increase foundation chain in multiples of the layout repeat (see Layout). Work additional rows repeating this center rhythm.
— Side Bands & Eyelet Rows :
Info :
Now we build the narrow side bands and the decorative openwork that frame the center. These are worked into the same row width as the base so counts remain consistent.
Row 31 :
Change to CC1. Ch1, sc in first 80 sts, then work the left side band: (for the 10-st rib) *ch1, sc in next st across 10 sts; continue sc across center 40 and right rib 10, then final 80 sc. Turn. (200)
Row 32 :
Ch3, dc in each st but in the 10-st ribs work dc in BLO to create a raised rib effect: dc in BLO across left rib (10), dc across center cable region (40), dc in BLO across right rib (10), dc across remaining grounding sts. Turn. (200)
Row 33 :
Ch1, switch back to MC. Work an eyelet sequence along both sides adjacent to ribs: sc 80, *(ch2, sk1, sc) x 5 in a 10-st band to create 5 eyelets across the rib band;* sc 40 center, rep the eyelet band on right, sc 80 finish. Turn. (200)
Row 34 :
Ch1, sc in each sc and ch-2 sp across to close eyelets. Turn. (200 sc)
Row 35-38 :
Repeat Rows 31-34 once to strengthen banding and repeat the eyelet motif twice. This creates the repeated vertical framing seen in the photo. Each repetition should keep 200 sts per row. Turn after each row.
Info :
If you prefer narrower eyelets, use ch1 spaces instead of ch2 to create a subtler openwork. Keep the count consistent by adjusting loops equally on both sides.
— Grounding Panels & Narrow Stripes :
Row 39 :
Change to CC2 (pale tan) for a narrow accent stripe. Ch1, sc across entire row in CC2. Turn. (200)
Row 40 :
Ch1, sc across in MC. Turn. (200)
Row 41-50 :
Work ten rows alternating sc and hdc to create a firm grounding area: odd rows sc, even rows hdc. Maintain 200 sts each row. This block creates the long flat fields on which applique9s are later sewn.
Info :
At Row 50 the base is now long enough visually to accept floral placement. If you want a shorter or longer runner, repeat center cable and grounding blocks as needed in even increments to maintain symmetry for flower placement later.
— Top & Bottom Base Panels (mirror) :
Row 51 :
Repeat Rows 31-38 in mirror to create the framed area toward the top end of the runner (sc, rib, eyelet repeat). Turn. (200)
Row 52-60 :
Work additional rows mirroring Rows 39-50: add narrow tan stripe and grounding sc/hdc alternation. These rows create balanced zones at each end for corner medallions and applique9 placement. Maintain 200 sts. Turn after each.
Info :
If you have adjusted foundation chain width, ensure motifs will still be centered by keeping the central 40-st cable band centered when adding or removing repeats.
— Corner Medallions (Make 4):
Info :
Corner medallions are worked separately in CC1/MC/CC2 and sewn to each corner. They are worked in rounds (flat circles) and edged with small scallops to match the outer border.
Round 1 :
With CC1, 6 sc in magic ring. (6)
Round 3 :
(1 sc, inc) x6 (18)
Round 4 :
(2 sc, inc) x6 (24)
Round 5 :
Change to MC. (3 sc, inc) x6 (30)
Round 6 :
(4 sc, inc) x6 (36)
Round 7 :
Ch1, sc in each st. (36) - Flatten and check diameter against corner area; adjust by adding one more rnd if needed.
Round 8 :
Switch to CC2. *Ch3, sl st in next st* rep around to make small scallops. Fasten off leaving tail for sewing. (36 tiny scallops)
Info :
Make four medallions so they can be sewn to each corner and stitched into the outer border for continuity. Pin them in place before attaching to ensure even spacing from the runner edges.
— Floral Applique9s (Make 12 flowers of two sizes):
Info :
Flowers are layered clusters of petals worked in rounds in dusty rose (Petal Color), cream (center petals) and a small yellow center. There are two sizes: Large Flower (8 petals) and Small Flower (6 petals). Make 8 large and 4 small to match the photo layout.
Large Flower Round 1 :
With Petal Color, 6 sc in magic ring. (6)
Round 3 :
*Ch3, 3 tr in next st, ch3, sl st in same st (petal made); sl st into next st to anchor; rep from * around to make 8 petals. Fasten off. (8 petals)
Round 4 :
Join CC1 in center of flower and sc around to create the inner petal layer; pick up stitches between petals to anchor. Fasten off leaving tail for sewing.
Small Flower Round 1 :
With Petal Color, 6 sc in magic ring. (6)
Round 3 :
*Ch2, 2 tr in next st, ch2, sl st in same st; sl st into next st; rep from * around to make 6 petals. Fasten off. (6 petals)
Center Detail :
With pale yellow, ch2, 6 sc in magic ring and pull tight; sl st to first and fasten off. Sew yellow center to middle of flower with a few stitches of matching yarn.
Info :
Block each flower lightly by pinning to a towel and spritzing with water; allow to dry so petals relax to the same shape. Make desired number of large and small flowers and set aside for assembly.
— Scroll Vines & Leaves (Make Many Short Scrolls):
Info :
Scrolls are long cords with loops and curled tips worked in cream. Leaves are small teardrop shapes worked in dark olive. Work multiple scrolls to border the central panels and to weave between flowers.
Scroll 1 :
With CC1 ch 40, sl st back along the chain to create a cord. At the end, form a loop: ch6, sl st into chain to create swirl; secure with sl st. Fasten off leaving long tail for sewing. (cord ~40 ch)
Scroll 2 :
Repeat ch 28 and sl st back for shorter scrolls used between flowers. Add 2-3 small loops made by ch6 and anchoring with sl st to create decorative curls. Fasten off. (cord ~28 ch)
Leaf :
With dark olive, ch6, sc in 2nd ch from hook, hdc, dc, hdc, sc, slip to the base to form a teardrop leaf. Fasten off. Make many to fit along scrolls and near flowers.
Info :
Make scrolls with a flexible chain length so you can arrange them as you like. Longer scrolls may be anchored at several points to keep the shape flat on the runner.
— Attaching Applique9s & Scrolls :
Info :
Blocking is essential before attaching. Pin the runner flat and pin all medallions, flowers, scrolls and leaves in place following the photograph layout: a row of alternating large flowers and smaller clusters runs along each side of the center cable panel. Scrolls weave between them. Step back frequently to ensure symmetric placement.
Attachment Step 1 :
Finger-baste with a few long whip stitches using matching thread or yarn tails to hold each piece in place. When satisfied with placement, sew motifs permanently with small hidden stitches using tapestry needle and matching yarn. Use multiple small stitches around base of each petal and leaf to secure.
Attachment Step 2 :
For scrolls, sew at each loop anchor and at two to three points along the cord so the curve remains flat and secure. Tuck ends under seam allowances and weave ends into the runner body.
Info :
Embroider small vein details on leaves with contrasting thread if desired. Use small running stitches across the leaf center to mimic natural veins and add depth.
— Outer Border & Scalloped Edge :
Info :
After applique attachment, work the outer border directly onto the runner edge to create layered bands and a scalloped finish. Use CC1 then MC for contrast. Work edging rows around the entire perimeter, turning the piece as you go.
Border Round 1 :
With CC1 join at any corner, ch1, sc evenly around the entire perimeter placing (3 sc, ch2, 3 sc) into each corner st to maintain square corners. Work evenly along edges distributing scs so the border lies flat. Join with sl st to first sc. (Even number sc around; do not count exact total; distribute as necessary.)
Border Round 2 :
Ch2, hdc in each sc around; in each corner work (hdc, ch2, hdc). Join with sl st. This creates a subtle raised frame. Fasten off CC1. (even)
Border Round 3 :
Join MC, ch1, sc in each st around. In corners work (sc, ch3, sc) to create room for scallops. Join and turn. (even)
Scallop Round 4 :
Ch1, *sk 2, (5 dc) in next st, sk 2, sl st in next st; rep from * around to form shell scallops. In corners work an expanded shell of (7 dc) into the ch3 sp. Join and fasten off. This is the outer scalloped edge visible in the photograph.
Info :
If scallops pucker, block the edge with pins and steam or spritz until dry to open shells and relax stitches; this gives a smooth scalloped look.
— Final Finishing Touches :
Info :
Weave in all ends neatly on the WS. Trim stray fibers and double-check that applique9s are secure. If some areas lift, add an extra few invisible stitches to secure motifs more firmly without visible top stitches.
Blocking :
Block the finished runner flat to final measurements. Use rust-proof pins and gently stretch the scalloped border to even spacing. Allow to dry completely before use.
Care :
Hand wash or use gentle machine cycle in a mesh bag on cold. Reshape while damp and lay flat to dry. Avoid tumble drying to preserve delicate applique9 details.
Completing this runner is such a rewarding journey from textured center braid to soft scalloped edges — each applique9 adds another layer of handcrafted charm. The finished piece feels like a little vintage heirloom that transforms a table instantly. I love how the flowers and scrolls cast gentle shadows and invite touch; it makes every meal feel special. 🧶🌿✨